Cards

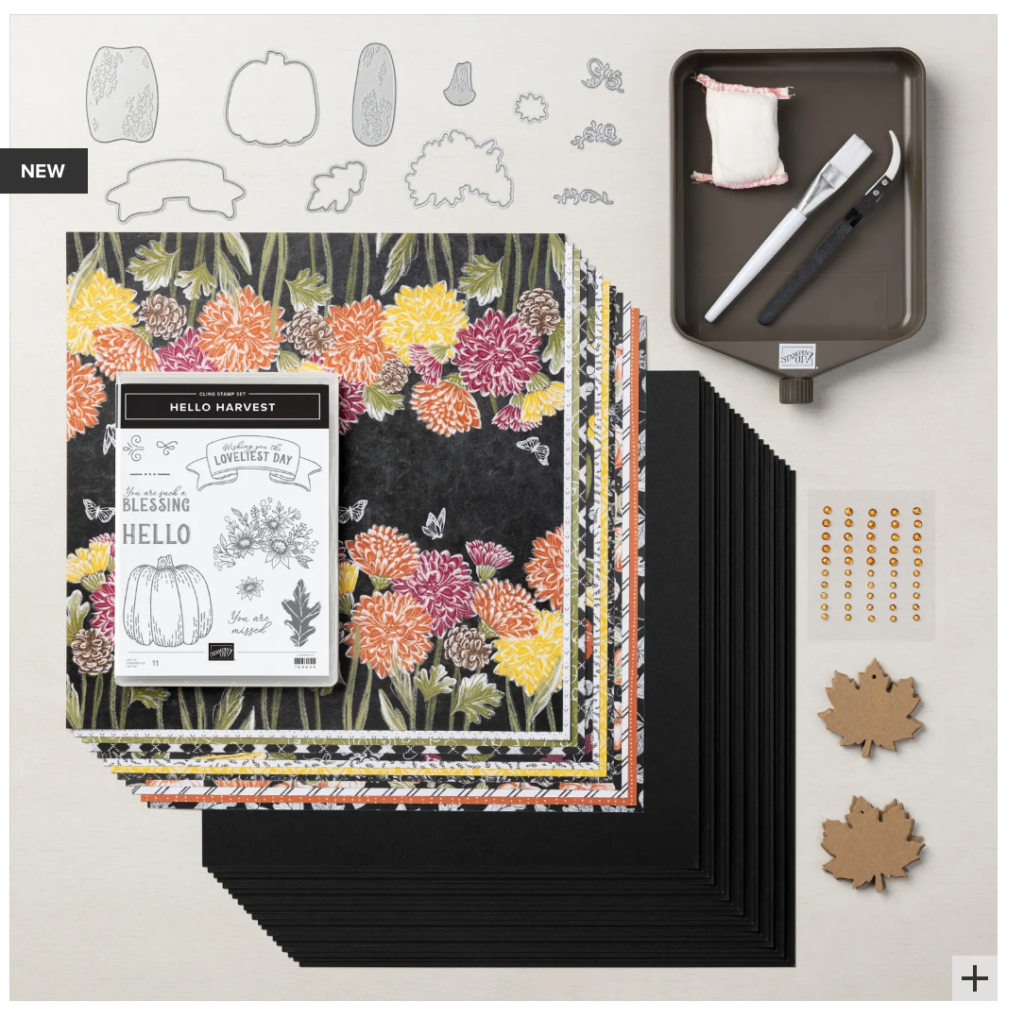
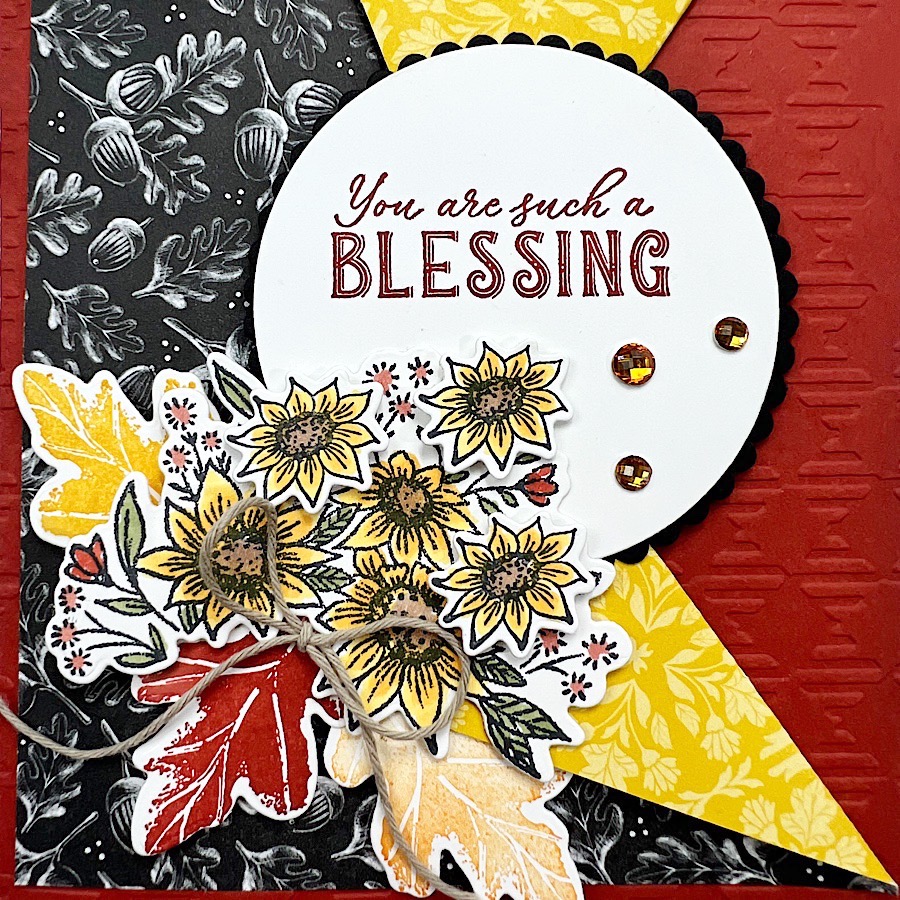
Make a Hello Harvest Watercolor Card

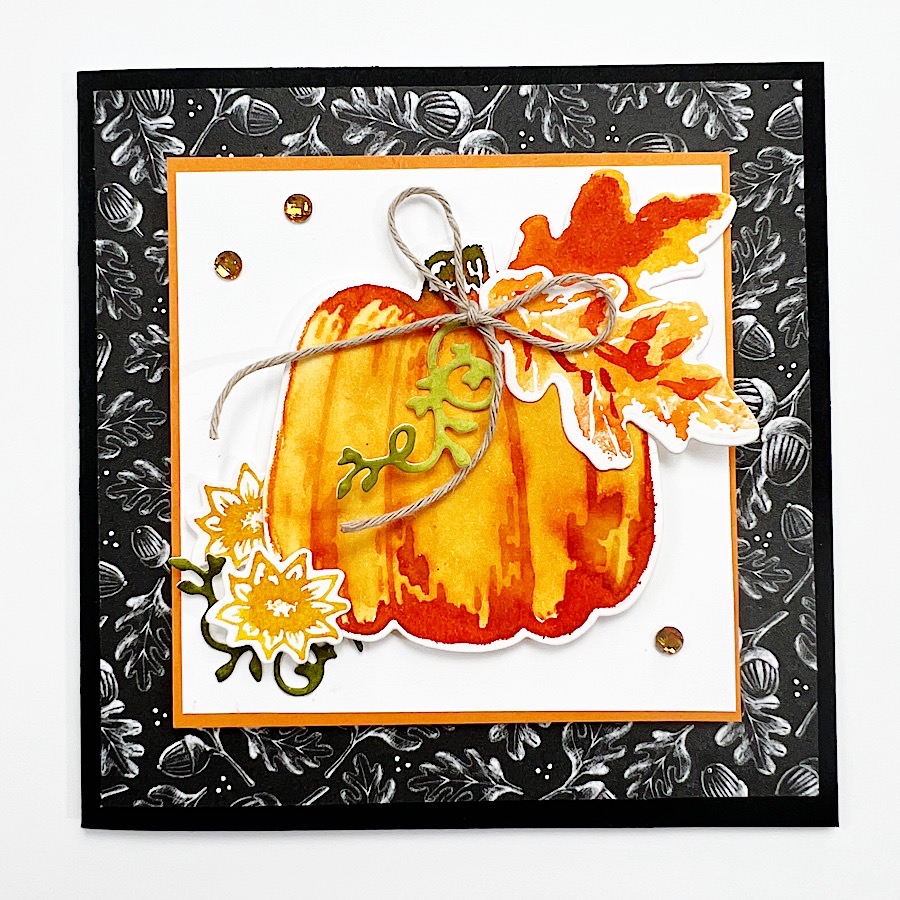
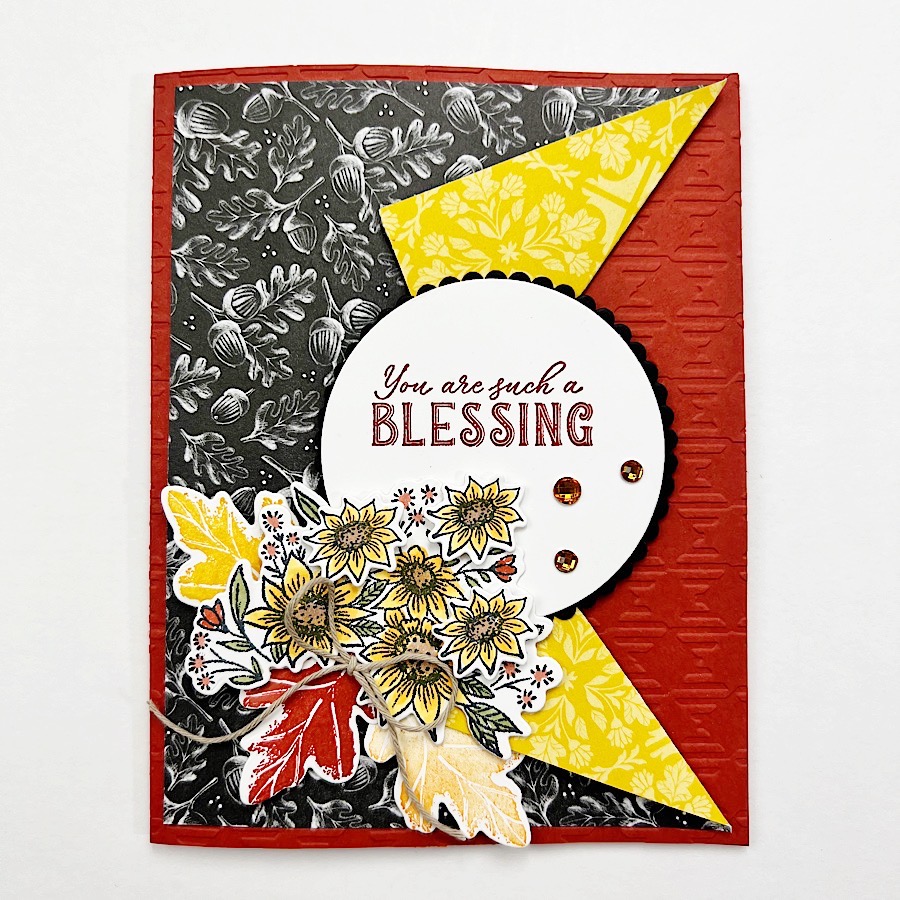
Probably not a popular opinion, but I’m not a pumpkin spice latte fan. I hope we can still be friends – lol! I am, however, a fan of pumpkins and am beginning to scatter them around the house and craft with them as we enter September. This card, made yesterday during my live Coffee & a Card, was so fun to make.

I used Water Painters along with re-inkers and stamps to create the soft, watercolor effect onto Shimmery White cardstock. The card base is an 8-1/2″ x 4-1/4″ piece of Basic Black cardstock folded in half. The other layers on the card include a 4″ x 4″ piece of Rustic Harvest Designer Series Paper, a 3-1/8″ x 3-1/8″ piece of Pumpkin Pie cardstock and a 3″ x 3″ piece of Basic White cardstock.

Product List

Make a Christmas Banners Floating Christmas Card

I’ve noticed several cards around the interwebs that are using the “floating” technique. I was curious to see how to make them and today’s project is the result of that curiosity.

Because this was my first attempt at making a floating card, I kept it simple. I used strips of various sizes from the Celebrate Everything Designer Series Paper to create the floating circle on my card. Once I placed the floating circle onto the card front I embellished it with die-cuts from the Christmas Banner Dies.

Video Tutorial

Product List
Christmas Banners Bundle (English)
Christmas Banners Photopolymer Stamp Set (English)
Christmas Banner Dies
Sweet Sorbet Classic Stampin' Pad
Garden Green Classic Stampin' Pad
Sweet Sorbet 8 1/2" X 11" Cardstock
Garden Green 8-1/2" X 11" Cardstock
Celebrate Everything 12" X 12" (30.5 X 30.5 Cm) Designer Series Paper
Basic White 8 1/2" X 11" Cardstock
Soft Suede 8-1/2" X 11" Cardstock
Timber 3 D Embossing Folder
Baker's Twine Essentials Pack
Pearlized Enamel Effects Basics
Mini Stampin' Cut & Emboss Machine
Multipurpose Liquid Glue
Stampin' Dimensionals

Sweet Gingerbread Christmas Card

The card I’m sharing today is a fun-fold called a 2-step. The adorable elements from the Sweet Gingerbread Bundle by Stampin’ Up! were perfect for the steps of the card. And the sweet print from the Sweetest Christmas Designer Series Paper was a natural choice.

The fold on the card is created by making five scores on the 11″ side of a 4-1/4″ x 11″ piece of cardstock. Score at 1-1/4″, 2-1/2″, 4-1/4″, 6″, and 8-1/4″. The “steps” of the card will look like this:

I adhered a 4-3/4″ x 4″ piece of the designer series paper to a 5″ x 4-1/4″ piece of card stock then adhered the panel to the last step of the card. The remaining piece of designer series paper for the front step of the card measures 1-1/8″ x 4″. Watch the video tutorial for complete instructions for completing the Sweet Gingerbread Step Card.

Product List

Make a Hello Harvest Curtain Fold Card

Kiddos in our area started school this week and that means that the days will begin to get cooler as the Fall season begins. Today’s Hello Harvest Curtain-Fold card gives all the autumn feels. I used products from Stampin’ Up!’s Rustic Harvest Suite to create my card.

Look at those gorgeous, jewel-tone colors in the Rustic Harvest Designer Series Paper! I used a more subdued print for my Hello Harvest Curtain-Fold card. I didn’t want the paper to compete with the layers of die-cuts that I added.

I used ink and Stampin’ Blends to color the die-cuts on the card and popped everything up using Stampin’ Dimensionals. Here is a close-up.

The curtain-fold on the card front is very easy to achieve and I think it elevates the card. I will be using this technique a lot in the future.

Product List

Make a Bewitching Halloween Card

The project I’m sharing with you today is this bewitching Halloween card. I used the Bewitching Bundle from Stampin’ Up! to dress up this project. The idea for this card and how to create a pumpkin from circle dies came from a card by fellow Stampin’ Up! Demonstrator, Don Olchefske. You may view Dawn’s card here: https://bit.ly/3zIlWXb

Product List

Make a Hello Harvest Greeting Card

It’s not too early to begin thinking about your fall and holiday papercraft projects. How satisfying would it be to have a collection of greeting cards to choose from when the occasion arises come September?!

My Hello Harvest greeting card is one that I would be proud to send. The Rustic Harvest Designer Series Paper and beautiful images from the Hello Harvest stamp set did all the work for me.

Video Tutorial

Product List

Free Tutorial Tuesday – Wonderful World Card

I made the card I’m sharing with you today using the Wonderful World Bundle from Stampin’ Up! that you can receive for FREE with purchase! I created a sketch for this project from a card designed by a Stampin’ Up! concept artist and think the simplicity of it is just beautiful!

Keep scrolling down this post for a copy of the sketch and the free .pdf tutorial for this card. If you decide to create a card using today’s sketch we would love to see it! Please share it with us on my Facebook Page Here: https://www.facebook.com/theplaidpoodle or share it on your Instagram using #plaidpoodlesketches.

Click on the button below for today’s Free Tuesday Tutorial. Feel free to download and print for your personal use.

Here is the Plaid Poodle Sketch I used as a starting point to create today’s card. Download the free sketch here https://bit.ly/3IvZ0yo.

Make a Sweet Candy Canes Fun-Fold Christmas Card

Let’s call it Christmas in July but I could not wait to make a card using the Sweet Candy Canes Bundle from Stampin’ Up! I was also in the mood for a fun-fold card today. I tried my hand at a Double Gate Fold card.

The products from the Sweetest Christmas Suite by Stampin’ Up! worked beautifully for this card. I adore how the hard work of coordinating products is already done! See the full list of products I used to make this fun-fold Christmas card below.

Cutting & Scoring Guide

  • Real Red Cardstock = 11″ x 5-1/2″ scored at 1-1/4″, 3-3/8″, 7-5/8″ and 9-3/4″
  • Sweetest Christmas Designer Series Paper = two pieces 5-1/4″ x 1-3/4″ and two pieces 5-1/4″ x 1″
  • Belly Band = 11″ x 1″ Real Red cardstock and 11″ x 7/8″ Sweetest Christmas Designer Series Paper.
  • Card Insert = 4″ x 5-1/4″ Basic White

Video Tutorial

Product List

Cottage Wreaths Card for Free Tutorial Tuesday Sketch #6

I’m a sucker for wreaths! I have one on my front door, one on the wall in my entry, and one above my fireplace. So it’s no secret that some of my favorite cards include wreaths. I made the card I’m sharing with you today using the Cottage Wreaths Bundle from Stampin’ Up!

Here is the Plaid Poodle Sketch I used as a starting point to create today’s card. Download the free sketch here https://bit.ly/3yt3eU3. If you decide to create a card using today’s sketch we would love to see it! Please share it with us on my Facebook Page Here: https://www.facebook.com/theplaidpoodle or share it on your Instagram using #plaidpoodlesketches.

Click on the button below for today’s Free Tuesday Tutorial. Feel free to download and print for your personal use.

Free Tutorial Tuesday Sketch #5

I used Sale-a-Bration products that I earned for free with a qualifying order to make today’s card. I used the Rings of Love Designer Series Paper, the Happiest Hippos stamp set, and the coordinating Hippo Dies. All products are part of the July-August Sale-a-Bration brochure that goes live on Friday. Beginning July 1st customers can choose a free product from the brochure with each $50 Stampin’ Up! product purchase – no limits!

Here is the Plaid Poodle Sketch I used as a starting point to create today’s card. Download the free sketch here: https://bit.ly/3y1rBHh. If you decide to create a card using today’s sketch we would love to see it! Please share it with us on my Facebook Page Here: https://www.facebook.com/theplaidpoodle or share it on your Instagram using #plaidpoodlesketches.

Click on the button below for today’s Free Tuesday Tutorial. Feel free to download and print for your personal use.

Make a Trees for Sale Vintage Camper Card

The Stampin’ Up! Holiday Mini Catalog goes live this Friday, July 1st! As a Demonstrator, I am able to preorder from the catalog and could not wait to play with my new products! Here is the card I created for today’s Make-it-Monday Facebook Live episode:

We are a week from celebrating Independence Day here in the United States and that prompted me to choose the paper pattern from the incoming Celebrate Everything 12″ x 12″ Designer Series Paper pack. I created this relaxing campsite scene using the Tree Lot Dies. The dies can be earned free with a $100 purchase from Stampin’ Up!

That sweet vintage camper die makes me want to go camping as long as it’s cool and there are no bugs!

Watch the replay of the video to see how I put this card together.

Free Tutorial Tuesday Sketch #4

Here is today’s Plaid Poodle Sketch. Download the free sketch here: https://bit.ly/3OrP8HY. If you decide to create a card using today’s sketch we would love to see it! Please share it with us on my Facebook Page Here: https://www.facebook.com/theplaidpoodle or share it on your Instagram using #plaidpoodlesketches.

Here’s the card I created from today’s sketch. In place of the scalloped oval from the sketch, I created a faux watercolor watermelon.

Click on the button below for today’s Free Tuesday Tutorial. Feel free to download and print for your personal use.

Make a Best Butterflies Fun-Fold Card

The Best Butterflies Fun-Fold card I’m sharing today looks intricate but is easy to assemble and requires no special tools to create.

The fun-fold card is three-dimensional and stands on its own so the recipient can display it. The colors from the Butterfly Kisses 6″ x 6″ Designer Series Paper are bright and cheerful and the Butterfly Dies are such a whimsical touch!

The card has several layers but will still fold to fit into a standard A2 envelope. Because of the thickness however, this card will probably require extra postage.


Cutting & Scoring Guide

  • Card Base = 11″ x 4-1/4″ scored at 5-1/2″, 7″, 9″ and 10-1/2″ on the 11″ side.
  • Front Panel = 5-1/2″ x 3″ scored at 3-1/2″ and 5″ on the 5-1/2″ side
  • Designer Series Paper = 4″ x 5-1/4″, 4″ x 1-3/4″, 2-3/4″ x 3-1/4″ and 2-3/4″ x 1-1/4″
Product List

Make the Best Butterfly Card using a Sketch

It’s Tuesday and that means FREE Tutorial Tuesday! Here’s the card I created from today’s sketch. I used my new favorite Designer Series Paper – Butterfly Kisses and the coordinating bundle; Best Butterflies.

I made the card using today’s Plaid Poodle Sketch. Download the free sketch here: https://bit.ly/3zAEiLq If you decide to create a card using today’s sketch we would love to see it! Please share it with us on my Facebook Page Here: https://www.facebook.com/theplaidpoodle or share it on your Instagram using #plaidpoodlesketches.

Click on the button below for today’s Free Tuesday Tutorial. Feel free to download and print for your personal use.

Make a Sunny Splash Summer Fun Card

I don’t know what the temps are where you are but summer has arrived in Kansas City! It inspired me to create fun cards using the Sunny Splash stamp set from Stampin’ Up!

Summer fun includes sunshine so all my cards feature a bright, cheerful sun. Today’s video tutorial shows how to make three types of paper suns. Watch the replay below.

I used the Give it a Whirl dies to make all three cards. I also used the Amazing Thanks dies to create the “Thanks” card.

If you look closely you’ll see that I added three Fun Flowers Resin Shapes to the card front for some added interest. Here are the elements I used to make the card.


Product List
Sunny Splash Cling Stamp Set (English)
Give It A Whirl Dies
Amazing Thanks Dies (English)
Tuxedo Black Memento Ink Pad
Basic White 8 1/2" X 11" Thick Cardstock
Calypso Coral 8-1/2" X 11" Cardstock
Butterfly Kisses 6" X 6" (15.2 X 15.2 Cm) Designer Series Paper
Basic White 8 1/2" X 11" Cardstock
Fun Flowers Resin Shapes
Foam Adhesive Sheets
Stampin' Seal
Stampin' Dimensionals
Multipurpose Liquid Glue
Stampin' Cut & Emboss Machine