Latest Posts

Easter Decorations with Target Dollar Spot Supplies

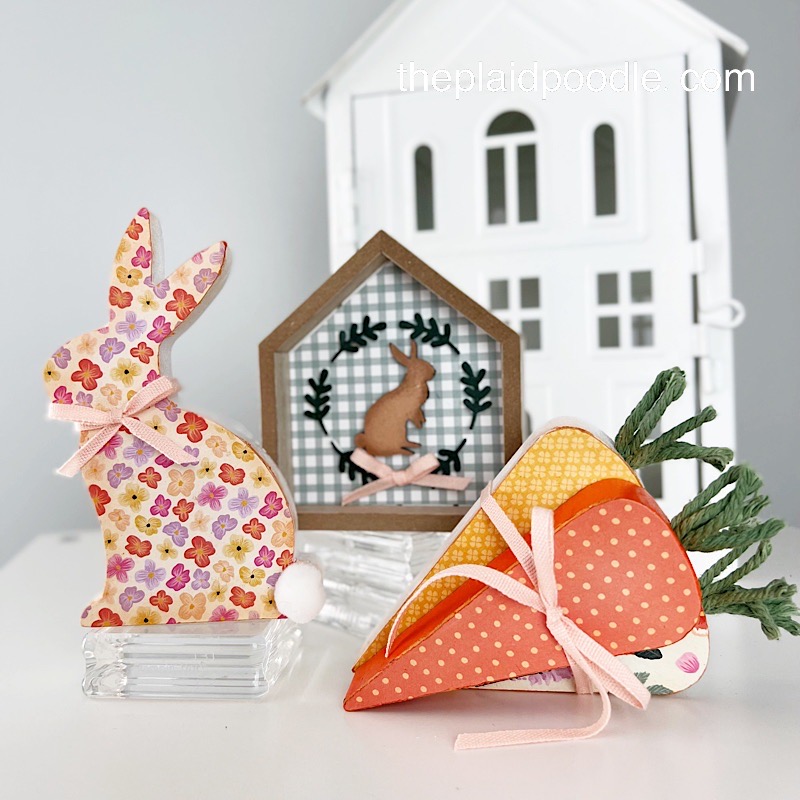
Are you a Target Dollar Spot fan? It’s my first stop upon entering the front doors of the store! I spied a $3 package of wooden Easter decorations this week and had to have them. Once they sat around in my kitchen for a few days I knew I could give these cuties a glow up! I failed to get a “before” photo but if you watch the video tutorial below you will see what I had to start with.

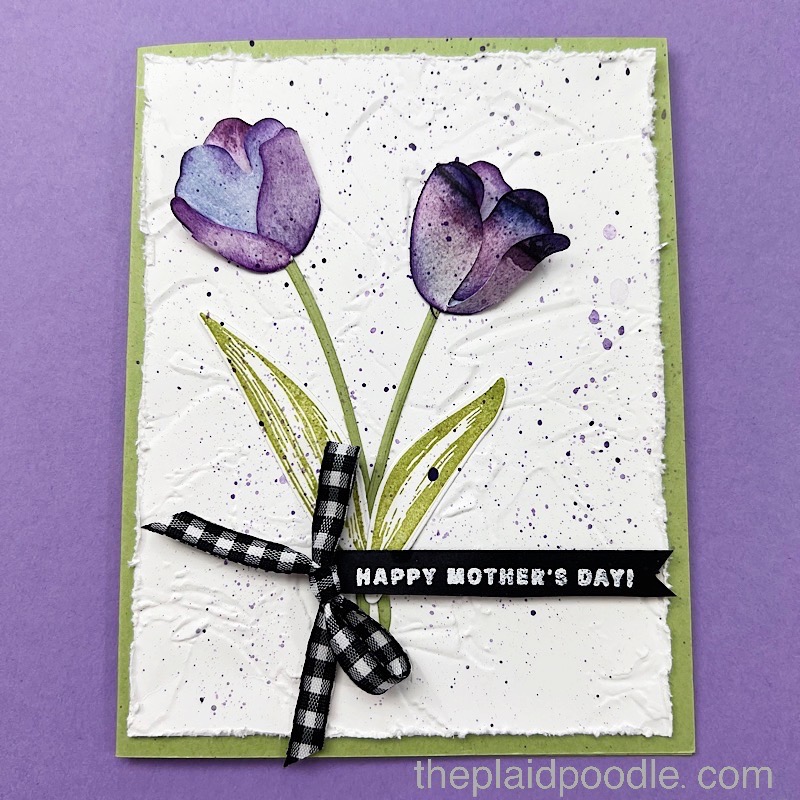
Here’s the after photo:

I’m so happy with the finished project and can’t wait to find a special place in my home to display them. The colors in the Pansy Petals Designer Series Paper from Stampin’ Up! were the right choice. I love how the prints all coordinate and the Petal Pink Cotton Ribbon unified the bunny, the little house, and the carrots in the event I display them all together.

Product List

Punch Art Cards using Hello Ladybug Bundle

One of the things I consider before purchasing a paper crafting tool is how versatile it is. Other times I don’t consider anything but the cuteness factor. The Hello Ladybug Bundle from Stampin’ Up! was just so stinkin’ cute that I had to have it. Little did I know all the adorable critters that could be created from one punch.

Who doesn’t love a bunny rabbit? It can be an actual, living rabbit, a fluffy stuffed animal, or a chocolate bunny; they’re all the best! The love of bunnies and the upcoming Easter holiday inspired me to create this card. I added die-cut clouds and images from the Friends of the Forest stamp set to this sweet trio of bunnies.

Here’s another whimsical card using the Hello Ladybug Bundle. I used the Punch to create the flower, the butterfly, and the ladybug.

Product List

Make an Amazing Silhouettes Pocket Card

Remember the Always in My Heart pocket card I made here? It was so much fun to make that I decided to explore other types of pocket cards I could create. The card I’m sharing today has a side pocket. My favorite part of this card is the sweet heart-shaped pull tab.

The stamped images on this monochromatic card are from the Amazing Silhouettes stamp set from Stampin’ Up! I stamped the butterfly image onto the card insert but left off any sentiment. This card is can be used for many occasions so I will add the sentiment when the need arises. I love that kind of versatility!

Make sure to watch my video tutorial below to see my tip for how I changed the color of the baker’s twine on the card from white to Fresh Fresia.

Cutting Guide

  • Card Base = 8-1/2″ x 5-1/2″ scored at 4-1/4″ on the 8-1/2″ side
  • Designer Series Paper = 4″ x 5-1/4″ and a scrap for heart die-cut
  • Fresh Fresia Cardstock = 5″ x 3-1/2″, 5-1/4″ x 2-5/8″, and a scrap for heart die-cut
  • Basic White Cardstock = 5″ x 2-3/8″, 3-1/4″ x 4-3/4″
Product List

Make a Simple New Horizons Card

The project I’m sharing with you today is so simple to make! All you need to put this card together is paper, stamps, and ink. It’s a great card for beginning card makers and for those of us that are pressed for time. The New Horizons Designer Series Paper does all the work for you to create a beautiful card.

Product List

Make an Always in My Heart Valentine Pocket Card

It’s Valentine’s Week and time is running out for me to share all my heart love projects! The card I’m sharing today is, like most Valentine cards are, over-the-top with lots of layers, patterns, frills, and glitter.

I used the Always in My Heart stamp set along with the coordinating Floral Heart dies from Stampin’ Up! to create this pocket card. The stars of the show are the fun Sweet Talk Designer Series Paper and that lovely floral heart die-cut. The sentiment tag that tucks inside the pocket makes a sweet bookmark.

Product List

Pocket Card Cutting Guide

Card base = 4-1/4″ x 5-1/2″

First Layer = 4-1/4″ x 5-1/2″

Pocket Layer = 4-1/4″ x 5-1/2″

Make a Friends of the Forest Shaker Card

Today’s project is a 4″ x 4″ shaker card. I used images from the Friends of the Forest stamp set and colored them in with Stampin’ Blend Markers. Just like the card I shared on Monday, I decided to heat emboss the “Glad You’re My Friend” sentiment using White Stampin’ Emboss Powder.

Product List

Make a Driving By Sunshine & Rainbows Card

You don’t have to be an expert on cars to love the versatile images and phrases in the Driving By Stamp Set. The festive balloons and gifts make this a great set for celebrations such as Christmas and birthdays. But the phrases can turn your project into a celebration of friendship, a message that’s timeless.

Don’t those images remind you of simpler times full of fun-in-the-sun? I couldn’t pick a favorite for the card I’m sharing with you today so I used them all!

I colored the stamped images using Stampin’ Blends and pulled the colors from the cheery Sunshine & Rainbows Designer Series Paper. I love this paper so much that it almost made me sad to cut the windows from it.

Cutting & Scoring Guide

  • Card Base measures 5-5/8″ x 8-5/8″ and is scored at 4-3/8″ on the 8-5/8″ side.
  • Stamped layer measures 5-1/2″ x 4-1/4″
  • Die-cut layer measures 5-3/8″ x 4-1/8″
Product List

Make a 3-Dimensional Flowering Tulips Mother’s Day Card

Are you ready for Spring? I sure am! One of the first signs of spring is the tulips and daffodils poking their heads out of the ground. My card today has two gorgeous 3-dimensional tulips popping up on it. I used the Flowering Tulips Bundle from Stampin’ Up! The bundle includes the Flowering Tulips Stamp Set and the Tulips Dies. Use the stamp set and dies together to create detailed tulips or use the dies on their own for a minimalist tulip design.

The Tulips Dies are a must-have for any floral enthusiast. Not only can you create layered tulip fields, but you can also create three types of layered tulip blossoms, perfect for creating a tulip bouquet! Simply die cut the coordinating dies with contrasting cardstock colors, and then fold the pieces together to make beautiful tulip blossoms. These dies are sized perfectly for the front of a card.

Product List

Make an Always in My Heart Valentine Card

I can’t believe we’re already halfway through January, 2022! Time just needs to stand still for a minute. Am I right? With Valentine’s Day coming at us quickly I needed to focus on the cards I want to send this year. I have the Always in My Heart stamp set and coordinating Floral Heart Dies from Stampin’ Up! sitting on the shelf in my craft room and they were calling out to me, “use us, use us”, so that is what I did.

The heartfelt sentiments in the stamp set make them perfect for Valentine’s Day, wedding, and anniversary projects. This is a Two-Step Stampin’ set; it allows you to layer two or more images to create one final image with extra texture and dimension in the colors you want.

Here is another card that I made using the piece left after die-cutting the heart from the Flowering Fields Designer Series Paper.

Product List

New Spring Mini Catalog & Sale-a-Bration!

The Stampin’ Up! Spring Mini Catalog is live! The January–June 2022 Mini Catalog is your passport to stunning seasonal projects! It contains all the products you’ll need to craft, create, and celebrate during Valentine’s, Easter, and more.

View and download the virtual version of the catalog here.

Sale-a-Bration

During Sale-a-Bration, you may earn a free gorgeous product with every $50 purchase from the Sale-a-Bration brochure! To see the exclusive products you can earn this Sale-A-Bration season, browse our digital brochure here. Remember to take a look at the coordinating products from the January–June 2022 Mini Catalog you can pair with your fabulous Sale-A-Bration finds! 

Besides free products with eligible purchase, there are other perks available only during Sale-a-Bration.

Hosting During Sale-a-Bration

Hosting is even more rewarding during Sale-A-Bration season. When you place any party or personal order of $300 or more, you can receive the Calming Camellia Cling Stamp Set (item 158117) for free!

Joining During Sale-a-Bration

When you become an Independent Stampin’ Up! Demonstrator you join a supportive community of others who share your passion for creativity! Join now and select $125 or products for only $99. During Sale-a-Bration you’ll also get your choice of any two stamp sets for FREE!

Any time is a great time to shop but shopping during Sale-a-Bration and earning FREE products is the best time!

DIY Heart Pop-Up Cool Treats Valentine Card

Happy New Year! I hope your holiday season was all that you were hoping for. I took two weeks off during Christmas and New Year’s and didn’t step into my craft room once. I couldn’t wait to get back to stamping this week!

The next holiday coming up is Valentine’s Day and that had me thinking of hearts and colorful, happy paper. The Sweet Talk Designer Series Paper from Stampin’ Up! was perfect for the project I had in mind. It’s a mini heart pop-up card.

This cute little card starts with a square base that measures 3-1/4″ x 3-1/4″ and includes a ribbon to keep it closed up tight. It’s the ideal size for the kiddos to tuck into all those sweet classroom Valentine boxes. When you untie the ribbon and open the card a delightful purple heart pops up.

I chose the Sweet Ice Cream stamp set from Stampin’ Up for the card sentiments. Doesn’t the font remind you of conversation hearts candy? The punches from the Hearts Punch Pack were just the right size for this mini card. Although the Simple Scored Board from Stampin’ Up! helped a lot with the card, the only thing required to create your own pop-up card is a paper trimmer, bone folder and a strong adhesive.

You will also need a 6-1/2″ x 3-1/4″ piece of Designer Series Paper for the inside lining of the card and a 3-1/8″ x 3-1/8″ piece for the front of the card. I colored a 2-3/4″ x 3″ piece of vellum using the Light Flirty Flamingo Stampin’ Blend Marker. Once the alcohol ink from the marker dried, I punched a scallop heart from the vellum then heat embossed the sentiment onto it using white Stampin’ Emboss Powder.

Product List

Make a Penguin Place Penny Slider Card

The project I’m sharing with you today is a penny slider card.

I used Thick Basic White card stock for the card base. It measures 8-1/2″ x 11″ and is scored at 4-1/4″ on the 11″ side. The first layer of Pool Party card stock measures 4-1/8″ x 5-3/8″. The Sweet Stockings Designer Series Paper layer measures 5-1/4″ x 4″. The final layer on the card with the slider mechanism measures 5-1/4″ x 3-1/4″ before the snow bank is cut from it.

Product List

Make a Peaceful Deer Standing Pop-Up Card

My new favorite fancy fold card is the Standing Pop-Up Card. I saw this type of card floating around the internet and knew I wanted to give it a try.

I used the Peaceful Deer Bundle along with the So Many Snowflake Dies to embellish the card base. Clear Wink of Stella on the snowflake die-cut to gives it a little sparkle along with the three Shaded Spruce rhinestones.

The sentiment panel on the back of the card it makes a pretty Christmas decoration to set anywhere.

Product List

Cutting/Scoring Guide

  • Card Base = 4-1/4″ x 10-1/2″ piece of cardstock scored at 1/2″, 1-3/4″, 3-3/4″ and 5″ on the 10-1/2″ side
  • Card Bridge = 3″ x 5″ piece of cardstock scored at 1/2″ and 1-3/4″ on the 5″ side
  • Designer Series Paper = 4″ x 4″ piece, 4″ x 1-3/4″ piece
  • Embossed Layer = 2-3/4″ x 3″
  • Snowflake Die-cut = 3″ x 3″
  • Stamped Deer Image = 3″ x 2-1/4″
  • Sentiment Panel = 4″ x 5-1/4″

Make Sweet Little Stockings Gift Tags

I love making tags! I guess it’s because tags are very quick and easy to make. Instant creative gratification! I thought the Stitched So Sweetly rectangle dies folded in half would make great bases for the tags I’m sharing with you today. I used products from the Sweet Stockings Suite by Stampin’ Up! to embellish the tags. Here are the three tags I created.

Product List

Book Binding Fun-Fold Christmas Card

I’ve been seeing book binding fun-fold cards all over social media lately and wanted to give it a try. Stampin’ Up! is offering 20% off dies from their annual catalog starting tomorrow so I decided to showcase a couple of them in today’s project. I chose two great stand alone die sets; the Basic Borders Die Set and the Stitched So Sweetly Die Set.

I love all the stitched layers on this book binding fun-fold card. To embellish the card I used the 3/8″ Chevron Weave Ribbon on the book binding and the Holiday Rhinestone Basic Jewels on the holly leaves die-cuts.

Cutting/Scoring Guide

  • Card Base = 4-1/4″ x 11″ piece of Evening Everygreen Cardstock scored at 5-1/2″ and 6-3/4″ on the 11″ side
  • Cherry Cobbler Cardstock = 4-1/8″ x 4-1/8″ piece and 4″ x 2-1/2″ piece
  • Tidings of Christmas Designer Series Paper = 4-1/8″ x 1-1/8″ piece and 3-3/4″ x 4-1/2″ piece
  • Basic White Cardstock = 3″ x 2-1/4″
  • Evening Evergreen Cardstock = scrap for holly leaves

Video Tutorial


Product List