Latest Posts

Free Tutorial Tuesday Sketch #5

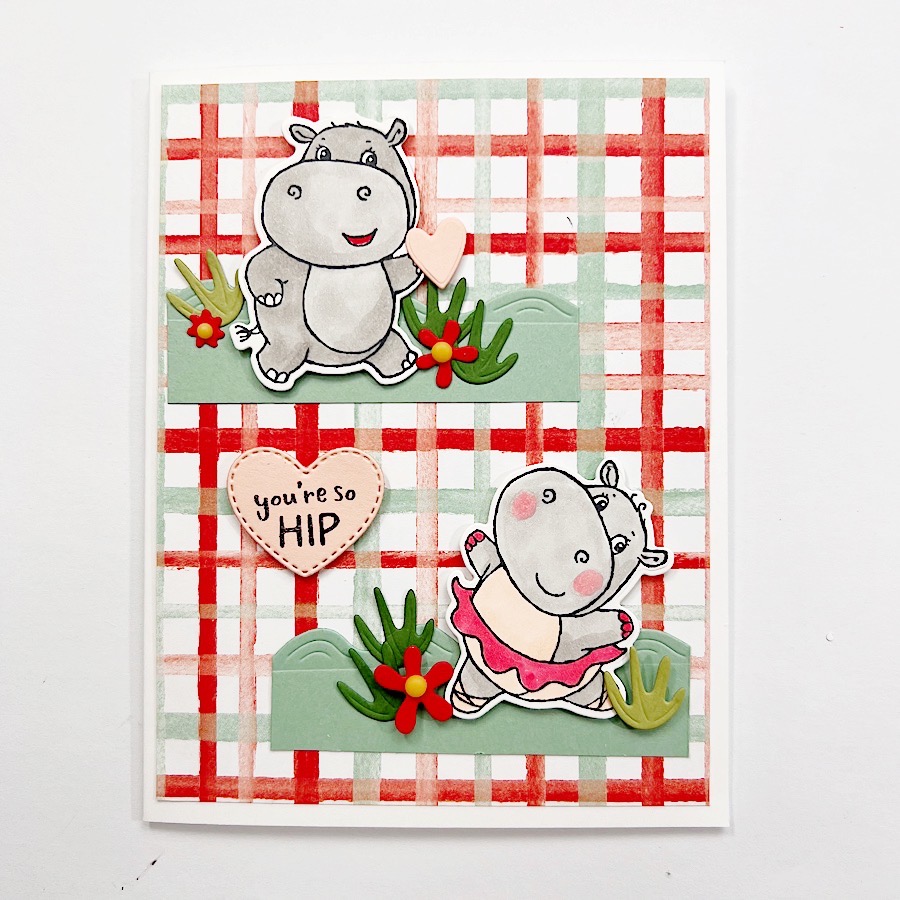
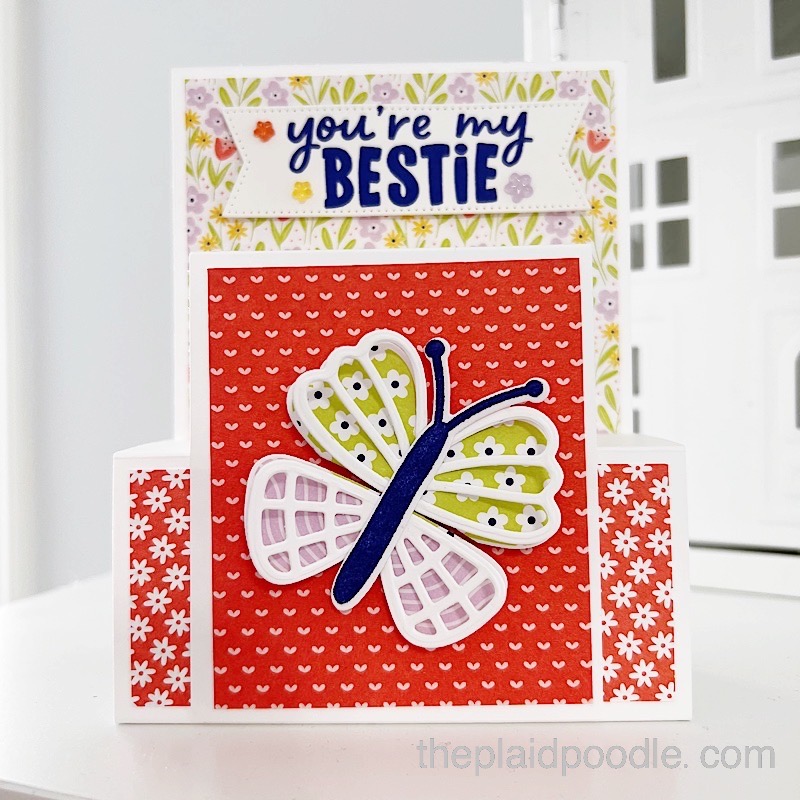
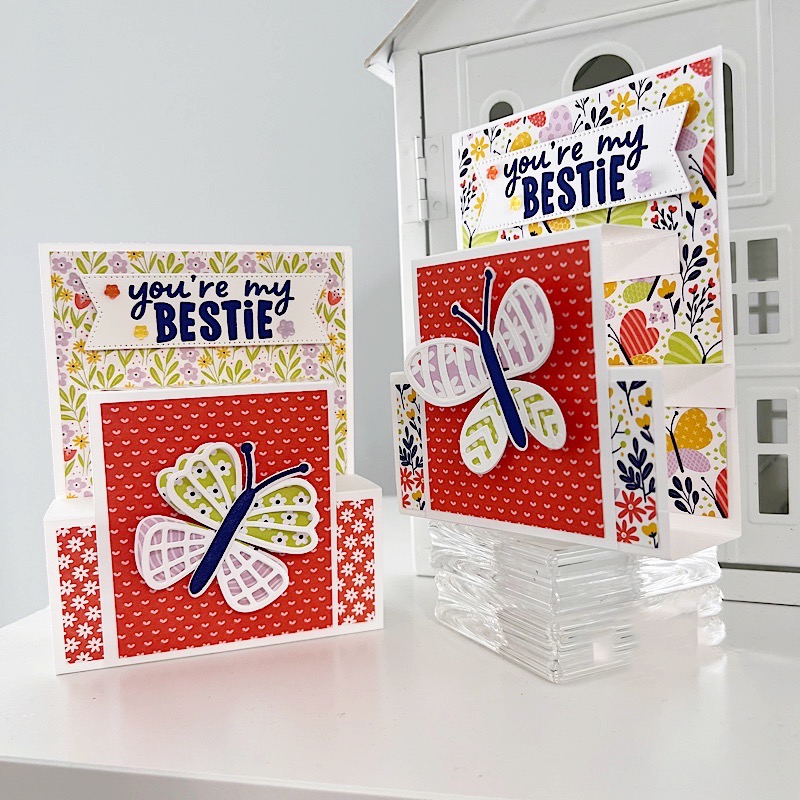
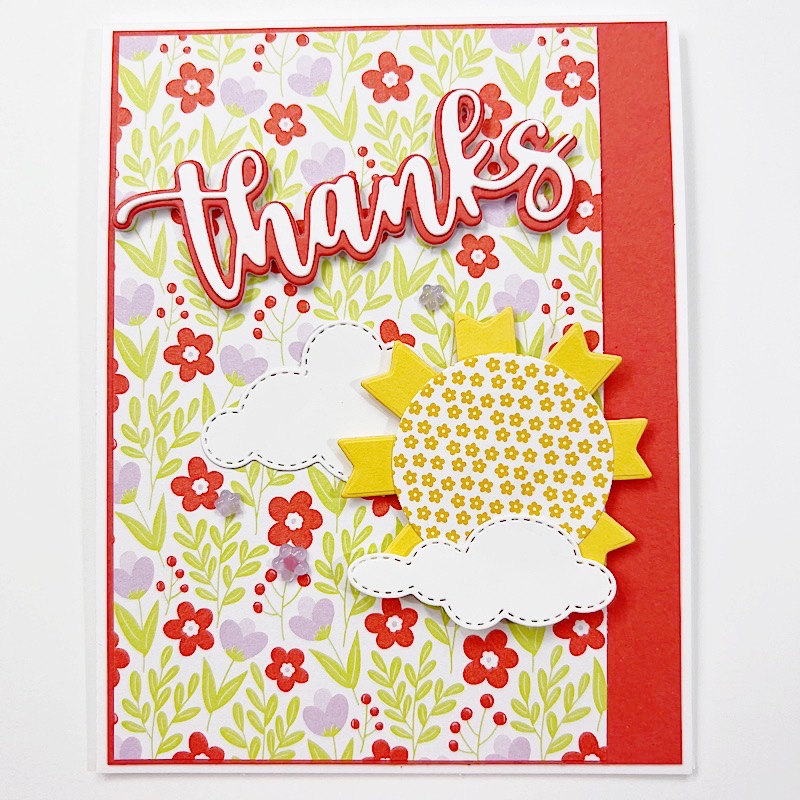
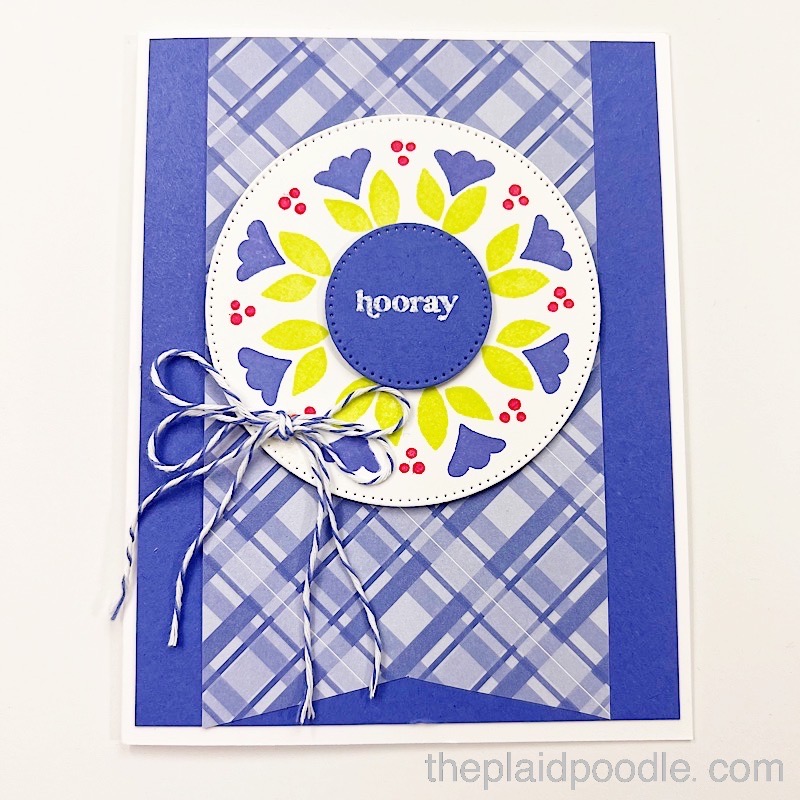
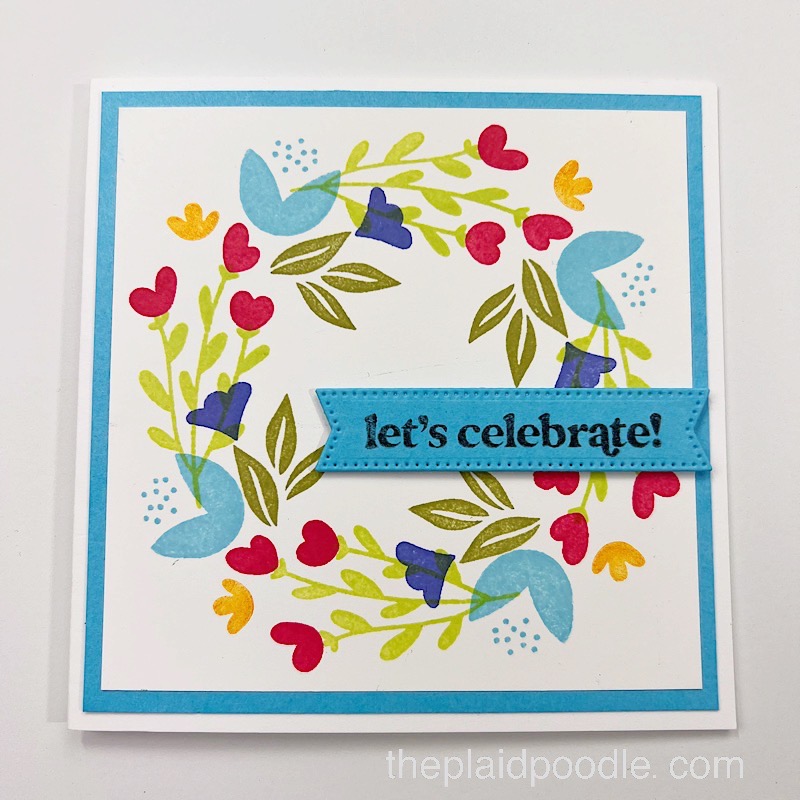
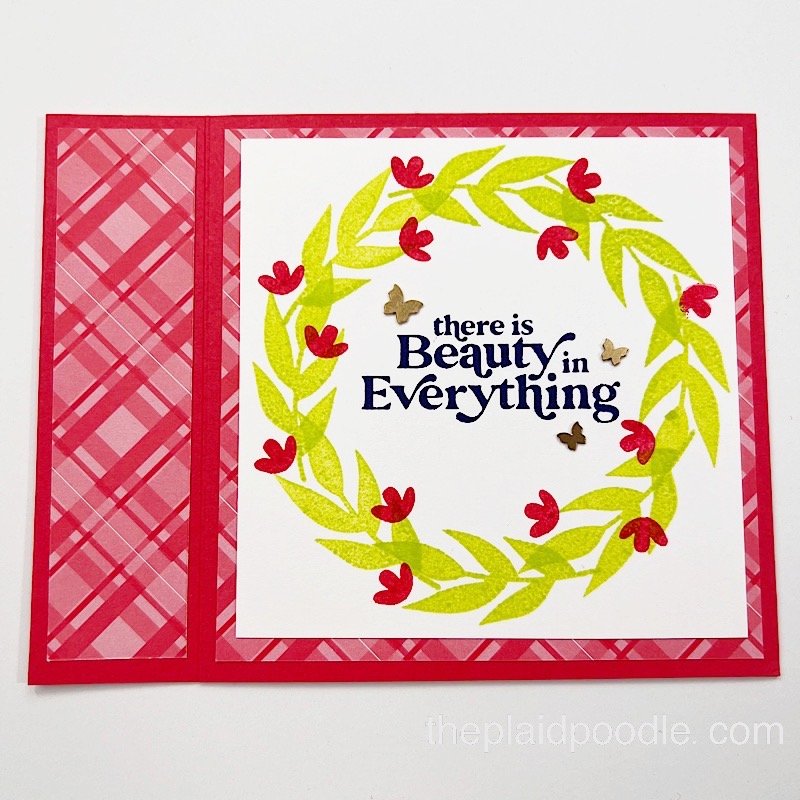
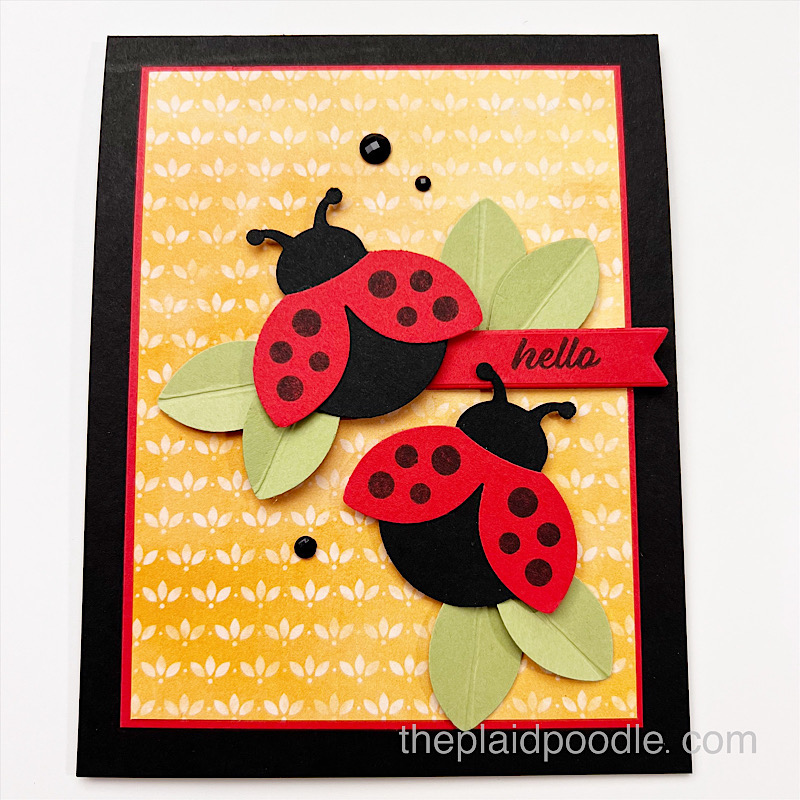
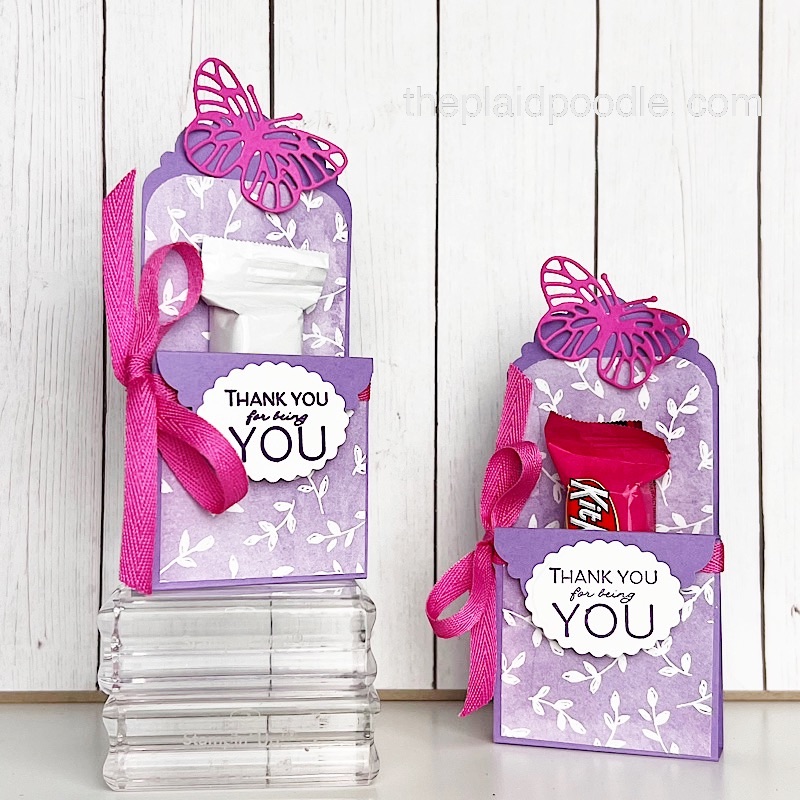
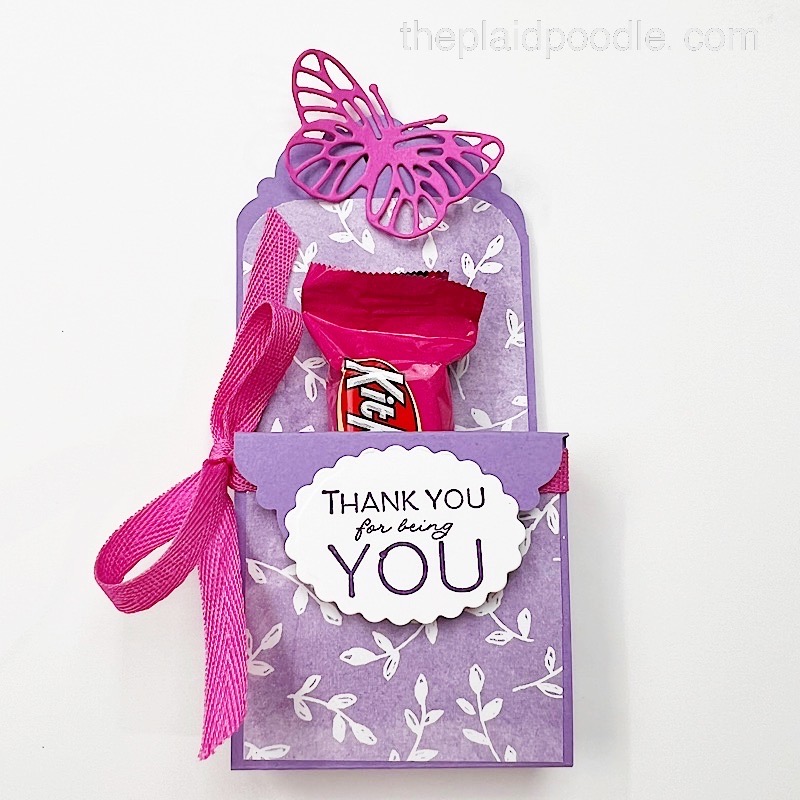
I used Sale-a-Bration products that I earned for free with a qualifying order to make today’s card. I used the Rings of Love Designer Series Paper, the Happiest Hippos stamp set, and the coordinating Hippo Dies. All products are part of the July-August Sale-a-Bration brochure that goes live on Friday. Beginning July 1st customers can choose a free product from the brochure with each $50 Stampin’ Up! product purchase – no limits!

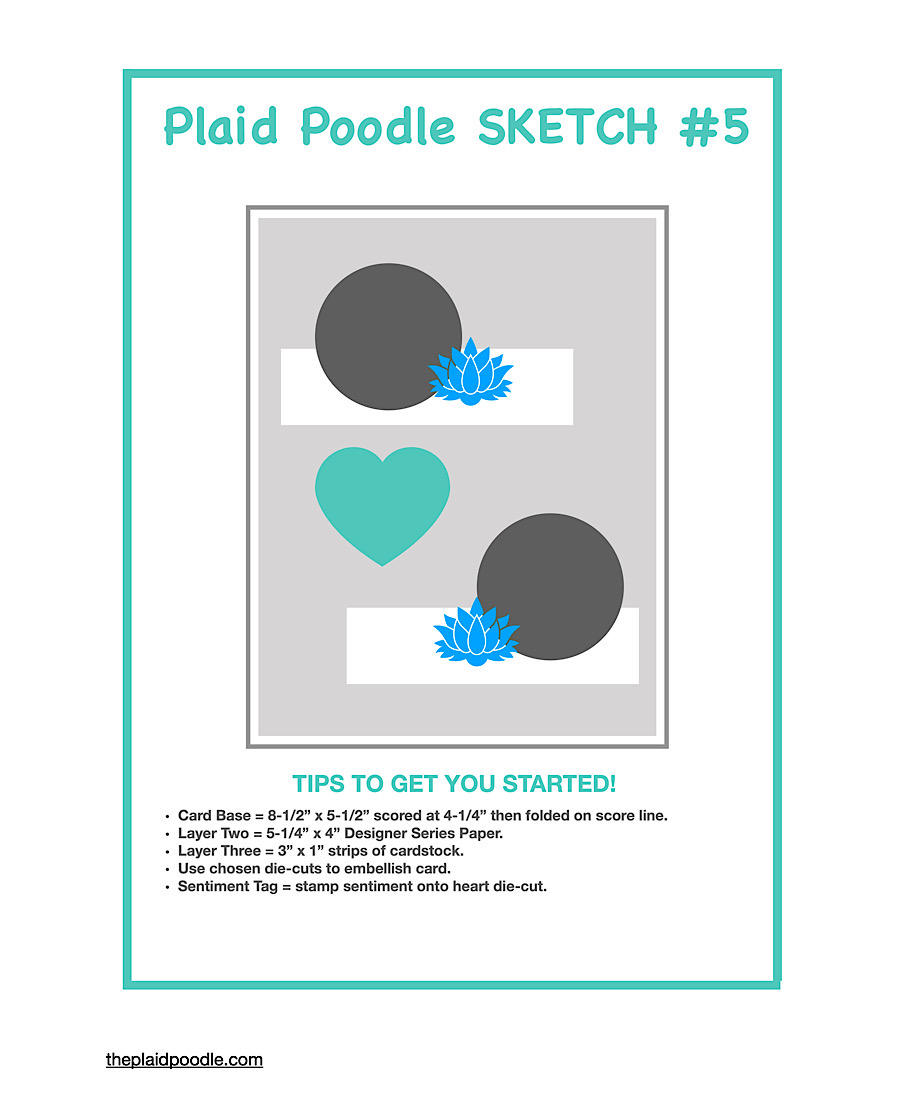
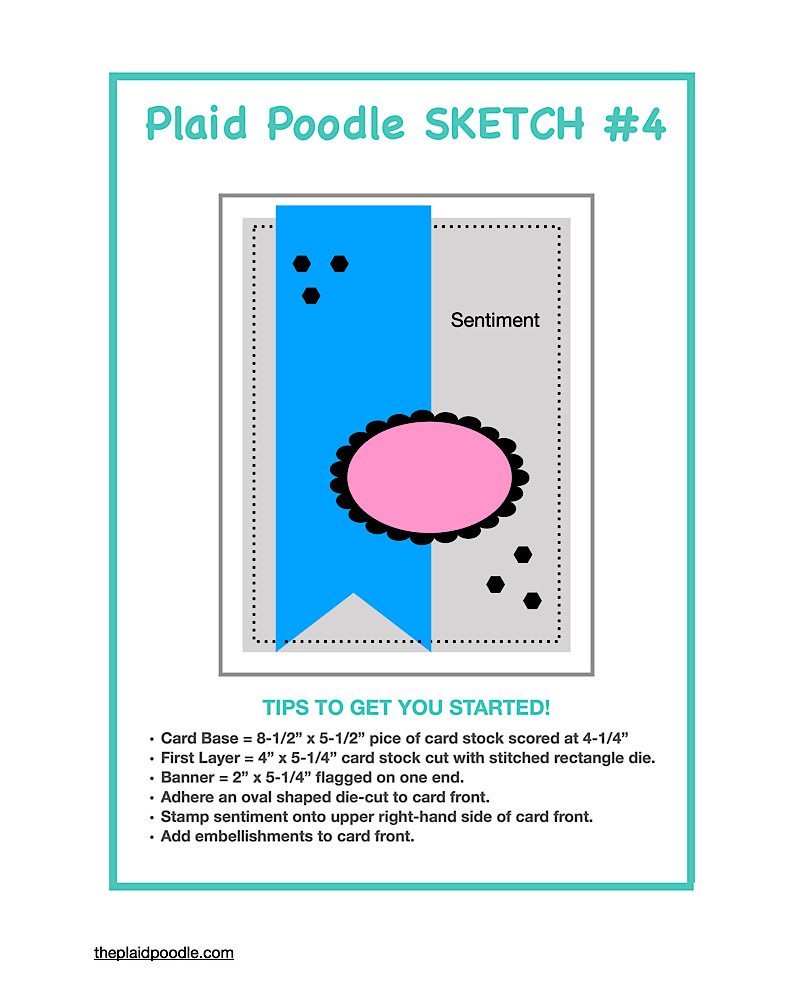
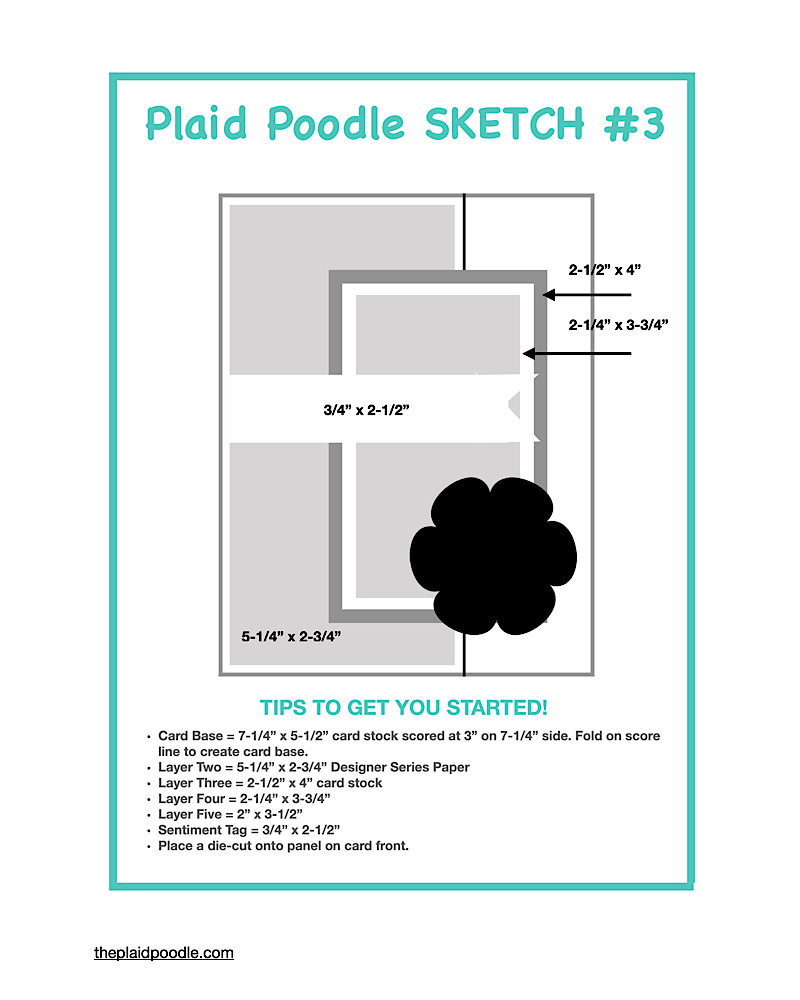
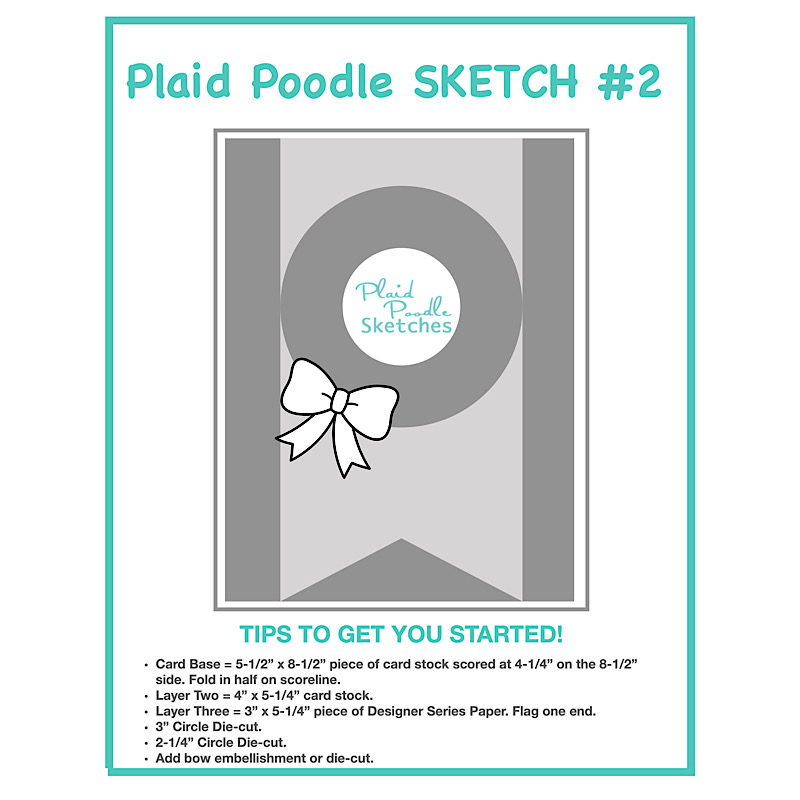
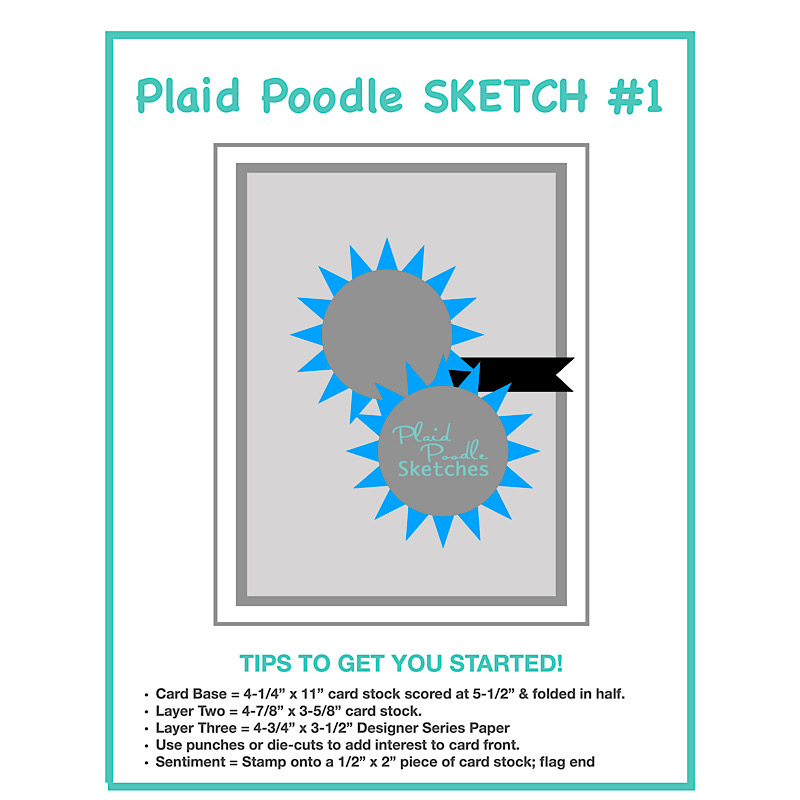
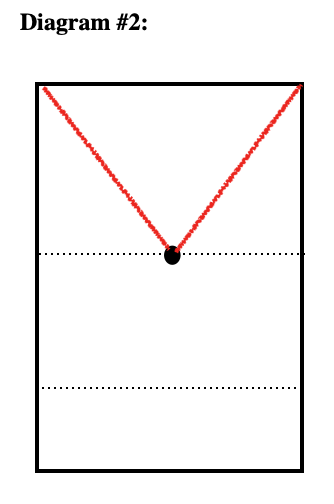
Here is the Plaid Poodle Sketch I used as a starting point to create today’s card. Download the free sketch here: https://bit.ly/3y1rBHh. If you decide to create a card using today’s sketch we would love to see it! Please share it with us on my Facebook Page Here: https://www.facebook.com/theplaidpoodle or share it on your Instagram using #plaidpoodlesketches.

Click on the button below for today’s Free Tuesday Tutorial. Feel free to download and print for your personal use.

Make a Trees for Sale Vintage Camper Card

The Stampin’ Up! Holiday Mini Catalog goes live this Friday, July 1st! As a Demonstrator, I am able to preorder from the catalog and could not wait to play with my new products! Here is the card I created for today’s Make-it-Monday Facebook Live episode:

We are a week from celebrating Independence Day here in the United States and that prompted me to choose the paper pattern from the incoming Celebrate Everything 12″ x 12″ Designer Series Paper pack. I created this relaxing campsite scene using the Tree Lot Dies. The dies can be earned free with a $100 purchase from Stampin’ Up!

That sweet vintage camper die makes me want to go camping as long as it’s cool and there are no bugs!

Watch the replay of the video to see how I put this card together.

Free Tutorial Tuesday Sketch #4

Here is today’s Plaid Poodle Sketch. Download the free sketch here: https://bit.ly/3OrP8HY. If you decide to create a card using today’s sketch we would love to see it! Please share it with us on my Facebook Page Here: https://www.facebook.com/theplaidpoodle or share it on your Instagram using #plaidpoodlesketches.

Here’s the card I created from today’s sketch. In place of the scalloped oval from the sketch, I created a faux watercolor watermelon.

Click on the button below for today’s Free Tuesday Tutorial. Feel free to download and print for your personal use.

Make a Best Butterflies Fun-Fold Card

The Best Butterflies Fun-Fold card I’m sharing today looks intricate but is easy to assemble and requires no special tools to create.

The fun-fold card is three-dimensional and stands on its own so the recipient can display it. The colors from the Butterfly Kisses 6″ x 6″ Designer Series Paper are bright and cheerful and the Butterfly Dies are such a whimsical touch!

The card has several layers but will still fold to fit into a standard A2 envelope. Because of the thickness however, this card will probably require extra postage.


Cutting & Scoring Guide

  • Card Base = 11″ x 4-1/4″ scored at 5-1/2″, 7″, 9″ and 10-1/2″ on the 11″ side.
  • Front Panel = 5-1/2″ x 3″ scored at 3-1/2″ and 5″ on the 5-1/2″ side
  • Designer Series Paper = 4″ x 5-1/4″, 4″ x 1-3/4″, 2-3/4″ x 3-1/4″ and 2-3/4″ x 1-1/4″
Product List

Make the Best Butterfly Card using a Sketch

It’s Tuesday and that means FREE Tutorial Tuesday! Here’s the card I created from today’s sketch. I used my new favorite Designer Series Paper – Butterfly Kisses and the coordinating bundle; Best Butterflies.

I made the card using today’s Plaid Poodle Sketch. Download the free sketch here: https://bit.ly/3zAEiLq If you decide to create a card using today’s sketch we would love to see it! Please share it with us on my Facebook Page Here: https://www.facebook.com/theplaidpoodle or share it on your Instagram using #plaidpoodlesketches.

Click on the button below for today’s Free Tuesday Tutorial. Feel free to download and print for your personal use.

Make a Sunny Splash Summer Fun Card

I don’t know what the temps are where you are but summer has arrived in Kansas City! It inspired me to create fun cards using the Sunny Splash stamp set from Stampin’ Up!

Summer fun includes sunshine so all my cards feature a bright, cheerful sun. Today’s video tutorial shows how to make three types of paper suns. Watch the replay below.

I used the Give it a Whirl dies to make all three cards. I also used the Amazing Thanks dies to create the “Thanks” card.

If you look closely you’ll see that I added three Fun Flowers Resin Shapes to the card front for some added interest. Here are the elements I used to make the card.


Product List
Sunny Splash Cling Stamp Set (English)
Give It A Whirl Dies
Amazing Thanks Dies (English)
Tuxedo Black Memento Ink Pad
Basic White 8 1/2" X 11" Thick Cardstock
Calypso Coral 8-1/2" X 11" Cardstock
Butterfly Kisses 6" X 6" (15.2 X 15.2 Cm) Designer Series Paper
Basic White 8 1/2" X 11" Cardstock
Fun Flowers Resin Shapes
Foam Adhesive Sheets
Stampin' Seal
Stampin' Dimensionals
Multipurpose Liquid Glue
Stampin' Cut & Emboss Machine

Make a Simply Fabulous Wreath Card

Ok you guys, here’s my second Tutorial Tuesday! I used my Stamparatus, a stamp placement tool, and the Simply Fabulous stamp set to make this cheerful card. This was too fun and too easy to resist sharing.

I created the Simply Fabulous card using this sketch for my inspiration. Sketches are great for an inspiration boost, seeing the big picture, and easy placement and measuring.

Click on the button below for today’s Free Tuesday Tutorial. Feel free to download and print for your personal use. If you decide to create a card using today’s sketch we would love to see it! Please share it with us on my Facebook Page Here: https://www.facebook.com/theplaidpoodle or share it on your Instagram using #plaidpoodlesketches.

To make my card, I stamped a wreath onto a 3-1/8″ x 3-1/8″ piece of Basic White cardstock using images from the Simply Fabulous stamp set then cut the wreath out with a circle die from the Stylish Shapes Dies; both from Stampin’ Up! To stamp the wreath I used this DIY template with my Stamparatus. I shared how to create your own wreath template in the video below.

Here are a few more cards I made using the wreath template:

Product List

Mini Catalog Last Chance Products

The January–June 2022 Mini Catalog will be retiring soon! It’s always bittersweet to see a classic Stampin’ Up! catalog take a trip to retirement. But, I’m looking forward to all the new products on their way—and hope you are, too!

Stock up on your favorite products before they’re gone for good! Save up to 50% on essential craft supplies. What are you waiting for? Start shopping! After all, this selection of Last Chance Products is only available while supplies last.

Click on the button below to view a list of retiring products and bundles. Remember, some products will be returning with the annual catalog but without the discounted bundle price. This list will point those out to you.

Click on the Last Chance Graphic below to view images of the retiring products.

Free Tutorial Tuesday

If you are a regular follower of mine you may already know that I took the months of April and May off to downsize and move my mother into an independent living senior living apartment. Although I have been physically absent from this blog and my social media sites, my mind has been working overtime on introducing new ideas to spark your creativity.

It’s amazing how allowing yourself a little space helps ideas to flow. I’m back and excited to announce Free Tutorial Tuesday! I’ll be offering a free project tutorial here on the blog each Tuesday! Today’s project is a card I created using the Hello Ladybug Bundle from Stampin’ Up!

I created the Hello Ladybug card using this sketch for my inspiration. Sketches are great for an inspiration boost, for seeing the big picture, and for easy placement and measuring. You will notice I replaced the starbursts from the sketch with leaves and replaced the circles from the sketch with the ladybug punches on my card.

Click on the button below for today’s Free Tuesday Tutorial. Feel free to download and print for your personal use. If you decide to create a card using today’s sketch we would love to see it! Please share it with us on my Facebook Page Here: https://www.facebook.com/theplaidpoodle or share it on your Instagram using #plaidpoodlesketches.

Product List

The New Stampin’ Up! Catalog is Here!

It’s the moment we’ve been waiting for—we can begin ordering from the new 2022–2023 Annual Catalog! I hope you’re as excited as I am about Stampin’ Up’s biggest publication of the year.

Is your wish list more than $99? Consider joining Stampin’ Up! When you join Stampin’ Up! during the month of May, along with your choice of $125 in products, you will receive these new In-Color products FREE! That’s over $190 in Stampin’ Up! products for just $99 plus tax along with FREE shipping!

Are you ready for a year filled with friendship, fun, creativity, and connection? That’s what the Annual Catalog is all about! With the turn of every page, you’ll find stunning product suites, inspiring project ideas, and the kind of coordination you can’t find anywhere else. Click on the catalog image below to view the virtual version.

Make an Easter Bunny Treat Holder with Paper!

I’m back from a glorious birthday vacation at the beach and am now laser-focused on Easter! I’ve already purchased pretty paper tableware (because that’s how we roll), filled Easter baskets for the littles, and have planned the menu. I always like to have a sweet takeaway for my adult guests and today’s project will fit the bill.

I found the cutest Easter Bunny Treat Holder online and knew I had to give it a go. My design is patterned after the project by Birgit Seidler, a Stampin’ Up! Demonstrator from Germany. Birgit was gracious enough to include the Imperial measurements making it easy for me to copy. You can check out Birgit Seidler’s original design here: https://bit.ly/3rorBP9

Here is my interpretation of the Easter Bunny Treat Holder. I used one of my favorite retiring Designer Series Papers; the Hand Penned paper from Stampin’ Up! The “Easter Blessings” sentiment on the tag is from a now-retired stamp set called Itty Bitty Greetings.

The paper folding and trimming required to get those fun bunny ears is not difficult. It would however be hard to explain here so I suggest you watch the video below for the instructions.

Cutting & Scoring Guide

Score a 12″ x 9-1/2″ piece of Designer Series Paper at 2-1/2″, 3-1/2″, 4-1/2″, 7″, 8″ and 9″ on the 9-1/2″ each side. Score at 1-3/4″ and 6″ on the 12″ side.

If it helps, here are two diagrams showing the scoring and cutting lines for this project. Diagram #1 is the entire 9″ x 12″ piece of Designer Series Paper. Diagram #2 shows where to cut the ear toppers. The black dotted lines are score lines. The red lines are cutting lines. Once you watch the video these diagrams will make fore sense.

Product List

Make a Welcoming Window Card

I shared these cards today during my Coffee & a Card Facebook Live. They are made using the Welcoming Window Bundle from Stampin’ Up!. The bundle is discounted 20% during the month of March along with 12 other bundles.

Product List

Make a Springtime Party Favor

Here is a sweet little treat holder that I made up to share with my card class attendees this week. The party favor is so fun and easy to make and will work for any occasion or season depending on your choice of paper and embellishments.

The Hand Penned Designer Series Paper inspired my color choices for the party favor.. To make the base I used a 2″ x 7-3/4″ piece of Highland Heather card stock that I scored at 1″, 3″ and 3-1/2″. I then punched both ends of the card stock using the Delightful Tag Topper Punch.

The designer series paper on the front panel of the party favor measures 1-7/8″ x 1-7/8″. The designer series paper for the inside panel of the party favor measures 1-7/8″ x 3″. To give it a more finished look, I rounded the corners on one end of this strip using the Detailed Trio Punch.

I secured the candy inside the treat holder using Stampin’ Seal then wrapped a length of Magenta Madness 1/4″ Ribbon around the outside of the party favor and tied it in a bow. Finally, I embellished the party favor with a butterfly die-cut and a sentiment tag. Watch the video replay below to see just how easy this Springtime Party Favor is to make!

Product List

St. Patrick’s Day Leprechaun Hat Treat Holder

Happy St. Patrick’s Day! I wanted to share this darling Leprechaun Hat Treat Holder with you today. I embellished the hat with the sweet clover made by adhering three heart die-cuts together. For these I used the medium and small heart dies from the Give it a Whirl Dies.

The Soft Succulent gingham print from the Pansy Petals Designer Series Paper pack was a sure bet for the hat. I shared how to assemble this cute hat Monday during my Make-it-Monday Facebook Live. You can watch the replay here:

Click on the button for the hat template mentioned in the video. Remember to print the .pdf at full size on your printer.

Product List
Sweet As A Peach Photopolymer Stamp Set
Pansy Petals 12" X 12" (30.5 X 30.5 Cm) Designer Series Paper
Layering Circles Dies
Give It A Whirl Dies
Evening Evergreen Classic Stampin' Pad
Soft Succulent 8 1/2" X 11" Cardstock
Mini Stampin' Cut & Emboss Machine
Baker's Twine Essentials Pack
Multipurpose Liquid Glue
Mini Stampin' Dimensionals

Make a Rainbow Inspired Card using Paper Scraps

The card I’m sharing with you today is so stinkin’ cute! I’ve been wanting to make this card ever since I purchased the Cloud Punch from Stampin’ Up! The rainbow-inspired card is quick and easy to make and features a blending technique as well as some heat embossing on the sentiment.

I cut a stencil using one of the dies from the Basic Borders Dies then used it to blend Balmy Blue ink onto a 4-1/8″ x 5-3/8″ piece of Basic White cardstock to create the cloudy background. I have a few different brands of blending brushes but the ones from Stampin’ Up! are so bougie and have become my favorites to use.

For all the tips and tricks I used to make this card watch this video replay from today’s Coffee & a Card Facebook Live.

Product List