Christmas

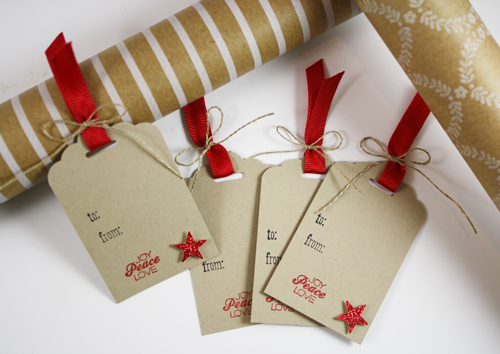
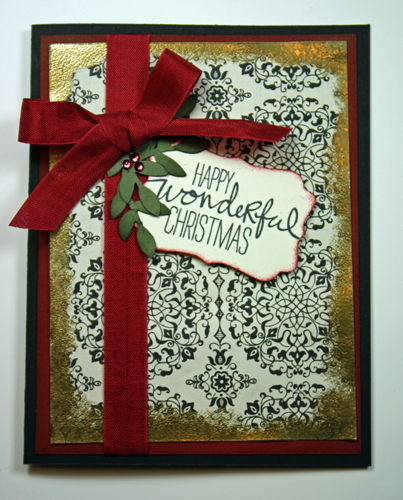
Merry Christmas to All DYI Ornament

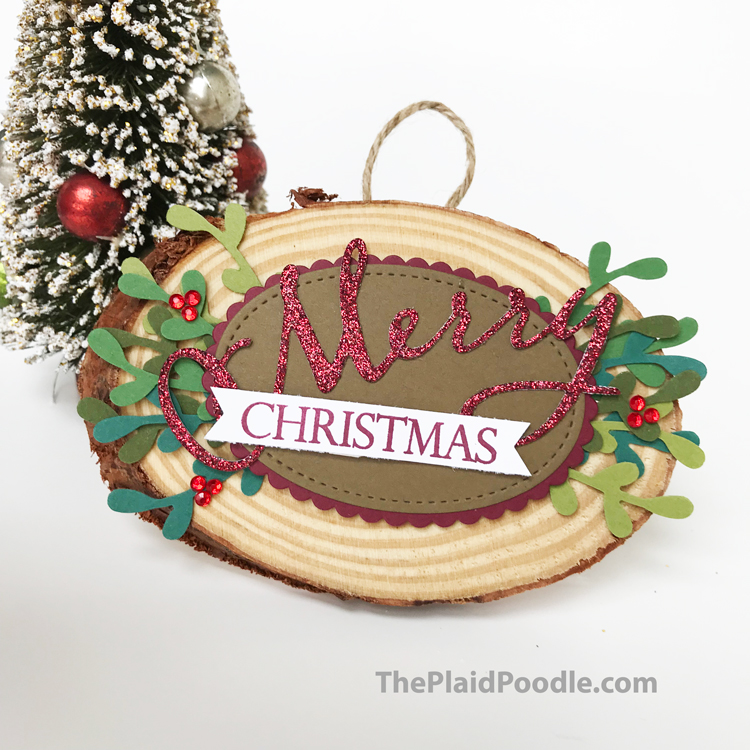
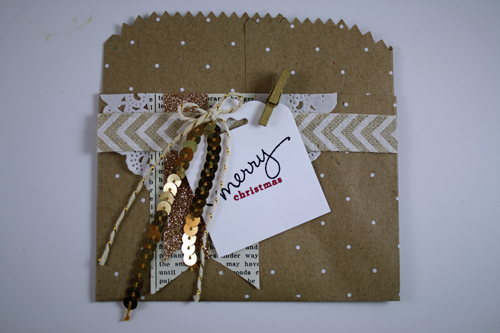
The trend right now in home decor, fashion and crafts is Farmhouse Chic.  I always make a handmade gift for the guests who attend my Christmas Fun & Fancy Classes and wanted to do something this year using the trend.  I ended up making this ornament for my guests.  The idea came from another Stampin’ Up! Demonstrator who made a larger, plaque version.  Unfortunately I cannot find the name of that Demonstrator to give her proper credit.

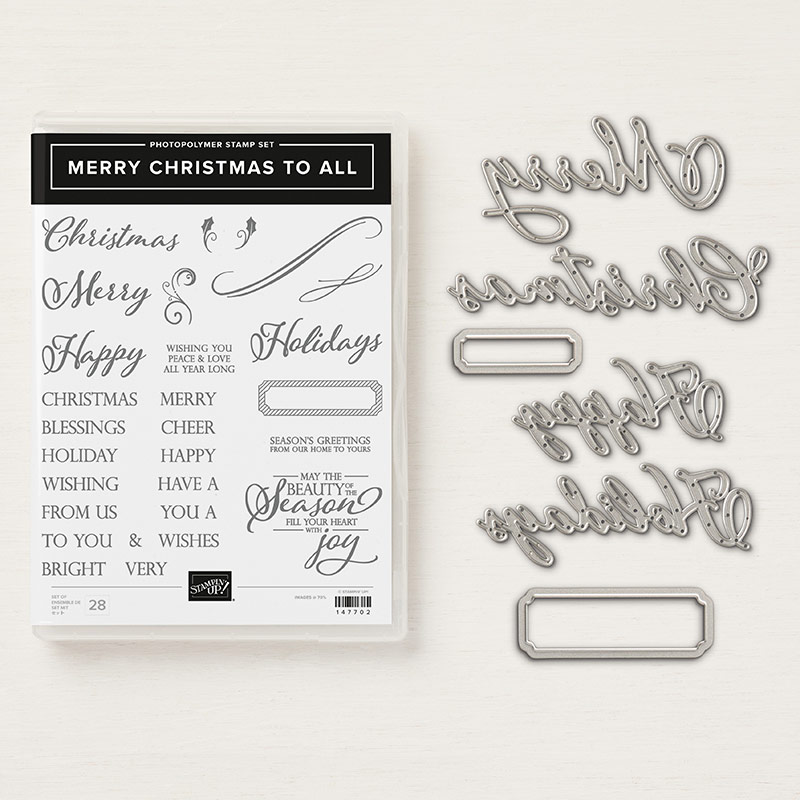
I used a traditional stamp set and Thinlits bundle – Merry Christmas to All.  This is a classic bundle that will stand the test of time and stay in my craft room for years to come.  I love that the Framelits include tag dies that fit perfectly around the word images.

I created the DYI ornament on this week’s Coffee & A Card Facebook Live.  I meet with everyone live each Wednesday morning at 11 am CST on my Facebook Page and we craft together.  Make sure you “Like” and “Follow” my page here so you don’t miss an episode.

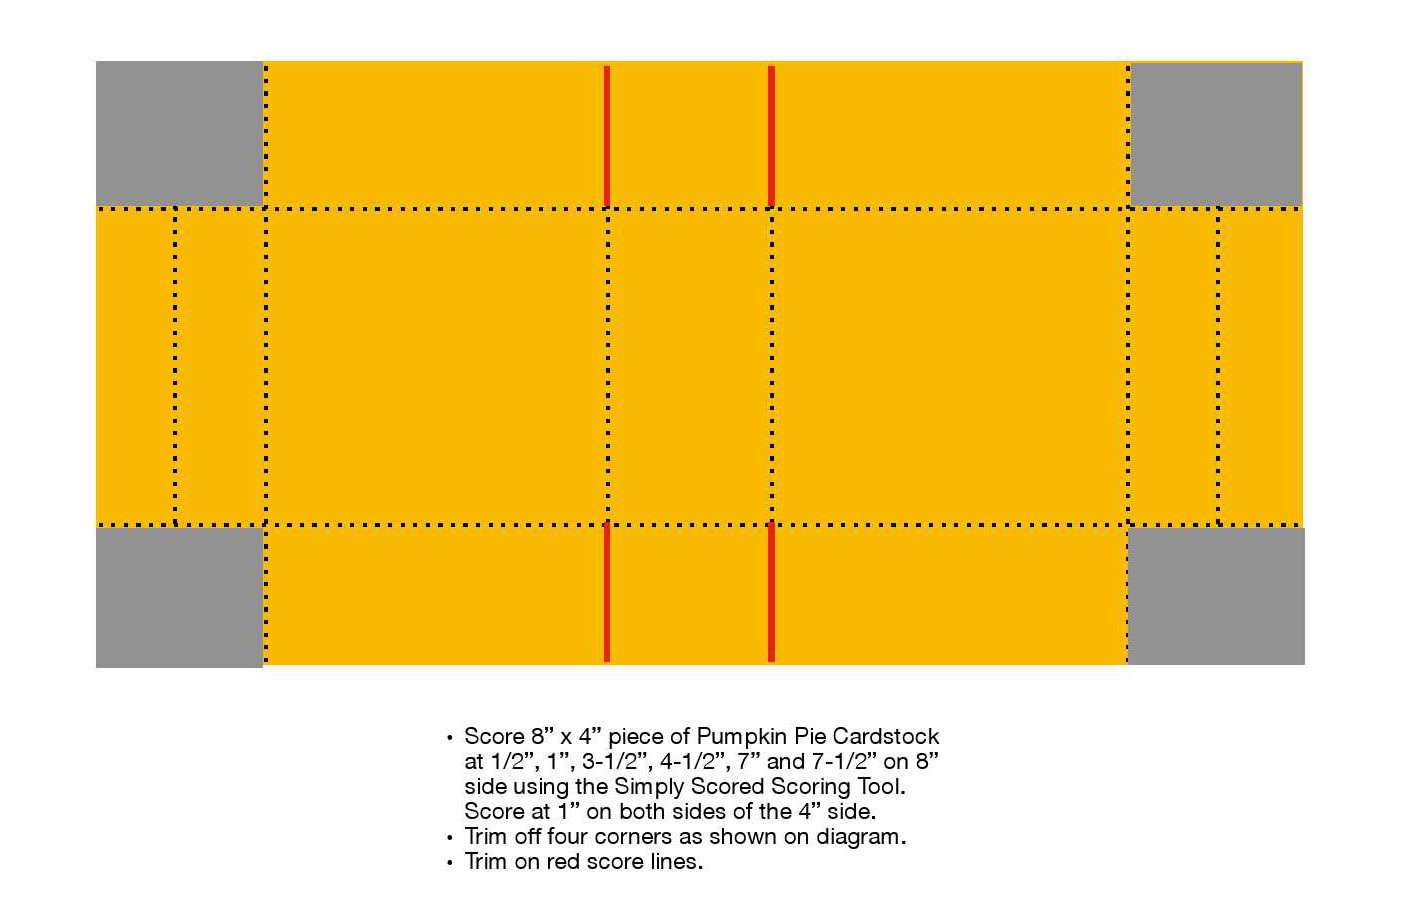
Here is an edited version of the video tutorial that includes all the dimensions:
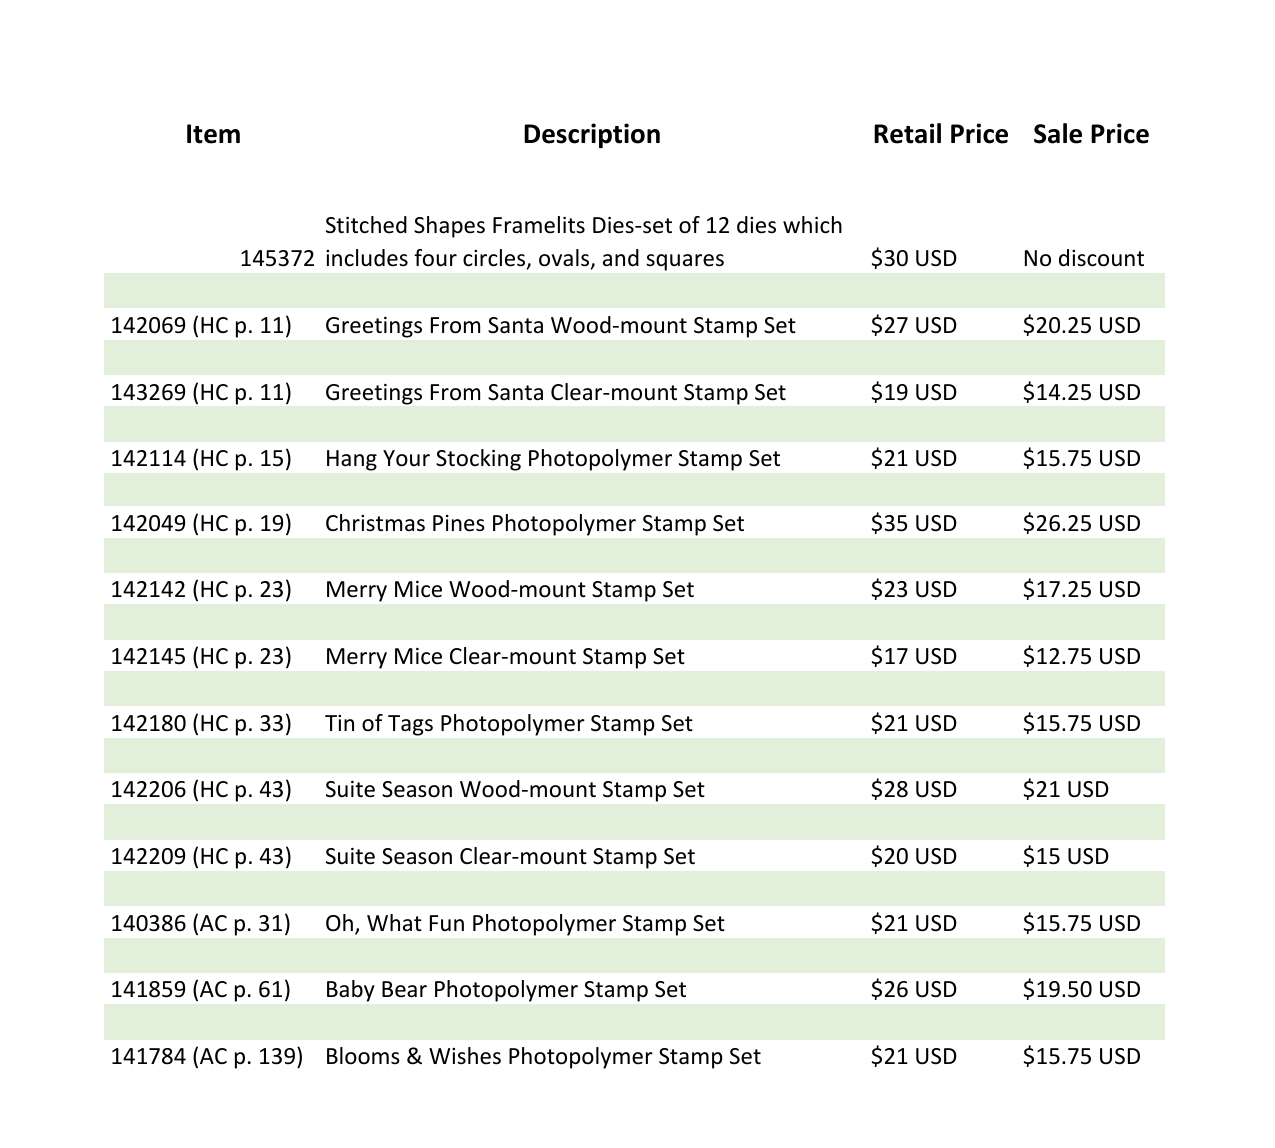
 

Product List

Signs of Santa Treat Bag

It is so much fun to surprise people with a little treat.  On Wednesday I made up some Halloween treat bags for four special trick-or-treaters in my life.

Aren’t they the cutest Storm Trooper, Elsa, Pink Power Ranger and Red Power Ranger you ever did see?  Here are the treat bags I put together for them using the Toil & Trouble Suite from Stampin’ Up!

These were so fun and easy to make that I wanted to share a tutorial creating a Christmas version.  I started with the Gusseted Cellophane Bags from Stampin’ Up! and embellished with products from the Santa’s Workshop Suite.

Project Dimensions

  • Santa’s Workshop Specialty Designer Series Paper = 2-7/8″ x 9″ scored at 1″, 3″ and 7-1/4″ on the 9″ side
  • Whisper White Card Stock = 2-1/2″ x 4″
  • Poppy Parade Card Stock = 3″ x 2″
  • Garden Green Card Stock = 3″ x 2″

Product List

Peaceful Noel Mini Gift Box

Today’s project is another version of the Spooky Sweets Treat Box I shared HERE.  This elegant little box would make the perfect table favors at your holiday meal.  It would also make a sweet hostess gift.  The box is so simple to assemble you could have several on-hand for those last minute holiday guests.

Metallics are very on-trend right now and the copper foil used in the Joyous Noel Suite by Stampin’ Up is spot on! I used Merry Merlot card stock for the box and adhered Joyous Noel Specialty Designer Series Paper to the front and back.  Then, to accent the copper foil in the Designer Series Paper, I punched two springs from the Joyous Noel Glimmer Paper using the Sprig Punch.  For the tag I stamped the sentiment with Merry Merlot ink onto the stitched circle and adhered it to a scallop circle cut from the glimmer paper.

To close the box, I tied a Snowflake Wire Element to the beautiful Merry Merlot & Copper 5/8″ Reversible Ribbon that I threaded through a hole punched in the box top.

I’m very happy with the results and think the box turned out beautifully!  Here is the video showing how to make the box ( prerecorded Facebook Live) and the Project Recipe with all the dimensions is posted below.

Project Recipe:

  • Merry Merlot Cardstock =  8″ x 4″ scored at 1/2″, 1″, 3-1/2″, 4-1/2″, 7″ and 7-1/2″ on the 8″ side.  Scored at 1″ on both sides of the 4″ side.
  • Joyous Noel Specialty Designer Series Paper = Two pieces 1-3/4″ x 2-1/4″ each
  • Joyous Noel 6″ x 6″ Glimmer Paper = 2″ x 2″ for the scallop circle, 3″ x 2″ for the sprigs
  • Crumb Cake Cardstock = 2″ x 2″

Product List

Hug in a Mug Christmas Note Card

The card I’m sharing in today’s post is a holiday themed thank-you card.  I sent these out to customers who placed orders with me in November.  Plaid is everywhere right now and the plaid pattern paper from the Christmas Around the World Designer Series paper collection from Stampin’ Up! is one of my favorites.

I used a die from the Popcorn Box Framelit Dies to create the sweet scallop edge and the Holly Builder Punch to create the Holly.  I wrapped a small length of Linen Thread around the Designer Series Paper and tied it up in a bow.  The Rhinestone Basic Jewels were colored with a Cherry Cobbler Stampin’ Blend Marker.

The sentiment comes from the Hug in a Mug stamp set.  While the set is great for a Christmas card, it is not specific to Christmas.   Hug in a Mug offers a lot of versatility and can be used all winter long for many occasions.


Product List

Stitched from the Heart

stitchframelit_demoheader_naNot only are stitches a classic trend, they illustrate the quality, precision, and extra care taken when creating a piece. Giving a stitched gift shows just how much you value that relationship. Beginning tomorrow, November 1st, Stampin’ Up! is giving us all the opportunity to purchase Stitched Shapes Framelits ahead of their official release in the 2017-2018 annual catalog and get 25% off coordinating stamp sets. With Stitched Shapes Framelits you can make paper stitches in seconds, turning any project into one that is stitched from the heart.

Get a sneak peek at some gorgeous holiday cards made using the new Stitched Shapes Framelits in this sweet video from Stampin’ Up! then check out the list of discounted stamp sets that will coordinate perfectly with them!

25% Off Select Stamp Sets:  (promotion ends 11/30/16)

16-nov-251ff-stamps_00032

Order Now Button_2-001

Wicked Good Wreaths

Changing up a few things around my home with the seasons is something I enjoy doing but without a lot of time I keep it simple.  One of the easiest ways to update home decor with the changing seasons is with wreaths. Take one down and replace with another – even I have time for that.  And  what is better than a beautiful home decor piece?  Saying, “I made that” to your family and friends!

The Fancy option In my Fun & Fancy Class yesterday was the Season to Season Wreath Project Kit.  I was a little worried that our class time would not be adequate to finish the wreath but it was surprisingly easy to put together and my guests left with completed wreaths.  Happy guests and a big sigh of relief from me!

The wreath is so pretty with a soft, vintage feel and will look great wherever I decide to place it.  The finished size is pretty substantial – about 15″.  And – bonus – it is good to go until New Year’s because of the three interchangeable banners; Halloween theme, Autumn/Thanksgiving theme and Christmas theme.  Mine is all decorated for Halloween and looks great hanging on the $5 wreath holder I made last Fall.  See instructions for that HERE

Holiday15_p06_b

The supplies to make your own Season to Season Wreath are:

Built for Free Using: My Stampin Blog

Another fun option for Halloween decorating is the Frightful Wreath Simply Created Kit. It is currently on the Clearance Rack while supplies last.  The coordinating stamp set is not available but the Happy Haunting sentiment from the Cheer All Year Stamp Set would substitute in great!

Frightful-Wreath-on-Stand

I would love to hear from you about your seasonal decorating!  Do you change it up a little or a lot or not at all?  Do you decorate for Halloween?  Leave a comment and let me know.  Thanks!


Cheer All Year – Really!

image

The card I’m sharing with you today was created by the Stampin’ Up! Creative Design Team.  It uses the Cheer All Year stamp set from the Stampin’ Up! Holiday Catalog and gives your projects some seasonal flair. At first look this is a holiday stamp set but as this card shows, you don’t have to put it away at the end of the year.  Just a simple “Hello” sentiment makes this a fun feathery card you can share all year long!  My favorite thing . . . the gold embossed feather tip!


image

Cheer All Year Stamp Set


Card Supplies:

Cheer All Year Stamp Set; Watermelon Wonder, Whisper White, and White Vellum Cardstock; Fancy Foil Designer Vellum; Basic Black Archival Stampin’ Pad; Watermelon Wonder Classic Stampin’ Pads; VersaMark Pad; Gold Stampin’ Emboss Powder; Gold Metallic Thread; Vintage Faceted Designer Buttons; Stampin’ Dimensionals; Banner Triple Punch; Big Shot; Lots of Labels Framelits Dies

Order Now Button_2-001


Twelve Weeks of Christmas Week 10

Cash-Envelope

The Plaid Poodles, Maggie and Sox, had a visit to the groomer yesterday.  Our dog groomer, Tammy, is wonderful to take whatever mess the dogs show up in and transform them into pretty little poodle like fancy!  And they smell terrific – for dogs!   I would post a photo if they would sit or stand still long enough to do so.

Because this was the Christmas visit I wanted to gift Tammy for her great service all year long.  I decided to create a gussied up envelope to tuck her tip in.  It turned out really cute and is perfect to tuck cash or gift cards into.  The envelope was so quick and easy to make that I created several for other hard-to-buy-for family (can someone say teenage nieces and nephews?).  Here’s the video tutorial with all the details:

Twelve Weeks of Christmas Week 9

Twelve-Days-of-Christmas-WK

Christmas is just twelve days away – gulp!  I am not ready.  I like to say, “Christmas comes ready or not”!  Sure we all want a perfect “Norman Rockwell” holiday but who defines what that is?  Define your own “perfect”.  Don’t kill yourself creating what you imagine a perfect Christmas to be.  Choose what’s important to you and go with that.  Let’s not stress over all the trappings of Christmas and remember the real reason we celebrate. Time is slipping by and Christmases spent together will become fewer and fewer so make the most of it.  Enjoy your family, dysfunction and all!  We won’t remember gifts given or received but we will remember with fondness the sweet times spent enjoying time with our loved ones.  Love each other and laugh together.

Talking about perfection . . . my Twelve Weeks of Christmas have not posted perfectly.  Technical difficulties, scheduling conflicts, blah, blah, blah.  In all honesty, I did not realize the challenge that this was going to become.  Thank you for sticking with me.  It is important to me that I follow through with my commitments and I plan on fulfilling my promise.  It may not have happened as I had planned or you expected but I hope you have enjoyed the series.  Your feedback would be most welcome!  Check back next week as I complete the Twelve Weeks of Christmas with Weeks 10, 11 and 12!

But first, let’s visit Week 9!  I am beginning to gift wrap the Christmas presents purchased thus far.  I created these simple little tags to top each gift.  They coordinate perfectly with the Stampin’ Up! Festive Designer Kraft Paper Rolls that I’m using for  my gift wrapping this year.  I kept it simple using the Tag Topper Scallop Punch.  The sweet little Joy Peace Love sentiment came from the Christmas Tagables photopolymer stamp set.


Product List

Order Now Button_2-001

Twelve Weeks of Christmas Week 8

12-WKS-of-Christmas-WK-8

Tag-a-Bag Gift Bag Gift Card Holder

By now most of us have the Christmas decorations up and have started purchasing presents for our friends and loved ones.  If you are anything like me you will be purchasing your fair share of gift cards.  Why not make the presentation of those gift cards a present in itself!  This gift card fits the bill.  It’s not only adorable but so simple to make using the Stampin’ Up! Polka Dot Tag-a-Bag Gift Bag.  The inspiration for it came from fellow Stampin’ Up! Demonstrator Krista Frattin.  I love the use of dainty accessories like the Tea Lace Paper Doily and Gold Sequin Trim paired with the practical paper bag and newsprint paper.  Very girlie girl and artisan!

The gift card holder is made by simply folding the Tag-a-Bag Gift Bag in half and adhering embellishments.  View my video tutorial for complete instructions:


Product List

Order Now Button_2-001

A Very Special Stampin’ Style Class

Invitations to eat, drink and be merry at the December Stampin’ Style Card Class were sent out and yesterday was the big day!  I wanted to celebrate all the special people who attend my classes all thru the year so we included a soup and salad lunch and turned December’s class into a party!  I tried a new soup recipe and it was a hit.  Several ladies requested the recipe so I thought I would share it here in case you might want to try it.  The recipe makes a larger quantity and is a snap to make.  I made it in the morning and kept it warm in my slow cooker until the party.

Cream of Chicken and Wild Rice Soup

1 pkg. Uncle Ben’s Original Long Grain & Wild Rice
1 pkg. Lipton’s Chicken Noodle Soup
1/4 c chopped onion
1/4 c chopped celery
1 carrot, chopped
3 cans low-sodium (or heart healthy) cream of chicken soup
1 large can chicken (I used rotisserie chicken)

Bring 8 cups of water to boil.  Add rice with seasonings, noodle soup, onion, celery and carrot.  Cook for 10 minutes or until rice is tender.  Stir in cream of chicken soup and chicken  and warm thoroughly.


 Party Favors

You can’t have a party without party favors so I whipped up cute little candy cane holders and placed one on the table at each guest’s place setting.  The inspiration for the candy cane holders came from fellow Stampin’ Up! Demonstrator Sam Donald.   And although I could never repay the blessing that my customers turned friends have become to me, I wanted them to have a small token of my appreciation so I made packages of mini Christmas note cards to take home.

Candy-Cane-Holders Christmas-Note-Cards


Christmas-Note-Cards-2


Photos from A Very Special Card Class

DEC-14-SS-Class Photos-001

Love these awesome women!  So great to take a few hours each month for ourselves and laugh, solve world problems (lol) and of course STAMP!  If you are in the Kansas City area we would invite you to join us.  Check my Stampin’ Up! website under Events for future dates HERE.


Twelve Weeks of Christmas Week 7

Happy-Wonderful-Christmas-C

It’s a Wonderful Life comes to mind when I look at this card.  The gold embossing on the edges imitate gold leaf and the sentiment from the Wondrous Wreath stamp set is out of the ordinary.  A little old fashioned in a good way.  Not to mention the sparkle of cherry cobbler rhinestones!  It’s what I call a “fancy” card.  Formal and dainty with a richness that takes you back to the high quality of times past.  Pure vintage.  You can almost hear an angel earning it’s wings!

Happy-Wonderful-Christmas-2

Here’s the video on how I made this card.


Dimensions:  Basic Black card stock 8-1/2″ x 5-1/2″ scored at 4-1/4″ for card base, Cherry Cobbler card stock 4″ x 5-1/4″, Typeset Designer Series Paper 3-3/4″ x 5″


Product List


Order Now Button_2-001

Twelve Weeks of Christmas Week 6

Back in the day, that time my sister married a Canadian, we celebrated our first Canadian Christmas. Our holiday dinner table was lovely and at each guest’s place setting was an adorable Christmas cracker. Nowadays Christmas crackers are everywhere because . . . you know . . . American consumerism, but back then they weren’t so obvious.  My family had the delight that Christmas of cracking open our very first Christmas crackers! Guess what? I didn’t realize that they actually “crack” when opened – there was smoke involved people! Great hilarity ensued and I believe my brother-in-law wore his crown for the remainder of the meal which may just be another Old English tradition that I am unaware of.

It is a sweet tradition for so many reasons and I always admire those paper party poppers when they catch my eye.  So after hearing somewhere (Pinterest?) that making Christmas crackers with the Stampin’ Up! Envelope Punch Board  is a snap I decided to give it a go.  Here are a few different versions that I whipped together in no time.  Check out my video tutorial and see for yourself just how easy-peasy they are!

Christmas-Crackers


Description:  Designer Series Paper measures 4-1/2″ x 6-1/2″ –  Scored on long edge (landscape) at 1″, 1-1/2″, 2″, 4-1/2″, 5″, 5-1/2″ then scored on short edge (portrait) at 1″, 2″, 3″ and 4″


Twelve Weeks of Christmas Week 5

Twelve Weeks of Christmas Week 5

I know, I know, I know!   I’m very behind in my Twelve Weeks of Christmas series!  I hope you will forgive me.  My goal was to include a video for each post of the series and well, to be honest, video technology is not a big talent of mine.  I am learning however and have decided that perhaps a new video camera would be helpful.  I’m sure it’s the equipment and not me, right?   We’ll see.  In the meantime thank you for your patience and I hope you enjoy the video tutorial for this sweet little card!

12-WKS-of-Christmas-WK-5

Project Details:

Stamps:  Endless Wishes 136829, Bright & Beautiful 135026 (w) 135029 (c)

Ink:  Lost Lagoon 133644, VersaMark 102283

Card Stock:  Smoky Slate 131202 (8-1/2″ x 5-1/2″), Soft Sky 131203 (4″ x 5-1/4″), Whisper White 100730 (4″ x 4″)

Accessories:  All Is Calm Designer Washi Tape 135844, Silver Embossing Powder 109131, Embossing Buddy 103083, Heat Tool 129053, Stars Framelits 133723, Big Shot Die-Cutting Machine 113439, Rhinestone Basic Jewels 119246, 104430 Stampin’ Dimensionals


Order Now Button_2-001

12 Weeks of Christmas – Week Three!!!

Gift Box Punch Board

This week’s project was made using the Stampin’ Up! Gift Box Punch Board.  It’s a fun element to add to holiday packaging, creating containers just right for that special gift.  Create boxes up to 4-inch square.  The sizing chart and instructions are even printed on the board making it a sinch to use!  View the video at the end of this post for a live demonstration of this nifty gadget! 

12-WKS-Christmas---WK-3

Aren’t these gift boxes cute?  They are the smallest measuring 1-3/4″ square.   I used a 6 x 6-inch piece of Old Olive Cardstock for the box and a scrap of Red Glimmer Paper and Whisper White Cardstock for the tag.  The Merry Christmas sentiment is from the Petite Pairs Stamp Set and was stamped using Cherry Cobbler Ink.  The box is tied together using 1/8″ Taffeta Ribbon in Old Olive.  I used the 1-1/4″ Scallop Circle Punch and the 1-3/4″ Scallop Circle Punch for the tag and used Stampin’ Dimensionals to assemble the tag and adhere it to the box.  View the video below for a full tutorial on how I assembled the boxes using the Gift Box Punch Board.


Order Now Button_2-001