Holidays

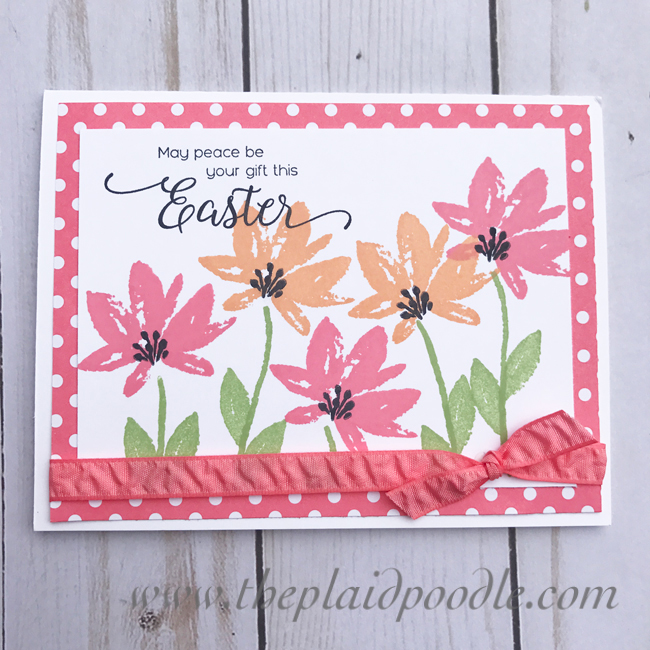
Spooky Sweets Treat Box

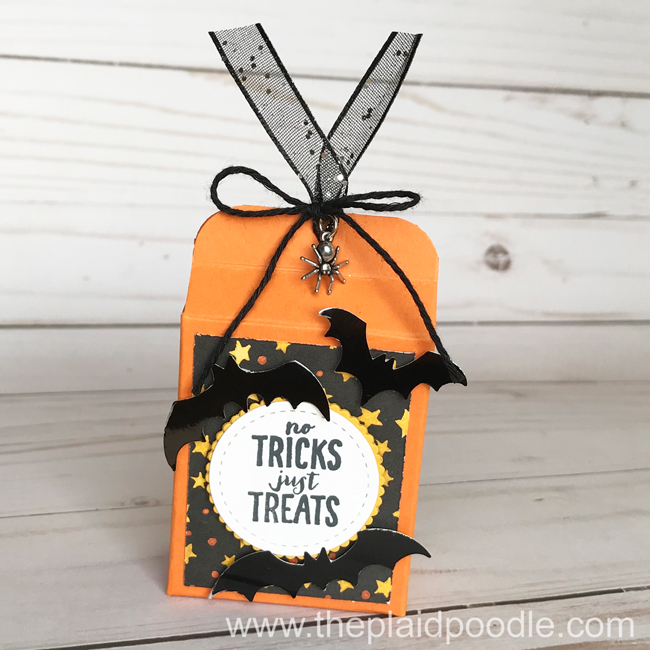
Halloween is literally the sweetest time of year and this delightful little box makes sharing all the sweets, treats and candy so much fun!  It’s ideal for classroom favors and all those special Trick-or-Treaters in your life.  My favorite thing about this project?  That itsy bitsy spider trinket!

The box itself is simple to make and requires just a couple basic tools.  Once the box is assembled, the limit is your imagination as to how you embellish it.  I kept it simple by using the Spooky Sweets stamp set and coordinating Spooky Bats Punch (when you purchase the two in a bundle there is a 10% savings).   Learn how to make this box by watching the video below.


Project Recipe:

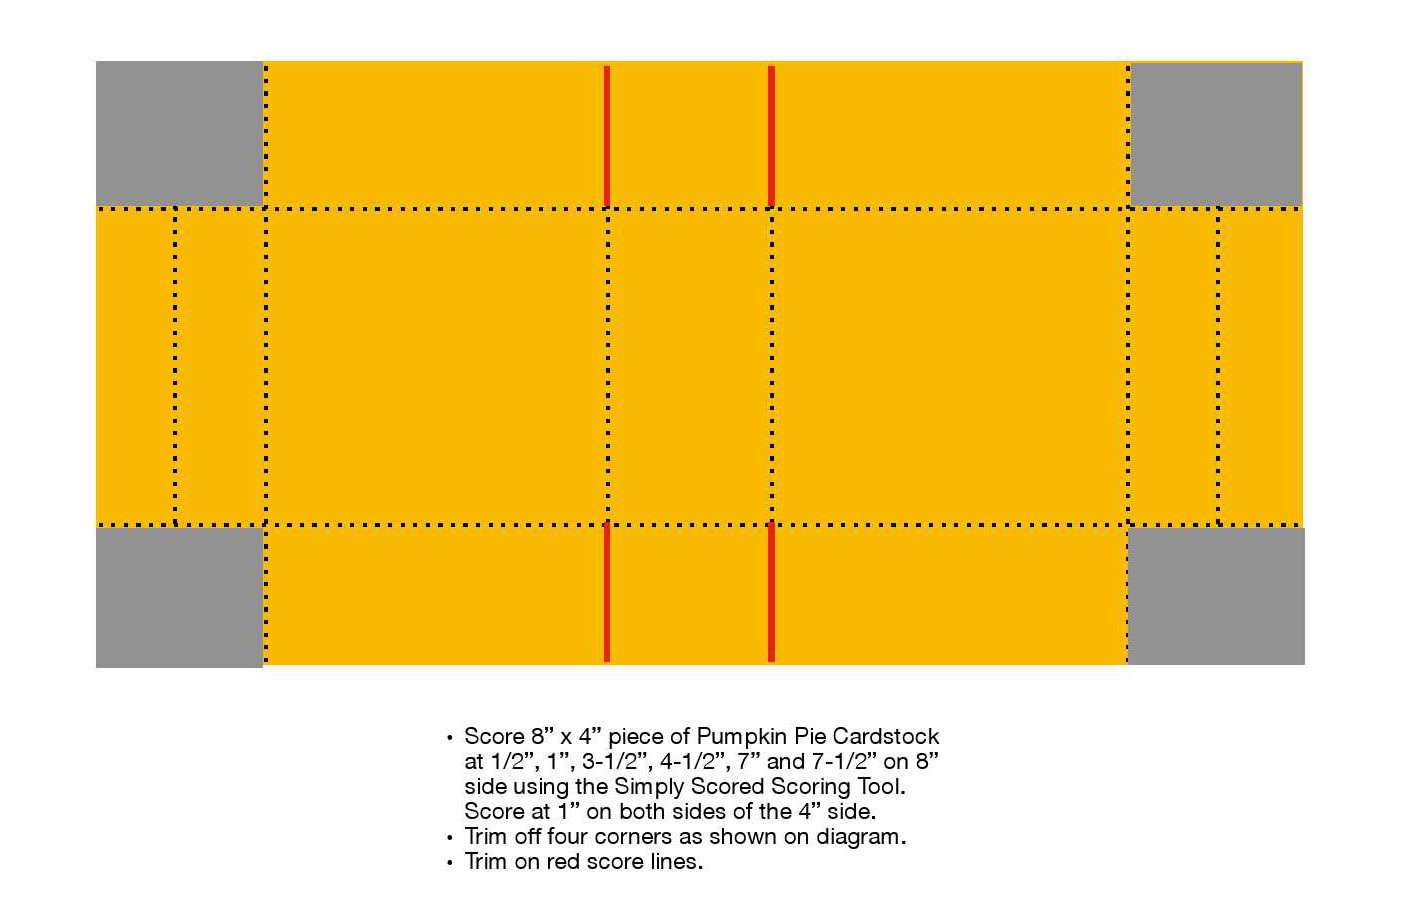
  • Pumpkin Pie Cardstock =  8″ x 4″ scored at 1/2″, 1″, 3-1/2″, 4-1/2″, 7″ and 7-1/2″ on the 8″ side.  Scored at 1″ on both sides of the 4″ side.
  • Toil & Trouble Designer Series Paper = 1-3/4″ x 2-1/4″
  • Crushed Curry Cardstock = 2″ x 2″
  • Whisper White Cardstock = 2″ x 2″
  • Black Foil Sheets = 3-1/4″ x 2-1/4″

Product List

Scoring Diagram

Hug in a Mug Christmas Note Card

The card I’m sharing in today’s post is a holiday themed thank-you card.  I sent these out to customers who placed orders with me in November.  Plaid is everywhere right now and the plaid pattern paper from the Christmas Around the World Designer Series paper collection from Stampin’ Up! is one of my favorites.

I used a die from the Popcorn Box Framelit Dies to create the sweet scallop edge and the Holly Builder Punch to create the Holly.  I wrapped a small length of Linen Thread around the Designer Series Paper and tied it up in a bow.  The Rhinestone Basic Jewels were colored with a Cherry Cobbler Stampin’ Blend Marker.

The sentiment comes from the Hug in a Mug stamp set.  While the set is great for a Christmas card, it is not specific to Christmas.   Hug in a Mug offers a lot of versatility and can be used all winter long for many occasions.


Product List

My Hero Matchbook Treat Holder

Today’s project is a quick and easy treat holder perfect for Easter giving. A snap to reproduce, you can make four of these cute little favors out of one 8-1/2″ x 11″ piece of card stock.

 Project Recipe:

  • Score 7-1/2″ x 2-1/2″ piece of Melon Mambo card stock on the 7-1/2″ side at 3/4″, 4-1/4″ and 4-1/2″ using the Simply Scored Tool.  Fold on score lines and burnish with the Bone Folder.
  • Adhere 2-3/4″ x 2-1/4″ and 2-1/4″ x 1/2″ pieces of Designer Series Paper onto matchbook cover using adhesive.
  • Cut square from 2-1/2″ x 2-1/2″ piece of Melon Mambo card stock using die from the Layering Squares Framelits using the Big Shot.
  • Stamp sentiment onto 2″ x 2″ piece of Whisper White card stock with Melon Mambo ink.  Cut out with die from the Stitched Shapes Framelits using the Big Shot.  Adhere to Melon Mambo square.  Adhere completed tag to matchbook using Stampin’ Dimensionals.
  • Staple candy inside matchbook.  Tie a bow with Melon Mambo 1/8″ stitched ribbon then adhere over staple using a Glue Dot.

Product List

Save

Stampin’ Up Avant Garden Easter Card

During the Stampin’ Up! Sale-A-Bration period, you get a FREE item of your choice for every $50 you spend (before shipping and tax).  It doesn’t get better than FREE, so with just a little over two weeks left for Sale-A-Bration I’ve been playing with products I have earned for FREE during this awesome promotion.

Today’s Easter card was stamped with the Avant Garden stamp set using Peekaboo Peach and Flirty Flamingo inks and coordinating Designer Series Paper.  The sweet ruched ribbon in coordinating Flirty Flamingo ties everything together.  I have a quick tip in the project video that shows how to get that perfect little flat knot in the ribbon

During Sale-A-Bration, you have not just one, but three ways to earn FREE products!  Shop to earn Sale-A-Bration items, join to get additional free product in your Starter Kit, or host to get more products with Stampin’ Rewards!  Read all about it and view the fabulous FREE products you can earn during Sale-A-Bration by clicking on the brochure images below.

Avant Garden Easter Card Recipe:


Dimensions:

Card Base: 8-1/2” x 5-1/2” piece of Thick Whisper White Card stock scored at 4-1/4”, 2016-2018 In-Color Designer Series Paper Stack: 4” x 5-1/4”, Whisper White Cardstock: 4-3/4” x 3-1/4”
Product List

Glue Dots

$5.25


Stampin’ Up! Online Extravaganza!

16-nov-celebrate-the-holidasy

Online Extravaganza!

November 21-28!

Discounts and a GIFT** from me!

Don’t Miss On-Line Extravaganza!
Black Friday starts early with Online Extravaganza happening November 21-28! Who could resist savings up to 40% and 24-hour sales with new products on the first and last day of this event? With the holiday season in full swing everyone could use a little help checking a few things off their gift list. And you don’t even have to leave the house!
Shop the Extravaganza as well as the Stampin’ Up! catalogs AND the Clearance Rack for deep discounts.
16-nov-extravaganza-button**Everyone who places an order of at least $35 through me or through my store and uses the Hostess Code AX3APGP6 at check-out will receive a pack of Gold Basic Metal Button embellishments from me.  (If your order totals $150 or more do not use this Hostess Code – you will automatically receive your gift along with Hostess Benefits.)
16-nov-store-button

Stitched from the Heart

stitchframelit_demoheader_naNot only are stitches a classic trend, they illustrate the quality, precision, and extra care taken when creating a piece. Giving a stitched gift shows just how much you value that relationship. Beginning tomorrow, November 1st, Stampin’ Up! is giving us all the opportunity to purchase Stitched Shapes Framelits ahead of their official release in the 2017-2018 annual catalog and get 25% off coordinating stamp sets. With Stitched Shapes Framelits you can make paper stitches in seconds, turning any project into one that is stitched from the heart.

Get a sneak peek at some gorgeous holiday cards made using the new Stitched Shapes Framelits in this sweet video from Stampin’ Up! then check out the list of discounted stamp sets that will coordinate perfectly with them!

25% Off Select Stamp Sets:  (promotion ends 11/30/16)

16-nov-251ff-stamps_00032

Order Now Button_2-001

Totally Trees Card

You are, like totally, going to like this card!

I’m jumping out of my creative box with the card I’m featuring today.  Believe me it wasn’t easy and it took someone else to get me there!  I totally copied my Totally Trees card today from another totally awesome Stampin’ Up! Demonstrator, Mary Brown.  I would have never thought to put the colors she used in her card together and the result is amazing!  We made this card in my Fun & Fancy Card Classes this month and it received the most votes for “favorite card”.

16-oct-totally-trees-cardThe card has so much going on but it does not overwhelm.  First of all there are five different colors; some subtle, some bright and some regal, but they all work together.  The wood grain embossed background adds texture and the ribbon adds a little bling and shine to the card.  Not to mention the Totally Trees stamp set which has a pretty artsy, modern feel.  It’s bright and fresh and the kind of card that puts a smile on your face when you see it!

Enjoy the video!  The card dimensions and list of products used are below.

Project Dimensions:

  • Soft Sky Card Stock 8-1/2″ x 5-1/2″ scored at 4-1/4″, 4″ x 5-1/4″
  • Rich Razzleberry Card Stock 4-5/8″ x 2-7/8″
  • Whisper White Card Stock 2-3/4″ x 4-1/2″, 4″ x 5-1/4″ (for inside card)

Product List

Totally Trees Photopolymer Stamp Set

$26.00

Basic Black Archival Stampin’ Pad

$7.00

Wild Wasabi Classic Stampin' Pad

$6.50

Sweet Sugarplum Classic Stampin' Pad

$6.50

Pear Pizzazz Classic Stampin' Pad

$6.50

Pool Party Classic Stampin' Pad

$6.50

Soft Sky 8-1/2" X 11" Card Stock

$8.00

Rich Razzleberry 8-1/2" X 11" Card Stock

$8.00

Whisper White 8-1/2" X 11" Card Stock

$9.00

Woodgrain Textured Impressions Embossing Folder

$7.50

Big Shot

$110.00

3/8" (1 Cm) Glitter Ribbon Combo Pack

$6.00

Stampin' Pierce Mat

$5.00

Order Now Button_2-001

Paisleys & Posies Card

The project I’m sharing today is the second in my three-part autumn-themed series.  This card is super simple to make but looks anything but.  With the rich, autumn hued colors and the copper embossed sentiment it’s a classy little card.  I used several products from the Stampin Up! Petals & Paisleys suite featured in the 2016 Holiday Catalog.

I’ve said it before and I’ll say it again, Stampin’ Up! really takes the guess work out of coordinating elements for my paper crafting projects.  The problem of gathering pieces for a project that will look great together is handled for me and that rings true for this card.  It took me minutes to design the card and not much more to put it together from start to finish.

I chose to pull out one of the colors from the Petals & Paisleys Designer Series Paper and used Night of Navy for the card base, scallop circle and die-cut flourish.  To take the card up a notch on the fancy scale I used the Delightful Dijon ribbon from the 3/8″ Ribbon Trio Pack and heat embossed the sentiment using Copper Stampin’ Emboss Powder.

Enjoy the video and don’t forget to check out card #1 in the series HERE and return on Wednesday for the third card in my Autumn-themed series.

Project Dimensions

  • Night of Navy Cardstock:  8-1/2″ x 5-1/2″, 3-1/4″ x 2-1/4″, scrap
  • Petals & Paisleys Specialty Designer Series Paper:  5-1/2″ x 2″
  • Very Vanilla Cardstock:  3-1/4″ x 2-1/4″, 4″ x 5-1/4″

Product List

Big Shot

$110.00

Heat Tool

$30.00

Glue Dots

$5.25

Order Now Button_2-001

Vintage Leaves Card

It was bound to happen and it happened today.  I was forced to turn the furnace on.  Yep, just after firing up the Kuerig this morning I moseyed over to the thermostat and cranked that baby on!  It’s official, Autumn is here.

How appropriate that my card for today’s post just happens to be the first in my three-part series of Autumn-themed cards.  The sentiment comes from the Flourishing Phrases stamp set by Stampin’ Up!  I created it for a sympathy card but it would work for just about any occasion by changing up the sentiment and the Flourishing Phrases set covers most of them.

vintage-leaves-card The maple leaf image from the Vintage Leaves stamp set takes center stage for this card.  I added texture and dimension to the Crushed Curry pennant by running it through the Big Shot using the Woodgrain Textured Impressions Embossing Folder and popped it up on the card with Stampin’ Dimensionals.  The 5/8″ Burlap Ribbon and Linen Thread add even more texture.

Enjoy the video tutorial and don’t forget to check back on Monday for card number two in my Autumn-Themed series.

Project Dimensions:

  • Early Espresso Card Stock:  8-1/2″ x 5-1/2″ scored at 4-1/4″
  • Very Vanilla Card Stock:  2 pieces 5-1/4″ x 4″ each, 3-1/2″ x 3-1/2″
  • Crushed Curry Card Stock:  3-1/2″ x 1/2″

Product List

Big Shot

$110.00

Linen Thread

$4.50

Order Now Button_2-001

Acorny Thank You Treat Holder

When someone places an order with me I like to show my appreciation with a handmade card but every once-in-a-while I surprise them with a little something more.  In September I created these Autumn-themed treat holders for an event and loved them so much that I made up extras to slip in with my client’s orders.  These adorable bags could be filled with any kind of small candy but the stamp set I used is named Acorny Thank You so you know it had to be candy corn!


16-oct-acorny-thank-you-treat-bagAren’t they sweet?  They are quick and easy to make so I’ll be making up several to have on hand for many different events this fall.  They would be great to tuck in with a tip to hair dresser, manicurist and dog groomer as well as hostess gifts and table favors.

Here is a video tutorial for the Acorny Thank You Treat Holders and a full list of products used are listed below.


Product List

Linen Thread

$4.50

Glue Dots

$5.25


As an Independent Stampin’ Up! Demonstrator I’m here to be your creative coach, give you fun project ideas, share special offers, and, of course, teach you about fantastic stamping products. If you don’t already have a Demonstrator I would love to be yours. Contact me today at Leslie@theplaidpoodle.com

Order Now Button_2-001

Totally Trees

16-sep-just-trees-notecardSomeone needs to alert Mother Nature that tomorrow is the first day of fall because it was 94 degrees in Kansas City today! Add the heat index to that and I think it was something link a jilllion and ten outside!  Don’t get me wrong; I dearly love summer, especially after a long grueling winter, but fall must be my spirit season because a perfect day to me is a sunny, 72 degree day with ZERO percent humidity!  I hope I don’t offend, but humidity has to be from the devil!

My card today however doesn’t care what temperature it is outside.  It’s just busting with autumnal mood and color!  I used the Stampin’ Up! Totally Trees stamp set to create this card along with the Chocolate Chip, Delightful Dijon and Cajon Craze inks.  The inspiration behind this card was the little scrap of Petals and Paisleys Specialty Designer Series Paper.  I absolutely love that paper and only had a few snippets left so I used the left-over scraps to whip up a few of these adorable note cards.

Here’s a quick video tutorial for the card.  If you enjoy it why not slip over to Youtube land HERE and leave a comment?  While you’re there make sure to subscribe to my channel to receive upcoming videos.  Thanks!

Cardstock Dimensions:

        • Very Vanilla 5″ x 7″ scored at 3-1/2″, 3-3/4″ x 2-1/2″
        • Mint Macaron 3-1/4″ x 4-3/4″
        • Petals & Paisleys Specialty Designer Series Paper 3-1/4″ x 1-1/2″
        • Delightful Dijon 3-3/4″ x 2-1/2″


Product List

Big Shot

$110.00

Glue Dots

$5.25

Floral Wings Easter Basket

16-MAR-Floral-Wings-Easter-BasketWe will be hosting 10 for Easter dinner this Sunday and I have been busy this week preparing.  One of my favorite things to do for holiday dinners is to set a fun table and this Easter I wanted to place a basket filled with sweets at each place setting.  My time is short so I needed something quick and easy and came up with these cuties.  I’m really happy with how they turned out and think they scream, “Spring is finally here!”.   They would also make great favors for all the upcoming Spring events; baby showers, bridal showers, May Day, and Mother’s Day to name a few.

I was able to make three baskets from one sheet of 12″ x 12″ Designer Series Paper and they were super simple to put together.  The basket is made from a piece of 6″ x 6″ Designer Series Paper and the handle is a 6″ x 3/4″ piece of Designer Series Paper.  I used a 4″ x 3″ piece of Whisper White card stock to stamp the butterfly image onto and the lacy butterfly was cut from a 2-1/2″ x 2″ piece of Vellum.  Here is a video I created to show you how the baskets are made.  Enjoy!


Product List

Big Shot

$110.00

Glue Dots

$5.25


Order Now Button_2-001

Bloomin’ Love

IMG_1375

So it’s no secret that the majority of us are smack-dab in the middle of a very long, dark and cold winter.  I’m literally huddled over my space heater as I type this post.  There is certainly not a bud or bloom in sight so why not distract ourselves from the harshness of it all and let a little love bloom?

Romantic love is nice if you can get it but I’m thinking more along the lines of being a kinder, gentler people.  I’m suggesting we throw a little Bloomin’ Love around.

My Bloomin’ Love project tutorial today is perfect for that purpose.  What better way to put a smile on someone’s face than with a pretty box that’s filled with chocolate?  Who wouldn’t love receiving one of these cute little favors?  Sneak them onto your co-workers’ desks, tuck them into a friend’s purse when she’s not looking, leave one in the mailbox for your letter carrier or set them at each place-setting during your family meal.

Check out the video tutorial below and let me know if you make any and how you used them to brighten someone’s day!

Click on any of the images below to purchase the products used in this tutorial.

Wicked Good Wreaths

Changing up a few things around my home with the seasons is something I enjoy doing but without a lot of time I keep it simple.  One of the easiest ways to update home decor with the changing seasons is with wreaths. Take one down and replace with another – even I have time for that.  And  what is better than a beautiful home decor piece?  Saying, “I made that” to your family and friends!

The Fancy option In my Fun & Fancy Class yesterday was the Season to Season Wreath Project Kit.  I was a little worried that our class time would not be adequate to finish the wreath but it was surprisingly easy to put together and my guests left with completed wreaths.  Happy guests and a big sigh of relief from me!

The wreath is so pretty with a soft, vintage feel and will look great wherever I decide to place it.  The finished size is pretty substantial – about 15″.  And – bonus – it is good to go until New Year’s because of the three interchangeable banners; Halloween theme, Autumn/Thanksgiving theme and Christmas theme.  Mine is all decorated for Halloween and looks great hanging on the $5 wreath holder I made last Fall.  See instructions for that HERE

Holiday15_p06_b

The supplies to make your own Season to Season Wreath are:

Built for Free Using: My Stampin Blog

Another fun option for Halloween decorating is the Frightful Wreath Simply Created Kit. It is currently on the Clearance Rack while supplies last.  The coordinating stamp set is not available but the Happy Haunting sentiment from the Cheer All Year Stamp Set would substitute in great!

Frightful-Wreath-on-Stand

I would love to hear from you about your seasonal decorating!  Do you change it up a little or a lot or not at all?  Do you decorate for Halloween?  Leave a comment and let me know.  Thanks!


A Lovely Thank-You

10-15-Front-Portch-Mums

It’s starting to get chilly here in my part of the world and feeling like Fall.  The cooler weather put me in the mood to plant some mums in my front porch pots and I even bought a pumpkin to plop in the middle of them.  I love the deep, rich colors of fall don’t you?

Just like red and green say, “Christmas” the deeper yellows, oranges and reds say, “Autumn”.  Today’s card uses those colors along with some rustic elements making it a great card to send this time of year.  I used the thank-you sentiment from the A Whole Lot of Lovely stamp set but by changing up the sentiment this card would work for any occasion.  It’s also a very neutral card that any man or woman would enjoy receiving.

My favorite parts of this card are the Designer Series Paper – it’s from the Season of Cheer Designer Series Paper collection, a Christmas paper – always love products that do double duty.  Also can’t stand how cute that little wooden acorn is!

10-15-A-Whole-Lot-of-LovelyIf you would like to receive a free full-color project sheet for this project sign up for my mailing list and I’ll get one off to you.  In the mean time here is the list of supplies I used:

Built for Free Using: My Stampin Blog