Latest Posts

Birds & Branches Slimline Card

Slimline cards are a new trend in card making and I thought I would try my hand at it. I thought a bird nest balancing on a branch up in the sky would make a great slimline card. The Birds & Branches Bundle from Stampin’ Up! was perfect for what I had in mind.

I started with a 8-7/8″ x 7-3/4″ piece of Thick Whisper White card stock folded in half to form the card base. The dimensions I chose will allow the card to fit into a #10 business size envelope.

I used the Birds & Branches Bundle from Stampin’ Up! Don’t you just love the sweet little birds and their cozy nest?

Did you notice the stitched outline on the stamped layer on the card? Did you wonder how in the heck I was able to create a stitched rectangle perfectly sized for this slimline card? If so, you’re in luck because here is a video tutorial that shows how to extend your square and rectangle dies.

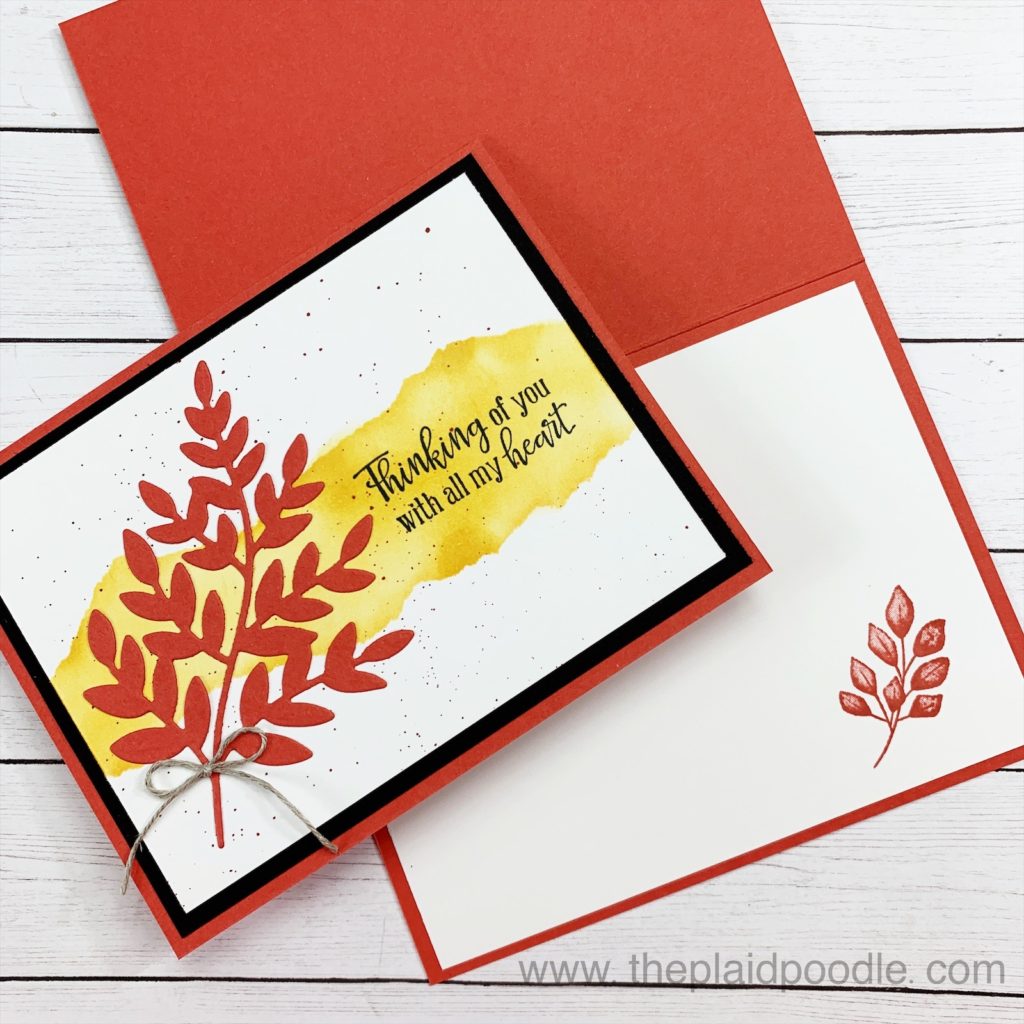
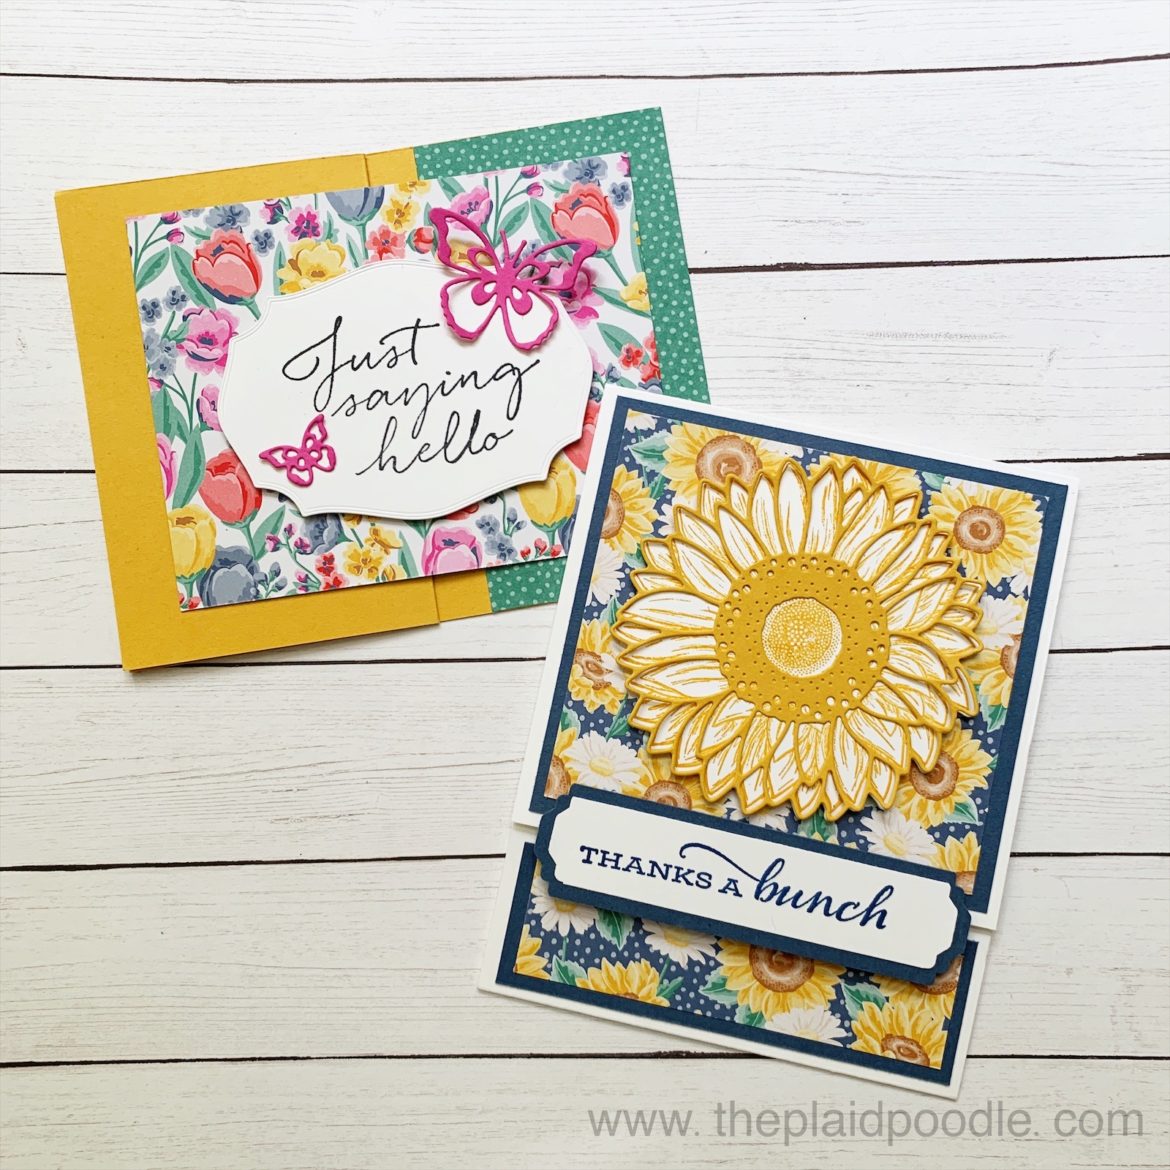
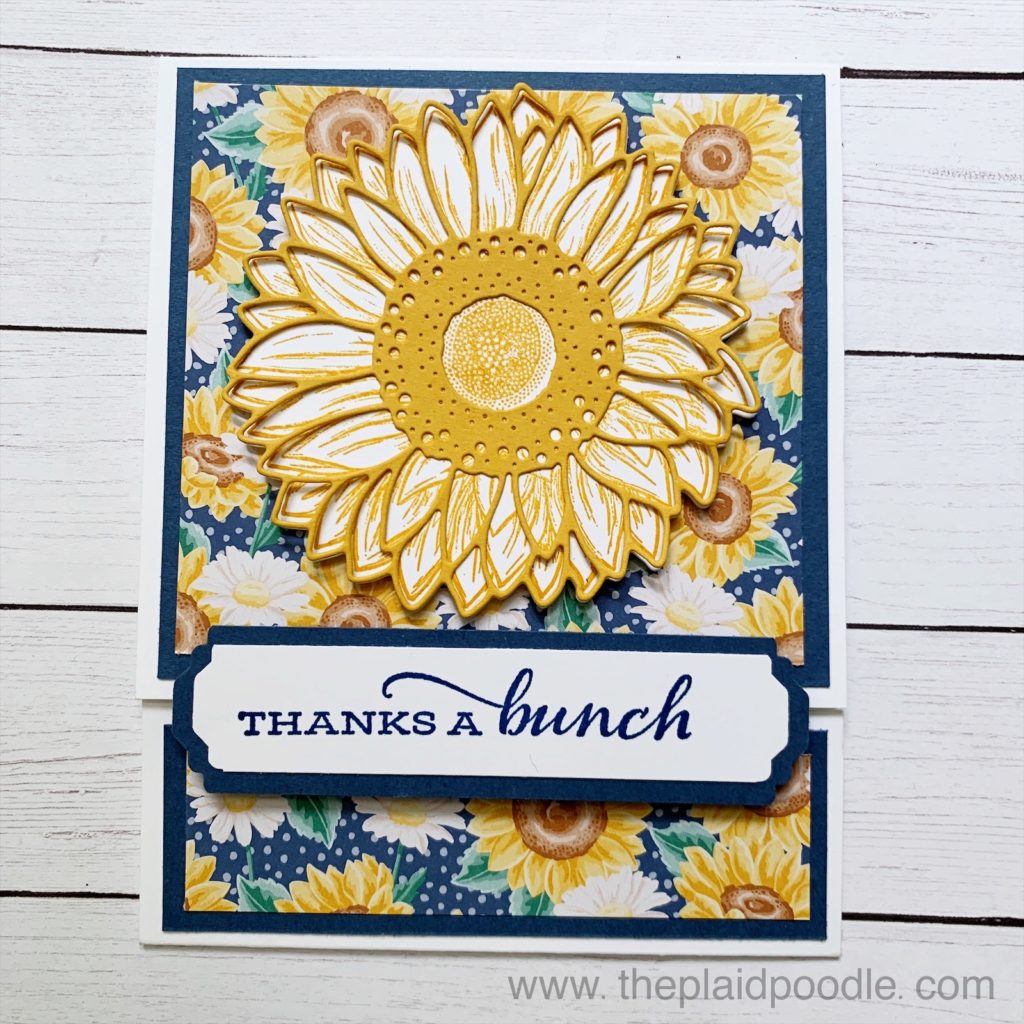
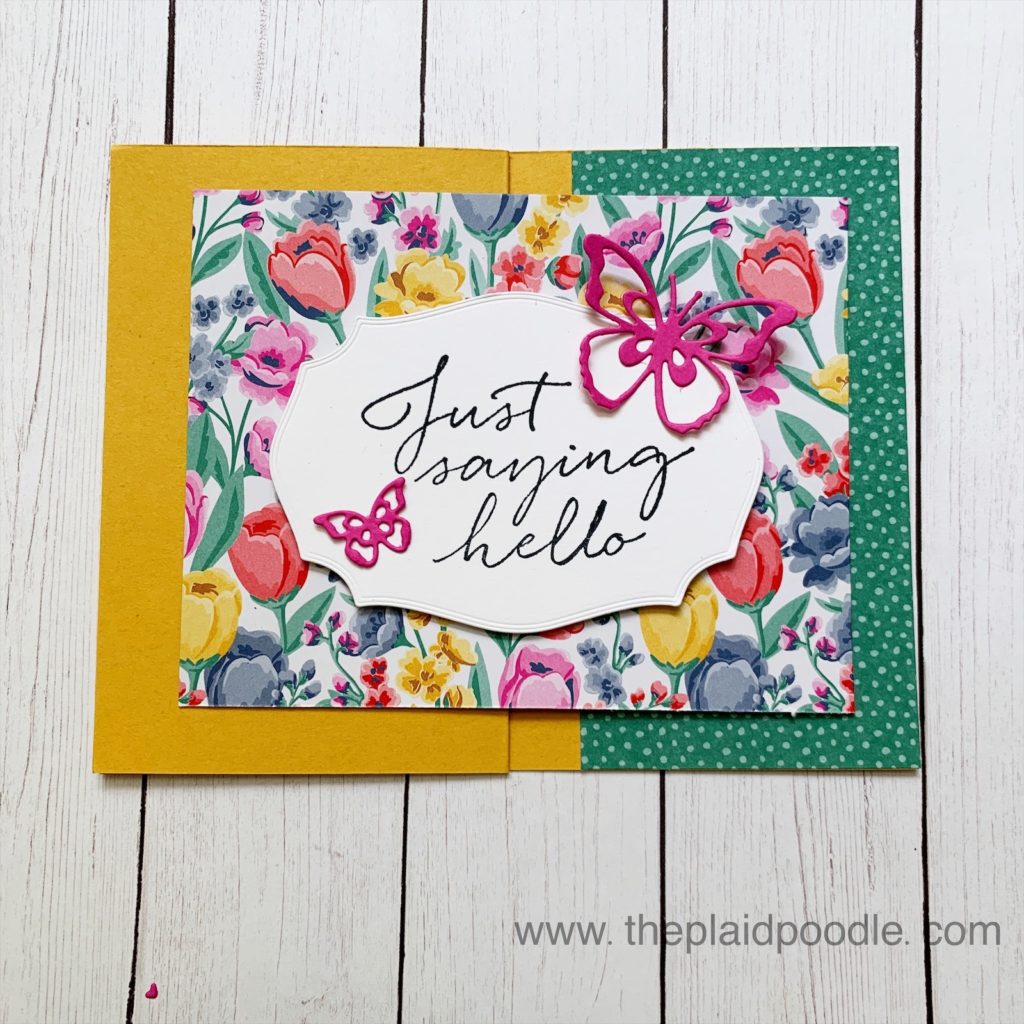
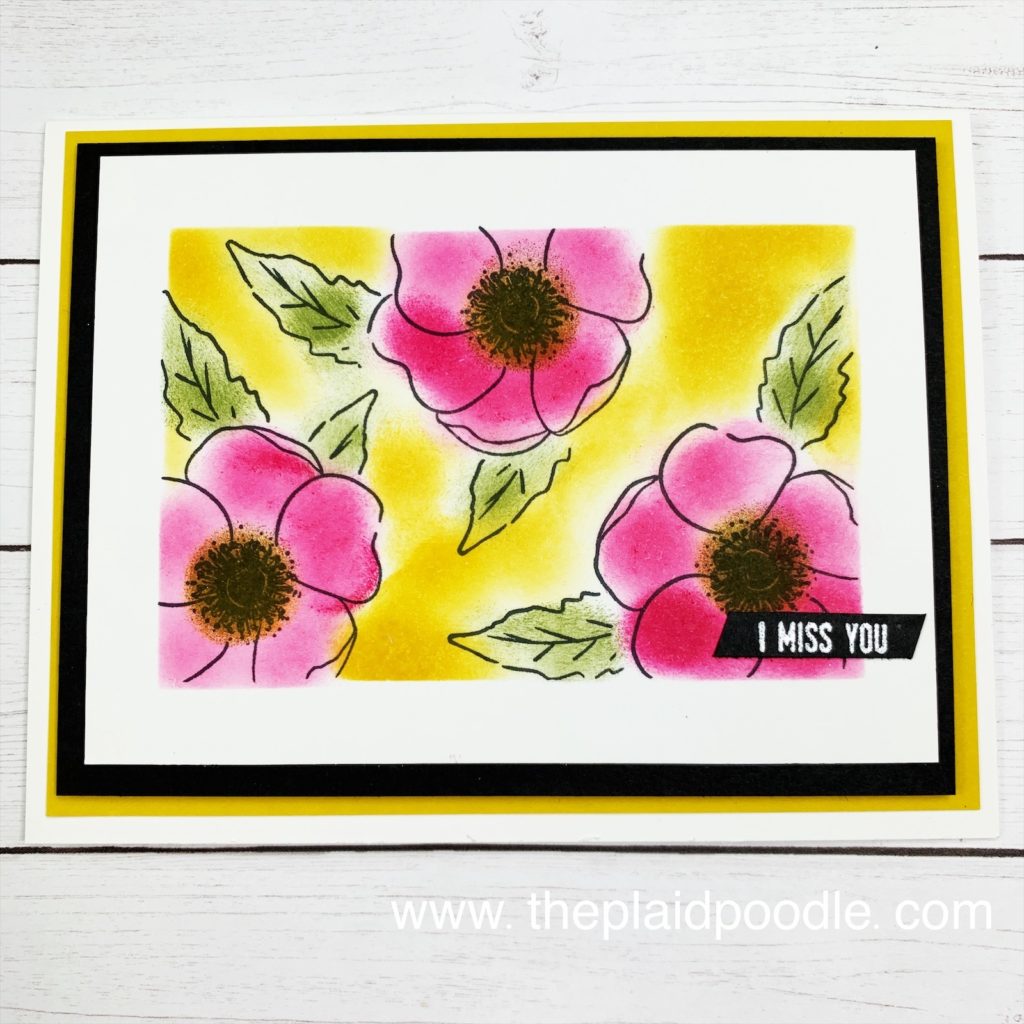
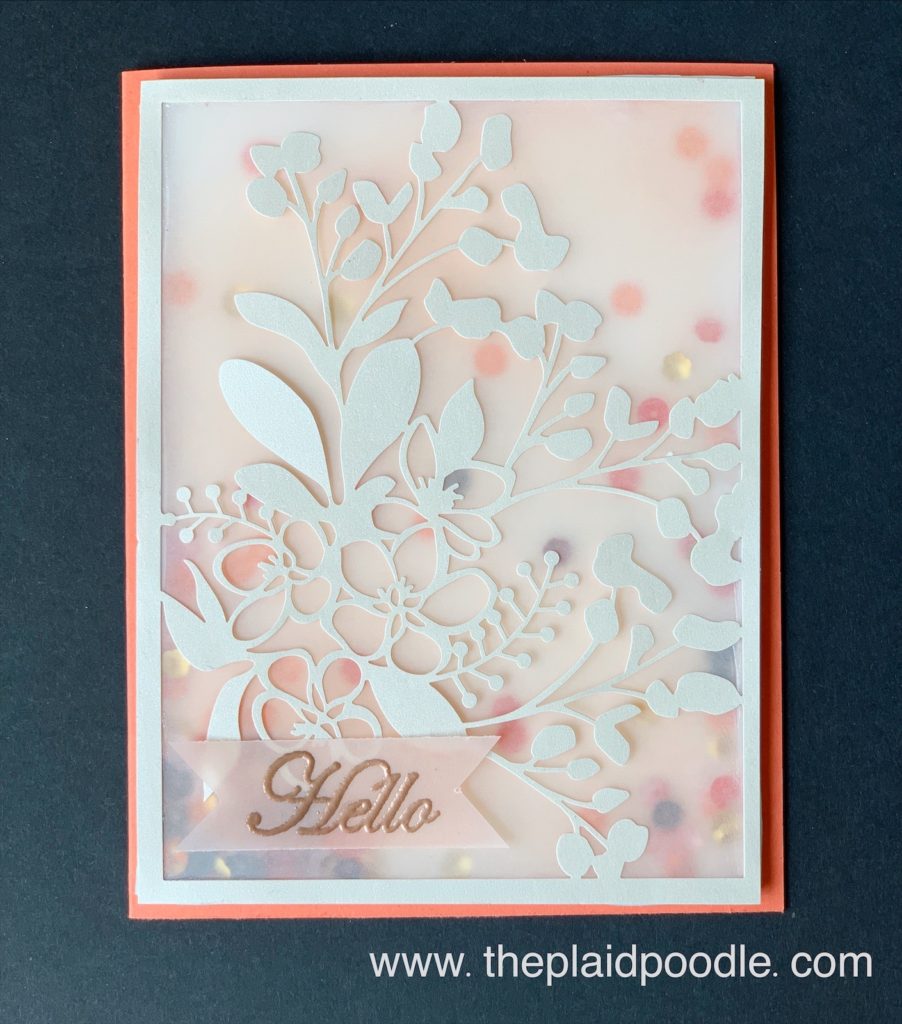
The sentiment I used came from the Field of Flowers stamp set from Stampin’ Up! Isn’t that font the bomb?!

Here is a couple of cards that I have created with the Field of Flowers stamp set. I love the simplicity of this stamp set.

Here are the card dimensions and a list of products used in my Birds & Branches Slimline card.

  • Card Base = 8-7/8″ x 7-3/4″ piece of Thick Whisper White card stock scored at 3-7/8″ on the 8-7/8″ side then folded on score line.
  • First Layer = 8-5/8″ x 3-5/8″ piece of Balmy Blue card stock
  • Stamped Layer = 8-7/8″ x 7-3/4″ piece of Whisper White card stock cut with second largest Stitched Rectangle Die.
  • Birds & Nest Die-Cuts = 4″ x 4″ piece of Crumb Cake card stock.
Product List

Thank you for stopping by my little part of the internet. I hope I may have inspired you to step out on a limb (gack!) to create your own slimline card!

Birds & Branches Birdhouse Treat Holder

I must be on a milk-carton kick because today’s project is using the same base as the watermelon treat holder I made last week, only larger. I knew I had to create a birdhouse as soon as I saw the Birds & Branches Bundle from Stampin’ Up!

Isn’t the carton the cutest?! I cut a circle in the front panel of the carton and framed it with a scallop circle for the entrance to the birdhouse. I covered the entrance with a piece of window sheet so that any treats put inside the carton will be visible.

The roof is embossed using the Pinewood Planks 3-D embossing folder and then trimmed with a 1/2″ strip of scalloped card stock. I used a paper piercer and handheld circle punch to attach the roof to the top of the birdhouse with the baker’s twine from the Flowers for Every Season Ribbon Combo Pack so that the recipient can open the box without damaging it.

Here is the video tutorial from today’s Make-it-Monday Facebook Live showing how to assemble the birdhouse milk carton. Below the video you will find the project cutting and scoring guide along with a list of the supplies used in today’s project.

Project Cutting & Scoring Guide:

  • Milk Carton = 10-1/2″ x 7″ piece of Seaside Spray card stock. Score at 2-1/2″, 5″,, 7-1/2″ and 10″ on the 10-1/2″ side. Score at 1/2″, 2″ and 4-1/2″ on the 7″ side. Trim per diagram
  • Carton Panels = four pieces of 2-1/4″ x 2-1/4″ 2020-2022 In-Color Designer Series Paper
  • Birdhouse Roof = 3″ x 5″ Flirty Flamingo card stock

Click on any of the images below for more information about that product.

Product List

These sweet little birdhouses would be a cute way to gift someone a gift card. I would fill the carton with some wrapped candy and slide a gift card in with the candy. They would also make sweet little table favors or party decorations.

I hope this post inspires you to create a milk carton birdhouse treat holder of your own!

Learn a Faux Watercolor Technique

For today’s card I used a faux watercolor technique. It was very easy to achieve using a torn paper stencil and Stamping Sponges.

The card base and fern die-cut is made using Terra-Cotta Tile card stock and I used Bumble Bee ink for the sponged stencil. The sentiment for the card came from the Peaceful Moments stamp set.

The card recipe is below with a list of supplies used and you can watch this video tutorial to learn how I created the faux watercolor look.

Card Recipe

  • Card Base – Terra Cotta Tile 8-1/2″ x 5-1/2″ folded in half.
  • Second Layer – Basic Black 5-1/4″ x 4″
  • Stamped Layer – Whisper White 5″ x 3-3/4″
  • Die-cut Layer – Terra Cotta Tile 3″ x 4″
  • Card Insert – Whisper White 5-1/4″ x 4″
Product List

I always like to stamp a little something on the insert of the cards I make and I used the small leafy branch image from the Forever Fern stamp set for this card. It’s such a sweet little touch and surprise for the card recipient.

I hope you enjoyed this faux watercolor technique and try it for yourself. I would love to know if you try it!

Make a Watermelon Milk Carton Treat Holder

Here is my latest Make-it-Monday creation. I wanted to make a party favor for our Father’s Day get-together this weekend and what’s better than a watermelon milk carton filled with sweet treats?!

I used two new In-Colors from the Stampin’ Up! 2020-2021 Annual Catalog; Magenta Madness and Just Jade for the treat holder. I used circle dies to create the cute little watermelon halves and the “YUMMILICIOUS!” tag.

I punched the watermelon “seeds” from Basic Black card stock adhered to an Adhesive Sheet with a handheld circle punch. Here is a side view of the treat box so that you can see the milk carton fold.

It’s fairly easy to make the milk carton box and it doesn’t require any special tools. You will want a trimmer with a scoring blade or a Simply Scored board to create the fold lines required to make the box. I have included a cutting and scoring guide along with a diagram and a video tutorial for you below.

Scoring Guide: Start with an 8-1/2″ x 5-1/2″ piece of card stock.

  • Score at 2″, 4″, 6″ and 8″ on the 8-1/2″ side of card stock.
  • Score at 1/2″, 2″ and 4″ on the 5-1/2″ side of card stock.
  • Score at 1-1/2″ and 5-1/2″ on the top of 1/2″ tab of carton.
  • Score two diagonal lines per the diagram below.
  • Trim on red score lines.
Product List

Thanks for stopping by! Let me know if you make your own Milk Carton treat box.

Two Fun Fold Cards Full of Flowers

Fun-fold cards pack a big “WOW” factor and are such a treat to receive! I enjoyed making the cards in today’s post and they were so easy to make.

This first card looks like a large matchbook. The sentiment tag is positioned just right to keep the card closed. The pretty sunflower print from the Flowers for Every Season 6″ x 6″ Designer Series Paper begged for me to use the Celebrate Sunflowers Bundle. It didn’t really beg me but don’t you think it was a great idea?

The second card uses paper from the Flowers for Every Season Designer Series Paper pack as well. This vibrant floral print is lively and includes my favorite new In-Color Magenta Madness! I pulled that color from the paper by adding the butterfly die-cuts.

Watch the video below to see how I put these full-of-flowers card together.

Cutting & Scoring Guide

Card #1:

  • Score 11″ x 4-1/4″ piece of Thick Whisper White cardstock at 4″ and 9-1/2″ on the 11″ side to create card base.
  • Misty Moonlight Cardstock: 4″ x 3-3/4″, 4″ x 1-1/4″ and 3-3/4″ x 1″
  • Flowers for Every Season Designer Series Paper: 3-3/4″ x 3-1/2″ and 3-3/4″ x 1″
  • Whisper White Cardstock: 3-1/2″ x 3/4″

Card #2:

  • Score 11″ x 4-1/4″ piece of Bumble Bee cardstock at 2-3/4″ x 5-1/2″
  • Flowers for Every Season Designer Series Paper: 4-1/2″ x 3-1/2″ and 2-1/4″ x 4-1/4″
  • Whisper White Cardstock: 4-1/2″ x 3-1/2″, 4″ x 3″
  • Magenta Madness Cardstock: scrap
Product List
Celebrate Sunflowers Bundle (English)
Tasteful Touches Bundle (English)
Celebrate Sunflowers Cling Stamp Set (English)
Sunflowers Dies
Tasteful Touches Cling Stamp Set (English)
Tasteful Labels Dies
Tuxedo Black Memento Ink Pad
Crushed Curry Classic Stampin' Pad
Whisper White 8-1/2" X 11" Thick Cardstock
Whisper White 8-1/2" X 11" Cardstock
Bumblebee 8-1/2X11 Cardstock
Misty Moonlight 8-1/2" X 11" Cardstock
Magenta Madness 8-1/2" X 11" Cardstock
Flowers For Every Season 6" X 6" (15.2 X 15.2 Cm) Designer Series Paper
Paper Trimmer
Lovely Labels Pick A Punch
Butterfly Beauty Dies
Multipurpose Liquid Glue
Stampin' Dimensionals
Mini Stampin' Dimensionals

Thanks for stopping by my little spot of the interwebs. I hope you enjoyed the projects I shared today.

Make Your Own Gift Bag!

I love making my own gift bags when possible. I can customize the size of bag to fit the gift and it’s fun to coordinate everything using stamps, paper and ink.

Here are two different sized bags I made using the Dino Days Bundle from Stampin’ Up!

Aren’t they cute?! These bags are great for the little people in your life. You can easily change up the designer paper and embellishments to fit any occasion.

Here is a video tutorial showing how I created the smaller bag using two pieces of 8″ x 8″ pieces of Designer Series Paper.

Scoring Guide for an 8″ Gift Bag:

  • Score top of two pieces of 8″ x 8″ Designer Series Paper at 1″. Score the remaining three sides of both pieces at 1-3/4″.

To make a larger gift bag use two pieces of 12″ x 12″ Designer Series Paper and score according to the guide below.

Scoring Guide for a 12″ Gift Bag:

  • Score top of two pieces of 12″ x 12″ Designer Series Paper at 1-1/2″. Score the remaining three sides of both pieces at 3″.

The next time you need a gift bag and you’re short on time, or when you want to use what you’ve got, go explore your paper stash and make your own!

Product List
Dino Days Bundle
Dino Days Photopolymer Stamp Set
Dino Dies
Dinoroar Designer Series Paper
Lovely Lipstick 8-1/2" X 11" Cardstock
Whisper White 8-1/2" X 11" Cardstock
Simply Scored
Paper Trimmer
Layering Circles Dies
Whisper White 5/8" (1.6 Cm) Flax Ribbon
Lovely Lipstick 1/8" (3.2 Mm) Grosgrain Ribbon
Leaf Ribbon
Multipurpose Liquid Glue
Stampin' Dimensionals

Make a Floating Card

I have been having a blast making floating cards! Floating cards are not new but I am new to them. The cards are simple to make but the end result is a pretty fancy card. I’m so glad I stepped out of my comfort zone to create these cards. I will definitely make them again.

Both floating cards I’m sharing today were made during one of my Coffee & a Card Facebook Live’s. I’ve included the video replays and a list of products I used in both cards.

For this first card I used the retiring Piece of Cake stamp set and Cake Builder Punch from Stampin’ Up! The Cake Builder Punch is discounted while supplies last.

Both the floating cards use the retiring Perennial Essence Designer Series Paper. The paper is also retiring and is discounted as well. The Designer Series Paper is elegant and perfect to use for any feminine occasion including birthdays, bridal showers and Mother’s Day.

For this second card I used retiring products as well. The Special Celebrations stamp set is full of card front sentiments as well as card insert verses. The intricate butterfly die on the card front is from the Springtime Impressions Dies and is also very discounted right now while supplies last.

Product List
Piece Of Cake Photopolymer Stamp Set
$17.00
Special Celebrations Cling-Mount Stamp Set
$33.00
Mossy Meadow Classic Stampin' Pad
$7.50
Window Sheets
$5.00
Highland Heather 8-1/2" X 11" Cardstock
$8.75
Mossy Meadow 8-1/2" X 11" Cardstock
$8.75
Blackberry Bliss 8-1/2" X 11" Cardstock
$8.75
Perennial Essence Designer Series Paper
$11.50
Petal Pink 8-1/2" X 11" Cardstock
$8.75
Whisper White 8-1/2" X 11" Cardstock
$9.75
Paper Trimmer
$25.00
Cake Builder Punch
$18.00
Layering Ovals Dies
$35.00
Stitched Shapes Dies
$30.00
Springtime Impressions Dies
$29.00
Take Your Pick
$10.00
Take Your Pick Die Brush Tip
$9.00
Petal Pink 1/4" (6.4 Mm) Metallic-Edge Ribbon
$7.00
Highland Heather Stampin' Blends Markers Combo Pack
$9.00
Petal Pink Stampin' Blends Markers Combo Pack
$9.00
Old Olive Stampin' Blends Markers Combo Pack
$9.00
Seaside Spray Stampin' Blends Combo Pack
$9.00
Mini Glue Dots
$5.25
Multipurpose Liquid Glue
$4.00

Masking Technique Card

I am loving the color combination in today’s card! I recently saw something online that used a bright pink along with jewel tones and knew I had to recreate it in a card. Who knew that Melon Mambo and Crushed Curry would look so fantastic together?!

The card images are stamped with Memento Tuxedo Black ink then filled with color using sponge daubers. The sponging gives the card a very soft, watercolor effect.

I also used two types of “masking” to create the card. Here is the video replay of my Coffee & a Card Facebook Live where I showed how to make the card:

Product List
Melon Mambo Classic Stampin' Pad
126948

Thanks so much for stopping by! I hope you enjoyed today’s project. Don’t forget to notice color combinations used out in the world and create something using them!

Make a 3-D Front Flap Card

TGIF everyone! I wanted to share this card that I made recently during one of my Coffee & a Card Facebook Lives. I go live two times per week and share some fun projects and paper crafting techniques. If you’re looking for some cool craftiness and you’re on Facebook, please follow me here: https://www.facebook.com/theplaidpoodle

This is a front flap card. It’s very easy to make and has a little pizazz with the 3-D hot air balloon and fancy fold. Click on the button for the .PDF copy of the Project Recipe and watch the video tutorial for step-by-step instruction.

Here is the supply list if you’re interested in any of the products used in this card. They are on the Stampin’ Up! Retiring List so it’s “while supplies last” only.

Product List

Have Another Quarantini!

Today’s card is a light-hearted look at the unique COVID-19 and social distancing situation we are currently in.

Aren’t the punch art olives the cutest? I cased them from a card fellow Stampin’ Up! Demonstrator Lorri Heiling created. The image and sentiments came from a new digital stamp set from Stampin’ Up!

This digital stamp set is packed with both lighthearted and thoughtful sentiments and imagery relevant to the unique COVID-19 and social distancing situation we are currently in. The best thing about this digital stamp set is that 100% of the Share Sunshine PDF Download proceeds will go to COVID-19 efforts and you can start crafting with the PDF download right away–with no shipping costs or delays!

You can use the download in your cardmaking and papercrafting projects. Simply print the imagery on cardstock and cut it out using Stampin’ Up!’s Paper Trimmer, punches, or dies. Since we are physically distanced from each other, now is a perfect time to share sunshine with our friends and family by sending cards!

Order the Share Sunshine PDF Download here and at check-out, you will be able to select which of these two organizations you want your proceeds to go to:

  • The World Health Organization’s COVID-Solidarity Response Fund
  • United Way Worldwide’s COVID-19 Community Response and Recovery Fund

What a great way to have fun creating fun cards, bring smiles to your family and friends and give back!

Make a Timeless Tulips Mother’s Day Gift Bag

My Make it Monday project this week is this sweet handled gift bag. These bags are so much fun to make and are the perfect size for a gift card, a small gift, or candy treats.

The bag is fairly quick and easy to put together but the handle requires a few extra steps. Watch this video tutorial for the nitty gritty on adding the handle.

Cutting & Scoring Diagram

Score 8″ x 4″ piece of Designer Series Paper at 1/2″, 3″, 4-1/4″ and 6-3/4″ on the 8″ side. Score at 1″ on the 4″ side of Designer Series Paper. Burnish score lines and trim on red lines.

Product List

Last Chance Discounted Products

Stampin’ Up! just released their 2020 Retiring Lists and there are bargains to be had! They will go quickly so if there is something you are dreaming of on the lists make sure you grab it before it’s gone!

When looking at the lists pay particular attention to any asterisks next to an item. Some items are not going away but are just being reconfigured or not being offered as a bundle.


*Amount in Stampin’ Rewards; host sets can only be purchased using Stampin’ Rewards from a qualifying party.
**While the items in these bundles are not retiring, they will no longer be available in a bundle after June 2, 2020.
***Bundle includes some products that are not retiring, refer to the Retiring List to see what individual products are retiring.
****These items are not retiring but being reconfigured with a new item number and name.

For example, These items are on the list with four **** so they, among others, ARE NOT GOING AWAY; they are just being reconfigured.


Here are links to .pdf copies of the retiring lists. You can view them, download them or print them out. For a better look however, I suggest you visit my Stampin’ Up! Store for images of all the goodies: SHOP WITH LESLIE.

If you have any questions please do not hesitate to reach out to me. My contact information can be found HERE.

Make a Dressed to Impress Mother’s Day Gift

Here is the sweet little clay flower pot I embellished during my Make-it-Monday Facebook Live today.

I purchased 2-1/4″ clay flower pots from Dollar Tree and painted the tops with white craft paint. Next, I wrapped Best Dressed Designer Series Paper around the pot using a decoupage medium to adhere.

Click on this button a template I created to cut the paper for a snug fit around the flower pot. Print it onto an 8-1/2″ x 11″ piece of paper and it should be the right size for your pot

I needed something to put in the flower pots so I filled a 3″ x 9″ printed gusseted celophane bag with some shreddy and chocolates then tied it up in a bow with a tassel. Finally, I created a plant marker for my flower pot using a stamp and coordinating die from the Dressed to Impress Bundle and a cake pop stick.

Here is a video tutorial for the project and a list of supplies used.

Product List

Additional Supplies:

  • 2-1/4″ clay flower pot
  • White craft paint
  • decoupage medium

These were so easy to make and would make great table favors for all types spring celebrations.

Make a Vellum Shaker Card

I demonstrated how to make these shaker cards in today’s Coffee & a Card Facebook Live. I used the Shimmer Detailed Laser Cut Specialty Paper and vellum from Stampin’ Up! to make the shaker box. I love how the vellum “veils” the sequins underneath.

The camera does not pick up the shimmer on the laser-cut paper but it is a pearl-like finish with a subtle sparkle. The specialty paper comes with 6 sheets; three sheets with a 12″ x 12″ pattern and three sheets with a variety of panels.

I used a smaller, 3-1/2″ x 5′ panel for this card and backed the shaker box with a piece of Mosaic Mood Designer Series Paper.

This card uses one of the 4″ x 5-1/4″ panels from the Shimmer Detailed Laser-cut Specialty Paper and could be adhered directly onto a Calypso Coral card base.

Project Recipe

  • Card Base = 8-1/2″ x 4-1/4″ piece of card stock scored at 4-1/4″
  • Mosaic Mood Designer Series Paper layer = 4″ x 5-1/4″
  • Shimmer Detailed Laser-Cut Specialty Paper = 3-1/2″ x 5″ panel or 4″ x 5-1/4″ panel
  • Vellum = 3-3/8″ x 4-7/8″ or 3-7/8″ x 5-1/8″ and 3/4″ x 3″
  • Very Vanilla Card Stock = 3-3/8″ x 4-7/8″ or 3-7/8″ x 5-1/8″
Product List

I sponged the vellum for the shaker box and the tag using Calypso Coral Ink and heat embossed the tag with Copper Stampin’ Emboss Powder. You can watch the replay of my Facebook Live and learn how to make your own shaker card by clicking on this link: https://bit.ly/2xhClWm

Make A Shaker Easter Basket

Here is the project we made on this week’s Facebook Live Make it Monday. I post over there a lot and would encourage you to hop on over to “Like” and “Follow” me there.

For this sweet shaker Easter basket I used the bunny and bird images from the Cuckoo for You stamp set and the sentiment from the Itty Bitty Greetings stamp set; both from Stampin’ Up! I also used the Cuckoo Clock dies that coordinate with the stamp set. You’re gonna want to have both and if you purchase them in a bundle you save 10%. Here is a complete list of the supplies I used in today’s project. Click on any image for more information.

Product List

To make your own shaker Easter basket cut the following ovals out with the Layering Ovals Dies from Stampin’ Up! using your die-cutting machine.

To create the box for the Easter basket use this diagram and watch the video below for step-by-step instructions.