Latest Posts

Make a Share a Milkshake, Life is Sweeter with You, Fun-Fold Card

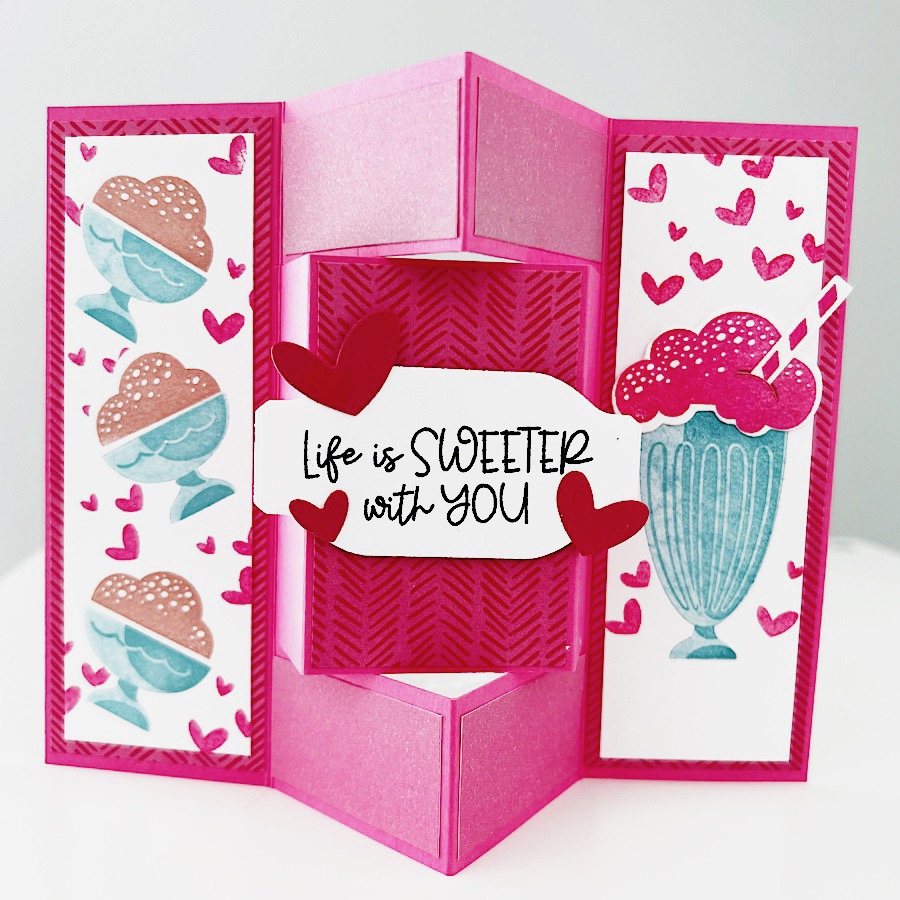
I used the Share a Milkshake Bundle from Stampin’ Up! to embellish the card I’m sharing with you today. Who doesn’t dream of floating ice cream dishes and strawberry milkshakes? You can’t get any sweeter than that!

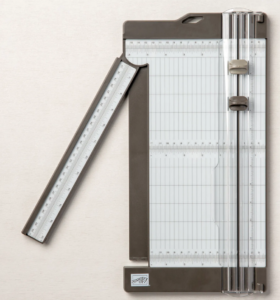
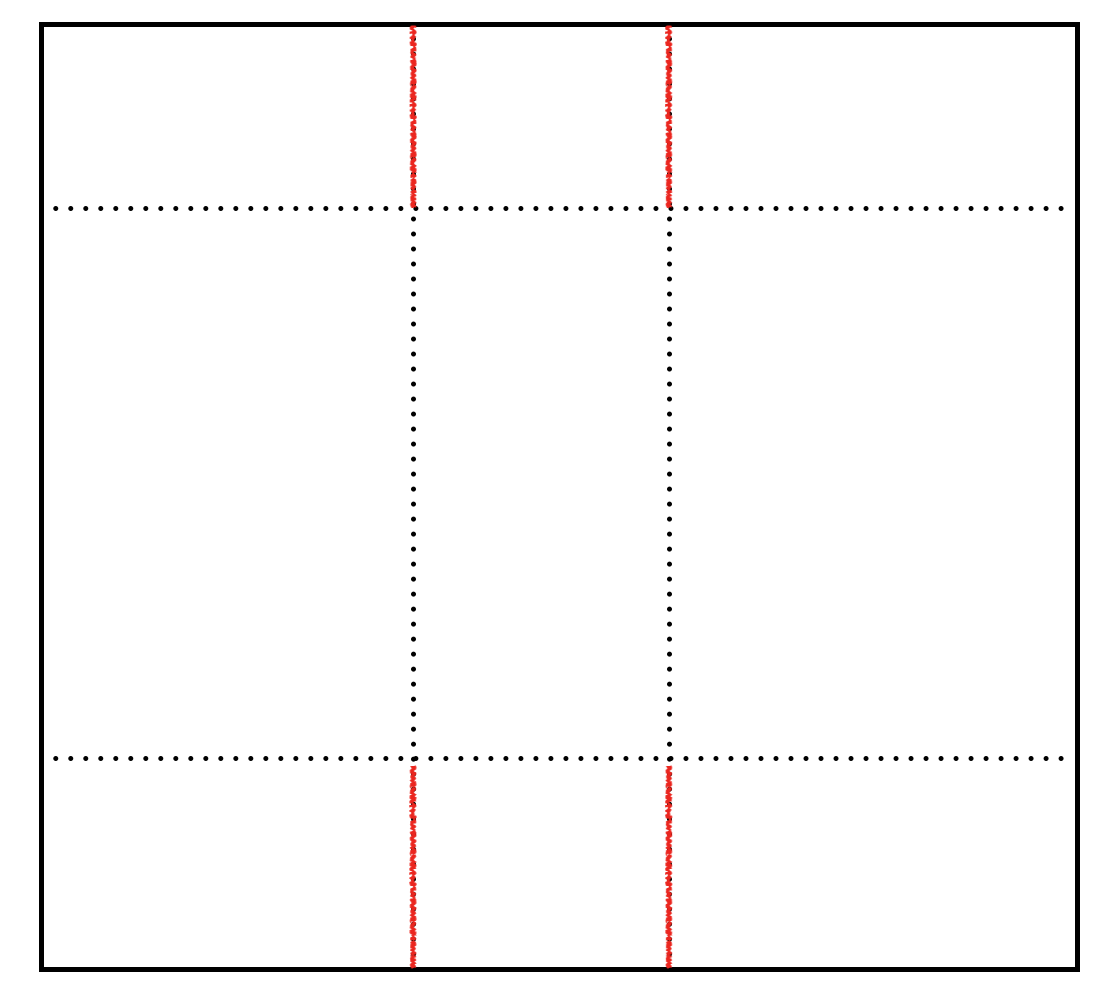
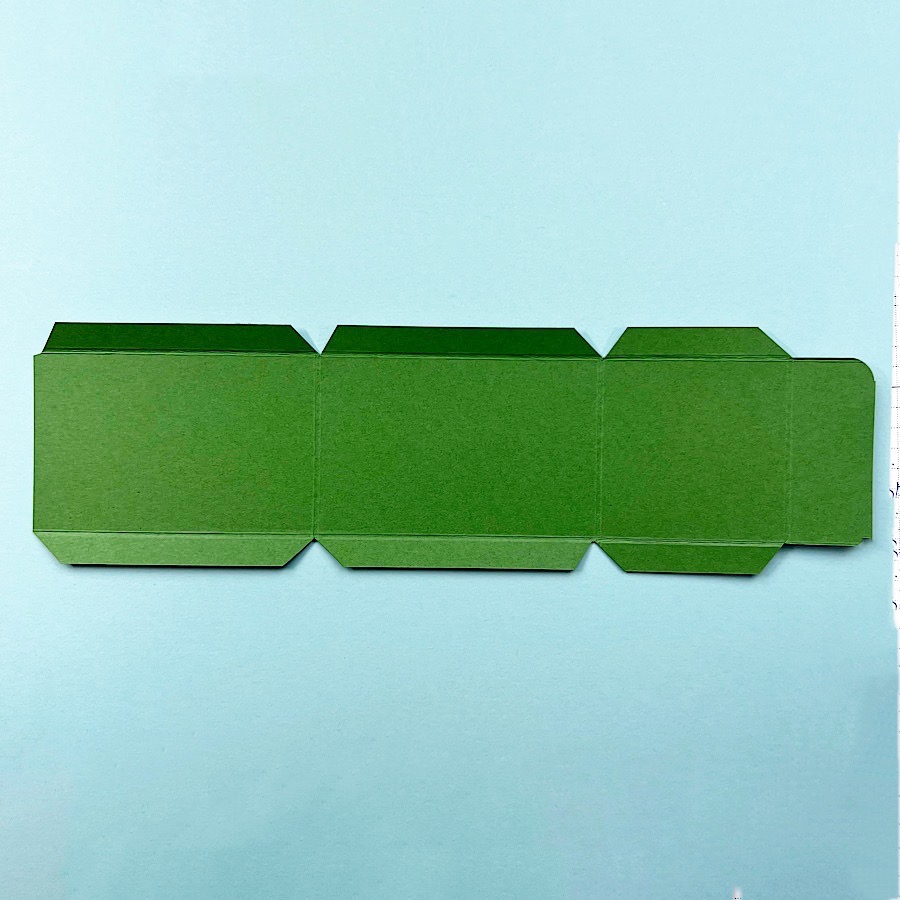
The fun-fold technique I used appears a bit complicated but is actually quite simple when you use a paper trimmer that includes a scoring blade. I used this one from Stampin’ Up!

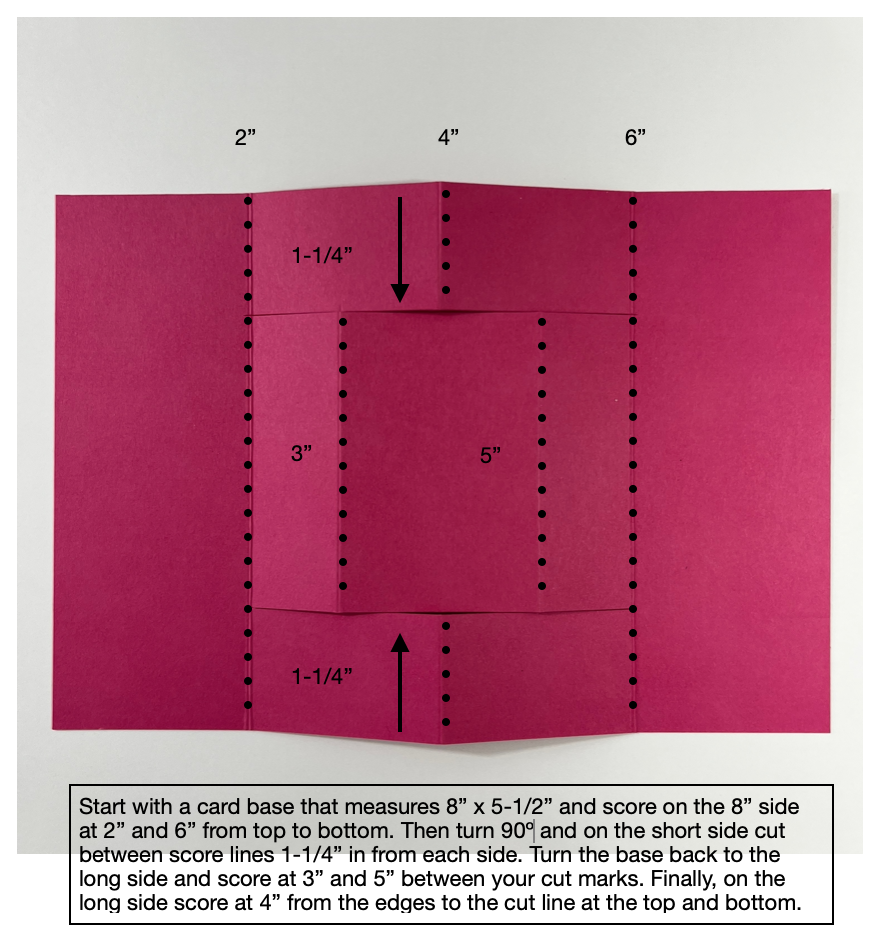
Here is a diagram showing the cutting and scoring I used to create this fun-fold card base:

Watch this video for complete cutting and scoring instructions:

Cutting & Scoring Guide

  • Card Base = 8″ x 5-1/2″
  • Designer Series Paper = two pieces 1-7/8″ x 5-1/4″ each, one piece 2-7/8″ x 1-7/8″, four pieces 1-7/8″ x 1″ each
  • Basic White = two pieces 1-5/8″ x 5″ each
  • Sentiment Tag -1-3/4″ x 3″
  • Scraps of Melon Mambo for heart die-cuts
  • Scraps of Basic White for ice cream and straw
Product List

Make a Fun-Fold Corner Pocket Card with Irresistible Blooms

Beginning March 1, 2023 customers will have access to the Hello, Irresistible Blooms Suite Collection along with other, online exclusive products. I made today’s card using the products from the suite.

I used the emboss/resist technique to create the dreamy watercolor effect on the flower die-cuts. The technique blends so well with the Hello, Irresistible Blooms Designer Series Paper. One of the viewers on my LiveStream today suggested the Crinkled Seam Binding Ribbon. It’s the perfect embellishment for the front of the card.

You will need two pieces of cardstock for the card base. One piece measures 4-1/4″ x 8″ and is scored at 2″ on the long side. The other piece measures 4-1/4″ x 3″. The Hello, Irresistible Designer Series Paper measures 3-3/4″ x 5″ and 3-3/4″ x 2-1/2″. Watch the replay of my Coffee & a Card Live-Stream for step-by-step instructions to make your own corner pocket card.

Make Three Quick & Easy Valentine’s Day Treat Holders

Valentine’s Day is just a few days away and I have three quick and easy Valentine’s Day treat holders to share with you.

I used the Peekaboo Treat Bags from Stampin’ Up! for the first Valentine’s Treat Holder. After adhering two strips of the Country Floral Designer Series Paper to the top and bottom of the bag, I added a sentiment tag. The tag is made with the Heart Punch Pack and then embellished with die-cuts from the Share a Milkshake dies.

The second quick and easy Valentine’s Treat Holder is this cute chocolate-topped ladybug. I used the Hello Ladybug Bundle from Stampin’ Up! as the base for a heart-shaped Dove chocolate.

The final quick and easy Valentine’s Treat Holder I’m sharing with you today is this wrapped Hershey’s Chocolate Nugget. It’s a 1″ x 8-1/2″ strip of Country Floral Designer Series Paper wrapped around the chocolate. I embellished it with a stitched circle die-cut topped with heart die-cuts.

Watch the video for step-by-step instructions for all three treat holders

Product List
Share A Milkshake Bundle (English)
Hello Ladybug Bundle (English)
Tuxedo Black Memento Ink Pad
Sweet Sorbet Classic Stampin' Pad
Heart Punch Pack
Stitched Shapes Dies
Peekaboo Treat Bags
Country Floral Lane 12" X 12" (30.5 X 30.5 Cm) Designer Series Paper
Basic White 8 1/2" X 11" Cardstock
Sweet Sorbet 8 1/2" X 11" Cardstock
Polished Pink 8 1/2" X 11" Cardstock
Balmy Blue 8-1/2" X 11" Cardstock
Basic Black 8-1/2" X 11" Cardstock
Multipurpose Liquid Glue
Mini Stampin' Dimensionals
Mini Glue Dots

Make a Beautifully Happy Thank-You Card

We’re almost halfway through the month of February – what? Sale-a-Bration will be going away in just a couple of weeks. If you’re new here, during the promotion you can choose a free Sale-a-Bration product with every $50 or $100 you spend. Read all about Sale-a-Bration here: https://bit.ly/40CPRwK

I created today’s card using the Beautifully Happy stamp set that I earned for free.

The Designer Series Paper I used for the card is a sneak peek of the Enjoy the Journey paper. The pack of 12″ x 12″ is available to customers as an Online Exclusive on March 1. Demonstrators were able to preorder the paper.

I send a free card tutorial to my email subscribers every Tuesday. This week subscribers received a card tutorial for this Valentine’s card and this sketch.

I used the same sketch to create today’s Beautifully Happy Thank-You Card. Did you notice how I changed things up from the sketch? Don’t miss one of my Fee Tutorial Tuesday emails! Sign up at this link: https://bit.ly/3l6KHJ1

Product List

Make a Dollar Tree Valentine Apothecary Jar

Today’s project is a fun, Valentine Apothecary Jar that I made using supplies from Dollar Tree. I purchased these small, plastic mason jars at my local Dollar Tree. I have also seen plastic apothecary jars in the Dollar Spot at Target which would be perfect for this project.

Make these easy jars for table favors, home decor, and coworker gifts. Use different colors for the embellishments and they would be beautiful for a wedding shower. I plan on using them as decoration on my treat table at my Galentine’s Card Party. If you’re local to the Kansas City area we would love to have you join us. See the party details by clicking on this link: https://bit.ly/3wW7om5

Product List
Heart Punch Pack
Share A Milkshake Bundle (English)
Country Bouquet Photopolymer Stamp Set (English)
Real Red Classic Stampin' Pad
Polished Pink Classic Stampin' Pad
Stamping Sponges
Balmy Blue 8-1/2" X 11" Cardstock
Real Red 8-1/2" X 11" Cardstock
Polished Pink 8 1/2" X 11" Cardstock
Basic White 8 1/2" X 11" Cardstock
Baker's Twine Essentials Pack
Heat Tool (Us And Canada)
Mini Stampin' Cut & Emboss Machine
Multipurpose Liquid Glue
Mini Stampin' Dimensionals

More to Sale-a-Brate, More to Love!

Sale-A-Bration is one of Stampin’ Up!’s biggest promotions of the year. It’s overflowing with paper crafting products you can earn for FREE when you shop!

There are even more products now available to shop, earn, and redeem during Sale-A-Bration. I don’t want you to miss out on these great products and incredible deals, so take a look at the newly added products here:

All Sale-a-Bration items can be viewed by clicking on this link: https://bit.ly/3HP8GFA

And don’t forget the items from the Sale-a-Bration brochure! Click on the image to view the brochure up close and personal!


Make an Adorable Owls Birthday Card with Free Products

I know a couple of fellas that are having birthdays this year and I cannot wait to give them this card I made today during my Make-it-Monday Livestream:

Isn’t that little hoot owl image from the Adorable Owls stamp set the cutest? The Adorable Owls stamp set from Stampin’ Up! is one of the free Sale-a-Bration products you can earn with a qualifying purchase through February.

Cutting & Scoring Guide

  • Card Base = 8-1/2″ x 5-1/2″ piece of Starry Sky cardstock scored at 2-1/8 and 4-1/4″ on the 8-1/2″ side.
  • Designer Series Paper = Two 2″ x 5-3/8″ pieces of Dainty Flowers Designer Series Paper
  • Scallop Circle = Cut scallop circle from 3″ x 3″ piece of Starry Sky cardstock
  • Stamped Circle = Cut circle from 3″ x 3″ piece of Basic White cardstock
  • Card Insert = 4″ x 5-1/4″ piece of Basic White cardstock
  • Sentiment Tag = 1/2″ x 3″ piece of Sweet Sorbet cardstock
  • Lable Punch = scrap of Sweet Sorbet cardstock
  • Numbers = scrap of Parakeet Party cardstock
Product List

Make a Belated Birthday Card with Two-Tona Flora

The card I’m sharing with you today uses the Two-Tone Flora Bundle from Stampin’ Up!. The bundle includes the Two-Tone Flora Stamp Set and the Two-Tone Flora Dies.

The Two-Tone Flora Bundle is a floral enthusiast’s dream! Use the Two-Step feature of the Two-Tone Flora Stamp Set to create detailed flowers and cut them out with the coordinating dies from the Two-Tone Flora Dies. This stamp set features solid flower images and coordinating shaded-detail images, so you can add more depth and dimension to your projects.

My favorite part of the card is this sweet sentiment. Anyone else out there who has trouble getting their cards mailed on time?

Here is another card made using the gorgeous lacy background die that is part of the Two-Tone Flora Dies.

And another card I made using the Two-Tone Flora Bundle along with the Basic Border Dies and the beautiful Fancy Flora Designer Series Paper . . .


Cutting/Scoring Guide

  • Card Base = 8-1/2″ x 5-1/2″ piece of Night of Navy cardstock scored at 4-1/4″ on the long side. Cut a 2″ panel from the card front using a paper trimmer.
  • Regency Park Designer Series Paper = 3-1/4″ x 4″
  • Card Insert = 4″ x 5-1/4″ piece of Basic White cardstock.
  • 2-11/16″ Basic White circle die-cut
  • Stamp images onto 3-1/2″ x 4″ piece of Basic White cardstock. Cut out using Two-Tone Flora Dies with die-cutting machine.
  • Sentiment Tag = 3/8″ x 2-1/2″ piece of Night of Navy
Product List
Two Tone Flora Photopolymer Stamp Set
Two Tone Flora Dies
Something Fancy Bundle (English)
Something Fancy Cling Stamp Set (English)
Something Fancy Dies
Balmy Blue Classic Stampin' Pad
Night Of Navy Classic Stampin' Pad
Soft Succulent Classic Stampin' Pad
Shaded Spruce Classic Stampin' Pad
Versamark Pad
Regency Park 6" X 6" (15.2 X 15.2 Cm) Designer Series Paper
Night Of Navy 8-1/2" X 11" Cardstock
Basic White 8 1/2" X 11" Cardstock
Adhesive Backed Milky Dots
Layering Circles Dies
Basics Embossing Powders
Heat Tool (Us And Canada)
Stampin' Seal
Stampin' Dimensionals
Mini Stampin' Dimensionals
Stampin' Cut & Emboss Machine
Stamparatus

Make a Thank-You Card with Something Fancy

I used the Note Cards & Envelopes from Stampin’ Up! to make this simple thank-you card.

After adding a stitched, scalloped rectangle to the card front, I created a tag. The dies from the Something Fancy Bundle from Stampin’ Up! are perfect tag builders! The font on the “thank you” sentiment stamp is going to be a favorite.

I used the Dandy Designs Designer Series Paper on the tag and to embellish the notecard envelope flap. The Dandy Designs paper can be earned for free with a qualifying purchase during Sale-a-Bration. Find all about Sale-a-Bration here: https://bit.ly/3GP7dxu

Product List

Make a Valentine’s Treat Box

We’re already in the middle of January so it’s not too soon to start making Valentine projects. The sweet Valentine’s Treat Box project I’m sharing today is a quick and easy craft to put together.

The Valentine’s Treat Box is 2-3/4″ wide, 1-1/4″ deep, and 2-1/4″ tall. I was able to fit four Ghirardelli chocolates in the box. That’s a perfect sweet treat for Valentine’s! There are many occasions to gift this Valentine’s Treat Box. I think it would make a lovely teacher gift, coworker gift, book club treat, or table favor at your Galentine’s party!

I couldn’t decide if the Valentine’s Treat Box needed a handle or not so I made one of each. Which one do you prefer?

The Valentine’s Treat Box started with a box I made using Kraft Paper. I then chose the Country Floral Lane Designer Series Paper from Stampin’ Up to wrap around the box. Finally, I used the Country Bouquet Bundle to embellish the front of the box.

Here is another project I made using the bundle. You can view it HERE.

Cutting & Scoring Diagram

Score a 5-3/4″ x 5-1/4″ piece of Kraft cardstock at 5-3/4″ x 5-1/4″ at 2-1/4″ and 3-1/2″ on the 5-3/4″ side. Score at 1-1/4″ and 4″ on the 5-1/4″ side.

Product List

Make Another Fun-Fold Card with Thanks a Bunch

The project I’m sharing with you today is a simple fun-fold card that I made using the Thanks a Bunch stamp set from Stampin’ Up! The Thanks a Bunch stamp set is one of the FREE options during Sale-A-Bration.

Of course, I had to use the Day at the Farm Designer Series Paper for this card. The paper is another FREE Sale-a-Bration option. You have a better view of the veggie-filled pattern when you open the front flap of the card.

Cutting & Scoring Guide

  • First Layer = 5-1/2″ x 4-1/4″ piece of Garden Green cardstock
  • Second Layer = 5-1/4″ x 4″ piece of Daffodil Delight cardstock
  • Third Layer = 5″ x 3-3/4″ piece of Day at the Farm Designer Series Paper
  • Front Flap = 8-1/2″ x 2-3/4″ scored at 4-1/4″ on the long side
  • Stamped Layer = 2-1/2″ x 4″ piece of Basic White cardstock
  • Card Insert = 2-1/4″ x 4″ piece of Basic White cardstock

I loved this cute Thanks a Bunch stamp set the first time I saw it. It is perfect for all spring and summertime occasions. But, if you stamp the carrot image upside down as I did on this card, you can create a forest of trees. An option to keep using the stamp set all year long!

Product List

Playing in the Rain Step Card

One of my favorite fun-fold cards is a Step-Card. The fold works well when you want to highlight smaller images. I used the new Playing In The Rain Bundle from Stampin’ Up! to create today’s project. I love how the front panel of the step-card highlights the jaunty little fox die-cut.

The inside of the card leaves plenty of room for an encouraging note to the recipient. I stamped and colored an umbrella image over a puddle inside the card.

Cutting & Scoring Guide

  • Card Base = 8″ x 5-1/2″ piece of Balmy Blue cardstock scored at 3″, 6″, and 7″ on the long side.
  • Front Panel = 3″ x 6″ piece of Balmy Blue cardstock scored at 4-1/4″ on the long side.
  • Rain or Shine Designer Series Paper = 2-3/4″ x 4″, 2-3/4″ x 5-1/4″, and 3/4″ x 5-1/4″
  • Card Insert = 2-3/4″ x 5-1/4″ piece of Basic White Cardstock
  • Sentiment Tag = 1″ x 2-1/4″ piece of Basic White Cardstock and scrap of Flirty Flamingo cardstock.

Video Tutorial

Product List

New Mini Catalog and Sale-a-Bration are Back!

It’s the moment we’ve been waiting for! The January–April 2023 Mini Catalog along with Sale-a-Bration is finally here. Earn fabulous FREE products from the Sale-a-Bration brochure with a qualifying purchase!

Are you ready to create, connect, and share with a community that loves to craft? That’s what the new Mini Catalog is all about! With the turn of every page, you’ll find stunning product suites, inspiring project ideas, and the kind of coordination you can’t find anywhere else.

Click on the catalog images below to view the Spring Mini Catalog and the Sale-a-Bration Brochure.

Is your Wish List long? The best deal to be had during Sale-a-Bration is by joining Stampin’ Up! Get $175 worth of products and a Mini Cut & Emboss Machine for just $129. Already have a die-cutting machine? Get $175 worth of products for just $99! Watch this quick video for all the details.

Make a Country Bouquet Valentine Card

Happy New Year! I hope your holiday was relaxing and you found some time to craft. Unfortunately, I caught a nasty bug and was sick. I spent most of my holiday time off resting. It has been so much fun getting back into my craft room and working with products from the new Stampin’ Up! mini catalog.

Today’s card is my first project of the 2023 new year! I used products from the Country Floral Lane Suite that will be available on January 5th.

Click on this button for a .pdf copy of today’s project tutorial:

Framed & Festive 3-D Christmas Tree Treat Box

We’re on the countdown to Christmas this week but it’s not too late to make something special for your friends and family. Today’s project is this 3-D Christmas Tree treat box.

The tree-shaped treat box can be embellished with whatever you have in your stash. It’s also great to use up your scraps of Christmas-patterned paper. For my treat holder, I used the Painted Christmas Designer Series Paper and kept the sentiment simple with a stamped Noel from the Framed & Festive stamp set on a die-cut circle. I’m usually a more-is-more kind of girl but sometimes simple is better.

To create the “frame” for the Christmas tree start with a 3″ x 10-1/4″ piece of cardstock. Score at 1″, 3-1/4″, and 6-3/4″ on the 10-1/4″ side. Score it at 3/8″ x 3/8″ on both edges of the 3″ side. Fold and burnish all score lines then trip per photo.

Watch the replay of my Make-it-Monday Live Stream for step-by-step directions to make the Framed & Festive 3-D Christmas Tree treat holder.

Product List
Framed & Festive Cling Stamp Set (English)
Christmas Banners Bundle (English)
Real Red Classic Stampin' Pad
Evening Evergreen Classic Stampin' Pad
Painted Christmas 12" X 12" (30.5 X 30.5 Cm) Designer Series Paper
Garden Green 8-1/2" X 11" Cardstock
Real Red 8-1/2" X 11" Cardstock
Basic White 12 X12 (30.5 X 30.5 Cm) Cardstock
Layering Circles Dies
Real Red & Garden Green 3/8" (1 Cm) Ribbon Combo Pack
Red Rhinestone Basic Jewels
Simply Scored
Mini Stampin' Cut & Emboss Machine
Multipurpose Liquid Glue
Stampin' Dimensionals