All Occasion Cards

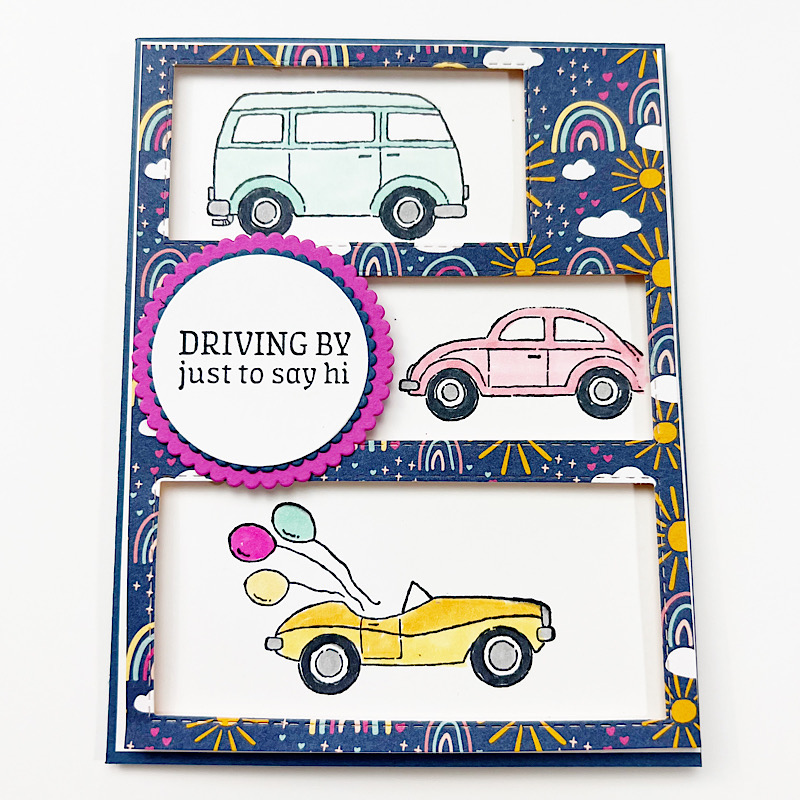
Make an Amazing Silhouettes Pocket Card

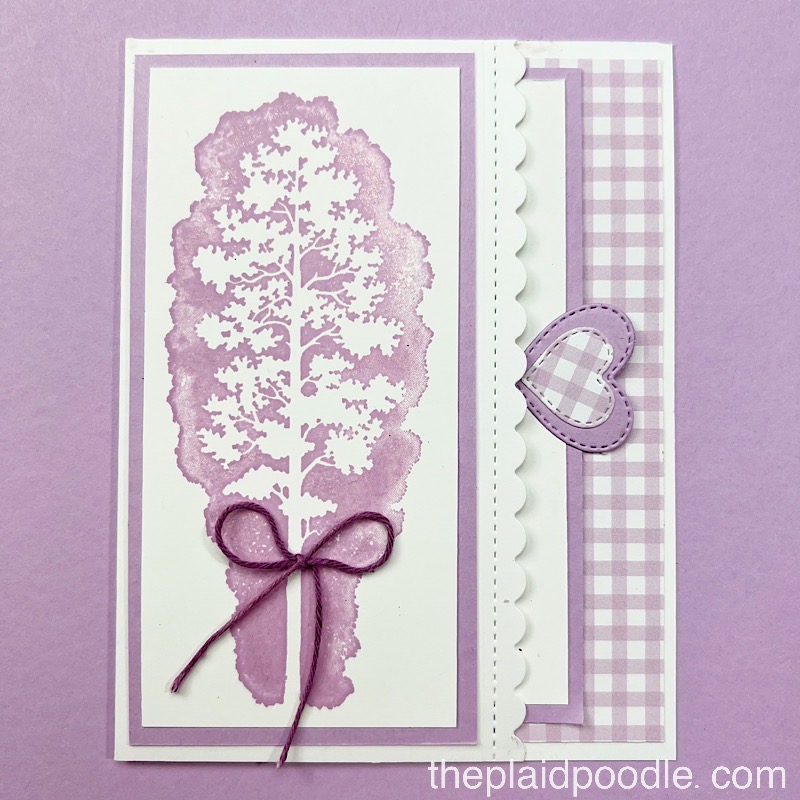
Remember the Always in My Heart pocket card I made here? It was so much fun to make that I decided to explore other types of pocket cards I could create. The card I’m sharing today has a side pocket. My favorite part of this card is the sweet heart-shaped pull tab.

The stamped images on this monochromatic card are from the Amazing Silhouettes stamp set from Stampin’ Up! I stamped the butterfly image onto the card insert but left off any sentiment. This card is can be used for many occasions so I will add the sentiment when the need arises. I love that kind of versatility!

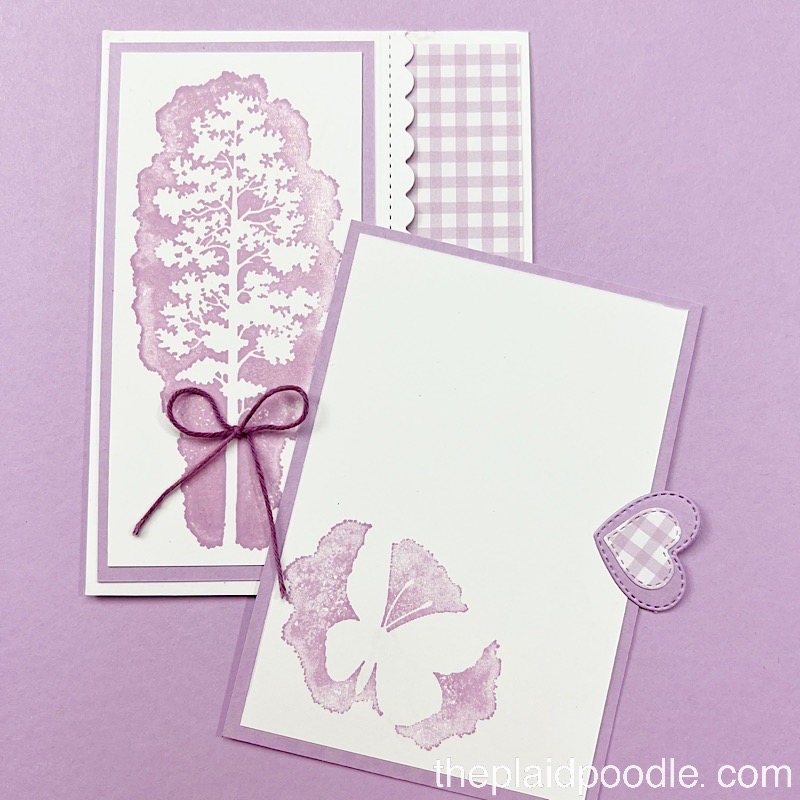
Make sure to watch my video tutorial below to see my tip for how I changed the color of the baker’s twine on the card from white to Fresh Fresia.
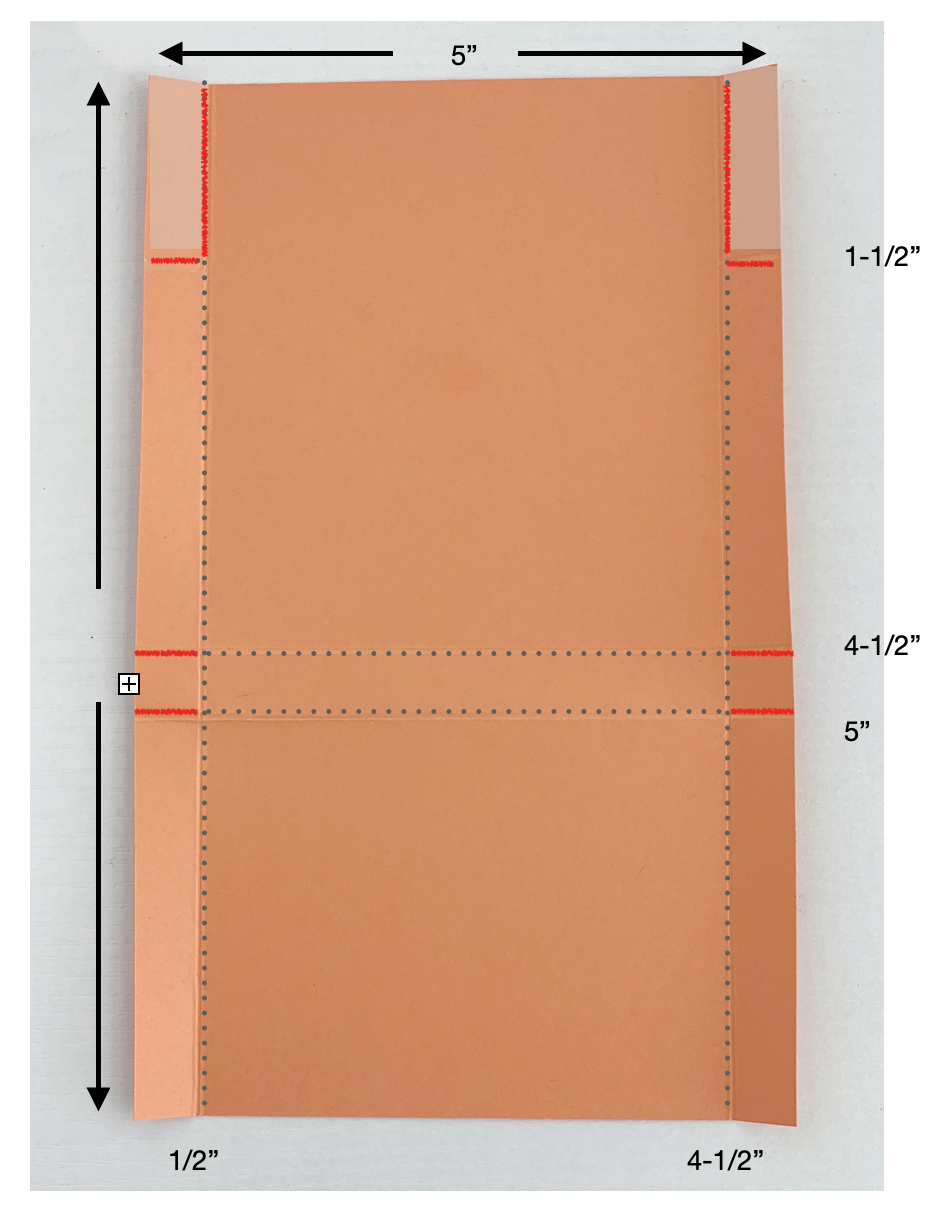
Cutting Guide

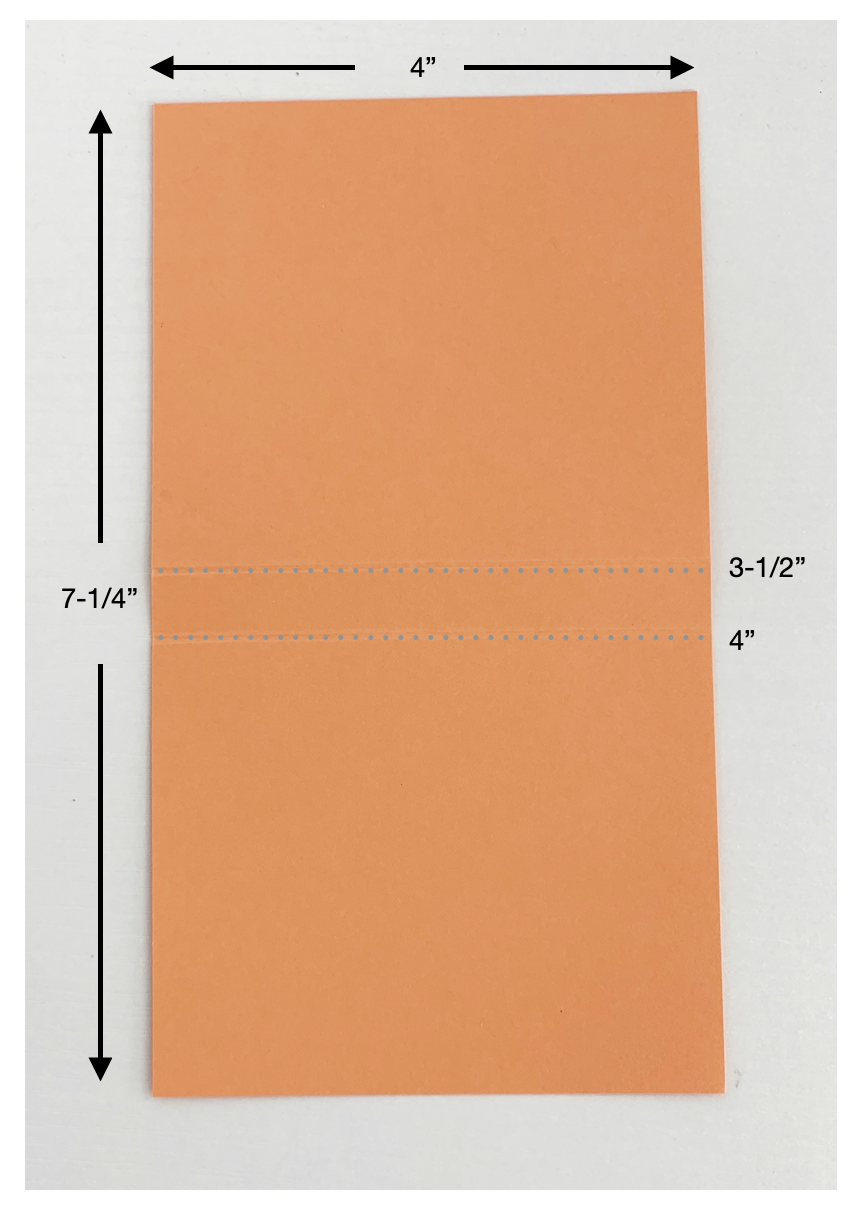
  • Card Base = 8-1/2″ x 5-1/2″ scored at 4-1/4″ on the 8-1/2″ side
  • Designer Series Paper = 4″ x 5-1/4″ and a scrap for heart die-cut
  • Fresh Fresia Cardstock = 5″ x 3-1/2″, 5-1/4″ x 2-5/8″, and a scrap for heart die-cut
  • Basic White Cardstock = 5″ x 2-3/8″, 3-1/4″ x 4-3/4″
Product List

Make a Simple New Horizons Card

The project I’m sharing with you today is so simple to make! All you need to put this card together is paper, stamps, and ink. It’s a great card for beginning card makers and for those of us that are pressed for time. The New Horizons Designer Series Paper does all the work for you to create a beautiful card.

Product List

Make a Friends of the Forest Shaker Card

Today’s project is a 4″ x 4″ shaker card. I used images from the Friends of the Forest stamp set and colored them in with Stampin’ Blend Markers. Just like the card I shared on Monday, I decided to heat emboss the “Glad You’re My Friend” sentiment using White Stampin’ Emboss Powder.

Product List

Make a Driving By Sunshine & Rainbows Card

You don’t have to be an expert on cars to love the versatile images and phrases in the Driving By Stamp Set. The festive balloons and gifts make this a great set for celebrations such as Christmas and birthdays. But the phrases can turn your project into a celebration of friendship, a message that’s timeless.

Don’t those images remind you of simpler times full of fun-in-the-sun? I couldn’t pick a favorite for the card I’m sharing with you today so I used them all!

I colored the stamped images using Stampin’ Blends and pulled the colors from the cheery Sunshine & Rainbows Designer Series Paper. I love this paper so much that it almost made me sad to cut the windows from it.

Cutting & Scoring Guide

  • Card Base measures 5-5/8″ x 8-5/8″ and is scored at 4-3/8″ on the 8-5/8″ side.
  • Stamped layer measures 5-1/2″ x 4-1/4″
  • Die-cut layer measures 5-3/8″ x 4-1/8″
Product List

Make a 3-Dimensional Flowering Tulips Mother’s Day Card

Are you ready for Spring? I sure am! One of the first signs of spring is the tulips and daffodils poking their heads out of the ground. My card today has two gorgeous 3-dimensional tulips popping up on it. I used the Flowering Tulips Bundle from Stampin’ Up! The bundle includes the Flowering Tulips Stamp Set and the Tulips Dies. Use the stamp set and dies together to create detailed tulips or use the dies on their own for a minimalist tulip design.

The Tulips Dies are a must-have for any floral enthusiast. Not only can you create layered tulip fields, but you can also create three types of layered tulip blossoms, perfect for creating a tulip bouquet! Simply die cut the coordinating dies with contrasting cardstock colors, and then fold the pieces together to make beautiful tulip blossoms. These dies are sized perfectly for the front of a card.

Product List

Make an Always in My Heart Valentine Card

I can’t believe we’re already halfway through January, 2022! Time just needs to stand still for a minute. Am I right? With Valentine’s Day coming at us quickly I needed to focus on the cards I want to send this year. I have the Always in My Heart stamp set and coordinating Floral Heart Dies from Stampin’ Up! sitting on the shelf in my craft room and they were calling out to me, “use us, use us”, so that is what I did.

The heartfelt sentiments in the stamp set make them perfect for Valentine’s Day, wedding, and anniversary projects. This is a Two-Step Stampin’ set; it allows you to layer two or more images to create one final image with extra texture and dimension in the colors you want.

Here is another card that I made using the piece left after die-cutting the heart from the Flowering Fields Designer Series Paper.

Product List

Make a Penguin Place Penny Slider Card

The project I’m sharing with you today is a penny slider card.

I used Thick Basic White card stock for the card base. It measures 8-1/2″ x 11″ and is scored at 4-1/4″ on the 11″ side. The first layer of Pool Party card stock measures 4-1/8″ x 5-3/8″. The Sweet Stockings Designer Series Paper layer measures 5-1/4″ x 4″. The final layer on the card with the slider mechanism measures 5-1/4″ x 3-1/4″ before the snow bank is cut from it.

Product List

Make a Counting Sheep Window Birthday Card

Sure, you can count sheep when trying to sleep, but the lambs in the Counting Sheep Stamp Set want to party! These fun, frolicking farm animals are ready for birthday parties and other festive occasions. Of course, you can also pair these darling sheep with greetings of your choice to use them for any occasion. They are ready to jump right onto your projects!

Create a fabulous farm life scene with the images in the Sheep Dies. Choose from a selection of sheep, then add a fence (even though there’s no way to contain this much fun). Complete the scene with party supplies so you’re ready to celebrate! Use these dies on any project you want to turn into a party.

Sale-A-Bration

The Counting Sheep Cling Stamp Set and coordinating Sheep Dies are part of the Sale-A-Bration promotion. For every $50 and $100 you spend, you’ll earn an exclusive Sale-A-Bration item for free! Depending on the amount you spend, you’ll be able to mix ‘n’ match the Sale-A-Bration items you earn. The Counting Sheep Cling Stamp Set is FREE with a $50 purchase and the coordinating Sheep Dies are also FREE during Sale-a-Bration with a $50 purchase. Here is my first creation using these fun new products.

Video Tutorial

Product List

Make a Sailing Home Pop-Up Diorama Card

I shared this Sailing Home Pop-Up Diorama card during this week’s Coffee & a Card Facebook Live and really stumbled through it. My listeners were so kind to stay with me until the end and I hope they were happy with the results.

Paper Cutting/Scoring Guide

  • Card Front = 8″ x 5-1/2″ piece of Bermuda Bay card stock scored at 4-1/4″ on the 8″ side. Fold on score line.
  • Card Insert = 8-1/2″ x 5-1/2″ piece of Bermuda Bay card stock scored at 1/2″, 4-1/4″, & 4-3/4″.
  • Middle Layer = 4-3/16″ x 5-7/16″ piece of Pool Party card stock scored at 1/4″ on both ends of 4-3/16″ sides.
  • Stamped Layer = 2-1/4″ x 5-1/2″ piece of Pool Party, 2″ x 5-1/4″ piece of Basic White card stock.
  • Sentiment Tag = 3-1/4″ x 2-1/4″ piece of Pool Party card stock, 3-1/4″ x 2-1/4″ piece of Basic White card stock.
  • Additional Card stock for Die-cuts = scraps of Whisper White, Sahara Sand and Soft Suede card stock.

It’s important to have the card stock measurements and score lines accurate to create this 3-D pop-up card but look at the result!

Did you notice the wavy water in the background? Watch my video tutorial to see how I was able to create the look of waves with just a scrap of card stock, ink and a blending brush. I mentioned that I had a little trouble assembling this card but edited all the goof-ups out of the video. The replay is a little choppy but it will explain correctly how to make this card.

Product List

Now that I’ve worked out all the kinks and know what I’m doing, I can’t wait to make more of these types of cards. I hope this encourages you to create your own diorama pop-up cards!

Make a Bowl of Cherries Measure of Love Greeting Card

It’s been a week this week and it’s only Wednesday. I’ve been tired and just haven’t felt myself. The weather has been pretty dreary and my allergies have been a bummer. The worst of it is that my creative mojo has taken the week off. How do you get your mojo back? I just start making things and they are usually CASED from other creators.

CASEing is to copy and share everything. Today I copied a card featured in the new Stampin’ Up! Annual Catalog. I did not have the Designer Series Paper the Stampin’ Up! concept artist used in the catalog sample so I substituted the Pansy Petals Designer Series Paper when making my card.

Paper Cutting/Scoring Guide

  • Card Base = 8-1/2″ x 5-1/2″ piece of Soft Sea Foam card stock scored at 4-1/4″ on the 8-1/2″ side.
  • Pansy Petals DSP = 4″ x 5-1/4″
  • Embossed Layer = 2-3/4″ x 4-3/4″
  • Shelf Die-Cut = scrap of Crumb Cake card stock
  • Stamped Images = 5-1/2″ x 3″ piece of Basic White card stock
  • Sentiment Tag = 1/2″ x 3″ piece of Soft Succulent card stock
Product List

Measure of Love Friendship Card with Twisted Ribbon Border

I recently ran across a new paper crafting technique shown by fellow Stampin’ Up! Demonstrator Cary Buckham. The technique, called twisted ribbon, is actually a quilting technique. I love how the technique does appear to be a zig-zag of folded ribbon.

To make the panel for my card, I used a pencil to mark every half-inch on a 5″ x 2″ piece of Pale Papaya card stock.

Next, I lined up 1″ x 3″ strips of Pansy Petals Designer Series Paper at a diagonal onto the Pale Papaya panel using the pencil marks as guides and adhered them to the card stock.

Then I adhered the next layer of 1″ x 3″ strips of Designer Series Paper to the panel lining them up at a diagonal in the opposite direction.

Watch the replay of this week’s Coffee & a Card to watch exactly how to achieve the twisted ribbon technique.

Paper Cutting Guide

  • Card Base = 5-1/2″ x 6-3/4″ piece of Calypso Coral cardstock scored at 2-1/2″ on the 6-3/4″ side
  • Card Insert = 5-1/4″ x 4″ piece of Basic White cardstock
  • Embossed Panel = 2-1/4″ x 5-1/4″ piece of Pale Papaya cardstock
  • Sentiment Tag = 4″ x 3″ piece of Basic White cardstock
  • “Ribbon Panel” = 5″ x 2″ piece of Pale Papaya cardstock
  • Pansy Petals Designer Series Paper = twelve 1/2″ x 3″ strips
  • Stamped Image = 2-1/2″ x 2-1/2″
Product List
Measure Of Love Photopolymer Stamp Set (English)
Tuxedo Black Memento Ink Pad
Real Red Classic Stampin' Pad
Pansy Petals 12" X 12" (30.5 X 30.5 Cm) Designer Series Paper
Calypso Coral 8-1/2" X 11" Cardstock
Pale Papaya 8 1/2" X 11" Cardstock
Basic White 8 1/2" X 11" Cardstock
Pool Party Stampin' Blends Combo Pack
Checks & Dots Embossing Folders
Stitched So Sweetly Dies
Silicone Craft Sheet
Paper Trimmer
Stampin' Seal
Multipurpose Liquid Glue

Sweet Ice Cream Baby Wipe Technique Thank-You Card

I have some requests to demonstrate the Baby Wipe Technique on a card and today is the day. The baby wipe technique is easy enough for anyone to do but it will require a few extra supplies. One obvious supply needed is baby wipes and fragrance free wipes work best.

Step #1

Choose your stamp set. Images with solid backgrounds are going to show-off the baby wipe technique the best but are not necessary. I chose the Sweet Ice Cream stamp set by Stampin’ Up! for today’s project.

The popsicle images worked beautifully with the baby wipe technique. I stamped the two-step popsicles onto a piece of Basic White cardstock to create a background for my card.

Step #2

Look at those variations of pink colors on the stamped images! I’m thinking I need a fruit bar right about now. To achieve this look, I folded a baby wipe in half and then in half again. I set it on an acrylic block then added several drops of Melon Mambo, Flirty Flamingo, and Petal Pink Stampin’ Ink Refils onto the folded baby wipe.

Looks like quite a mess doesn’t it? The inked baby wipe is a stamp pad for my project. You can watch the video replay of my Make-it-Monday Facebook Live to see how this technique works.

Product List
Sweet Ice Cream Bundle
Basic White 8 1/2" X 11" Thick Cardstock
Flirty Flamingo 8-1/2" X 11" Cardstock
Basic White 8 1/2" X 11" Cardstock
Melon Mambo Classic Stampin' Ink Refill
Petal Pink Classic Stampin' Ink Refill
Flirty Flamingo Classic Stampin' Ink Refill
Crumb Cake Classic Stampin’ Ink Refill
Tuxedo Black Memento Ink Pad
Blackberry Bliss Striped Ribbon
Layering Circles Dies
Crumb Cake Classic Stampin’ Ink Refill
Stampin' Seal
Stampin' Dimensionals
Mini Glue Dots
Multipurpose Liquid Glue

Hand-Penned Petals Watercolor Cards

Watercolor is one of my favorite mediums. It’s soft and fluid with no sharp edges – kinda like coloring outside the lines. I am no watercolor artist by any means but used the technique to create two cards during today’s Coffee & a Card Facebook Live.

The colors I chose are soft and coordinate beautifully with the Hand-Penned Designer Series Paper from Stampin’ Up!

To achieve the watercolor effect on this first card I used a stamp from the Hand-Penned Petals stamp set along with Stampin’ Write Markers and a Stampin’ Spritzer. Once the ink dried on the watercolor paper I used VersaMark ink to re-stamp the image onto the watercolor wash then heat embossed with White Stampin Emboss Powder.

On this second card I used ink and a Water Painter. Once dry, the florals were die-cut out using the Penned Flowers Dies then adhered them to the card front.

Watch the video replay to see how easy these two watercolor techniques are.

Product List
Hand Penned Petals Bundle (English)
Hand Penned Petals Photopolymer Stamp Set
Penned Flowers Dies
Polished Pink Classic Stampin' Pad
Soft Succulent Classic Stampin' Pad
Pale Papaya Classic Stampin' Pad
Versamark Pad
2021–2023 In Color Stampin' Write Markers
Fluid 100 Watercolor Paper
Blushing Bride 8-1/2" X 11" Cardstock
Basic White 8 1/2" X 11" Thick Cardstock
Hand Penned 12" X 12" (30.5 X 30.5 Cm) Designer Series Paper
Basic White 8 1/2" X 11" Cardstock
White Stampin' Emboss Powder
Genial Gems
Water Painters
Stampin' Spritzer
Stitched Rectangle Dies
Stitched So Sweetly Dies
Stamparatus
Heat Tool (Us And Canada)
Stampin' Seal
Multipurpose Liquid Glue
Stampin' Dimensionals

Make a Fine Art Floral Note Card Holder

These beautiful note card holders that I made during this week’s Make-it-Monday Facebook Live make terrific gifts for so many occasions. Suitable for hostess gifts, teacher gifts and birthday gifts. I also think they would make impressive craft fair items.

To make your own Fine Art Floral note card holder you will need two pieces of card stock. I pulled colors from the beautiful Fine Art Floral Designer Series Paper from Stampin’ Up! for my boxes; Basic Gray and Just Jade.

Cutting/Scoring Guide

Greeting Card Box

  • Score at 1/2″ and 4-12″ on the 5″ side of an 5″ x 8″ piece of card stock.
  • Score at 1-1/2″ to meet the first score line on both sides of the 8″ side of card stock (see diagram).
  • Score at 4-1/2″ and 5″ on the 8″ side of card stock.

Card Box Lid Flap

  • Score 4″ x 7-1/4″ piece of card stock at 3-1/4″ and 3-3/4″ on the 7-1/4″ side

Designer Series Paper

  • 3-3/4″ x 8-1/2″
  • 3-3/4″ x 2-3/4″

Video Tutorial

Product List

Learn to Make a Daisy Lane Window Card

The spring weather here in Kansas City has me wanting to plant some flowers in the worst way! Our weather is very sneaky as it has been known to snow in April so I’m holding off. Our rule-of-thumb is to wait until Mother’s Day to plant and it cannot get here soon enough!

Just because we’re prevented from exercising our green thumbs doesn’t mean we can’t make something to scratch that itch though. Today, during my regular Wednesday Coffee & a Card Facebook Live we made this fun window card.

To make the card I die-cut a frame using the Stitched Rectangle Dies from Stampin’ Up! then popped it up on the card front to create the “window”. Next, I used the Daisy Lane stamp set and coordinating Medium Daisy Punch to make the stem of daisies growing from the window.

Cutting/Scoring Guide

  • Card Base = 8-1/2″ x 5-1/2″ piece of Basic White Thick cardstock scored at 4-1/4″ on the 8-1/2″ side
  • First Layer = 5-1/4″ x 4″ piece of 2020-2022 In-Color 6″ x 6″ Designer Series Paper
  • Second Layer = 4″ x 2-1/2″ piece of 2020-2022 In-Color 6″ x 6″ Designer Series Paper
  • Stitched Die-Cut Frame = 5″ x 3-3/4″ piece of Bumblebee cardstock
  • Stamped Images = 6-3/4″ x 3-3/4″ piece of Basic White cardstock
  • Sentiment Tag = scrap

Video Tutorial

Supply List


I hope you enjoyed today’s card. I know I shouldn’t plant flowers in March but that doesn’t mean I can’t gather some fun, spring-like supplies and “plant” as much as I want with stamps paper and ink!