All Occasion Cards

Make a Hydrangea Hill Fancy-Fold Window Card

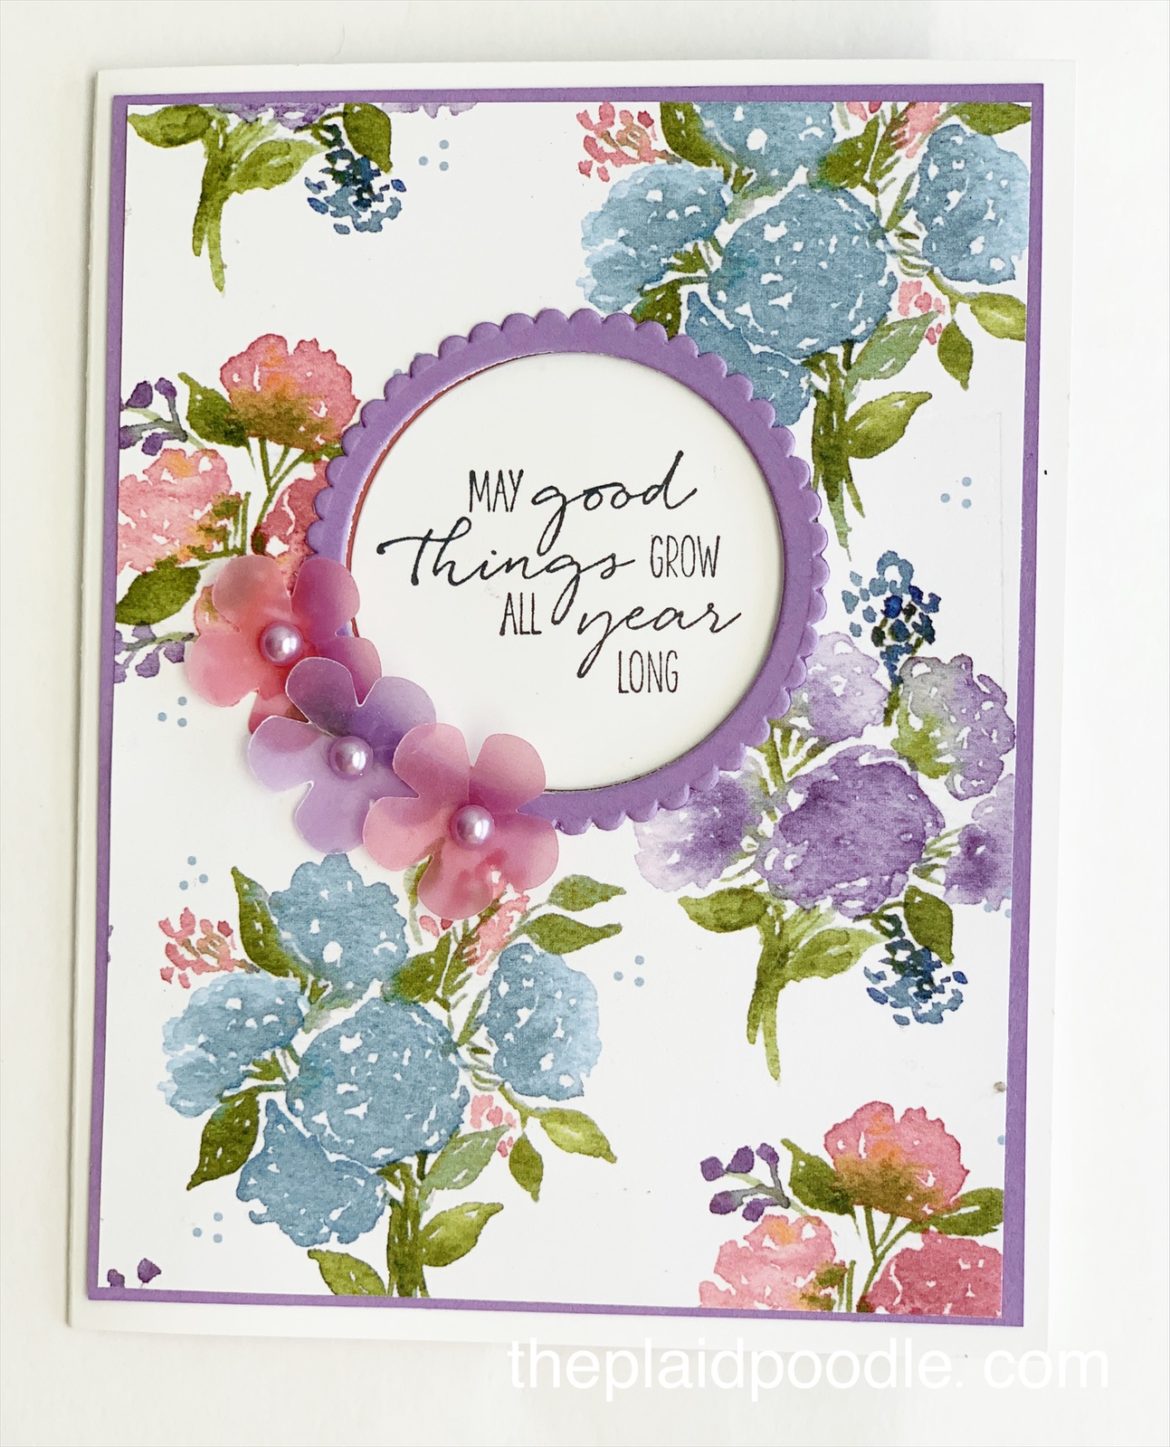
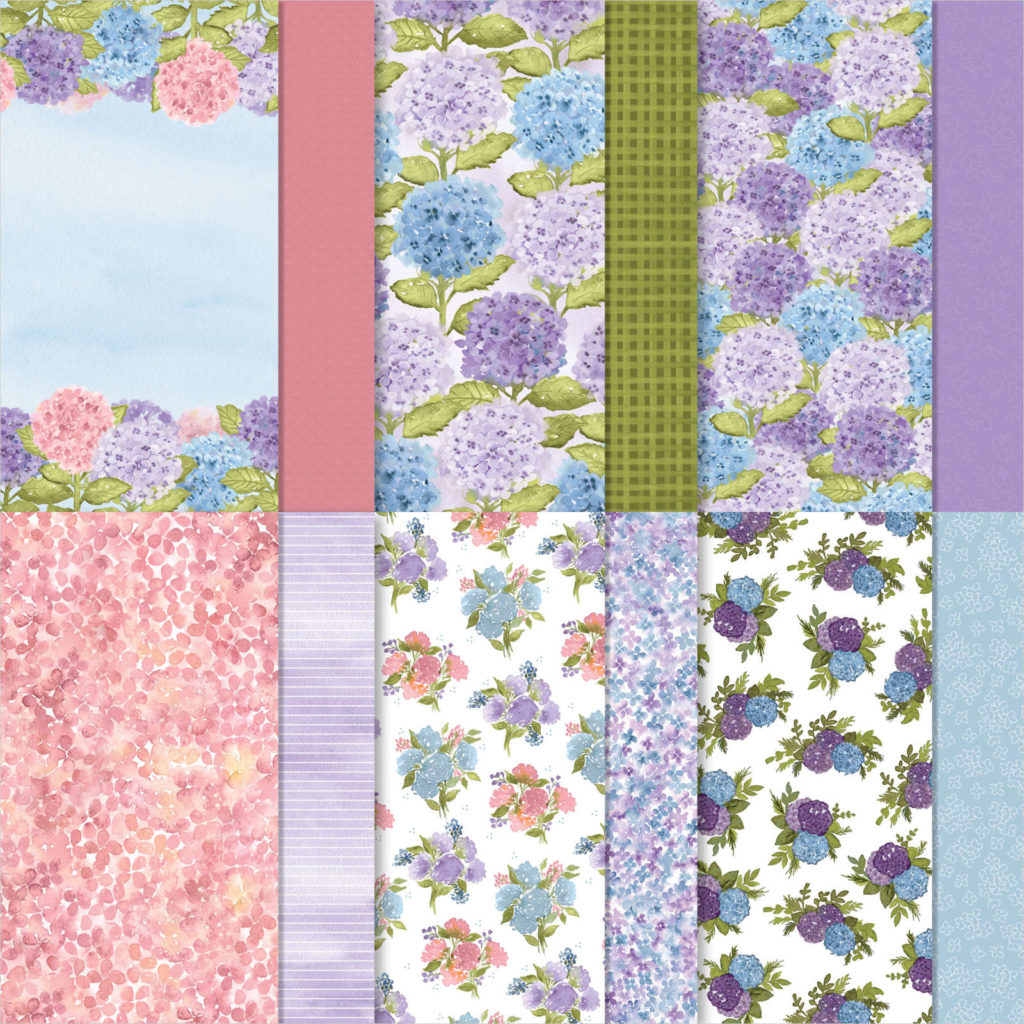
If you are a lover of hydrangeas like I am you will enjoy the Hydrangea Hill Designer Series Paper from Stampin’ Up! The paper is jam-packed full of beautiful blooms in all our favorite springtime colors.

I used one of my favorite prints from the paper pack for a fancy-fold window card that I was dying to make.

I think my favorite part of this card are the vellum petals with pastel pearl centers on the front of the card. To make the petals, I colored vellum with Highland Heather and Rococo Rose Stampin’ Blend Markers then punched the petals out using the Small Bloom Punch.

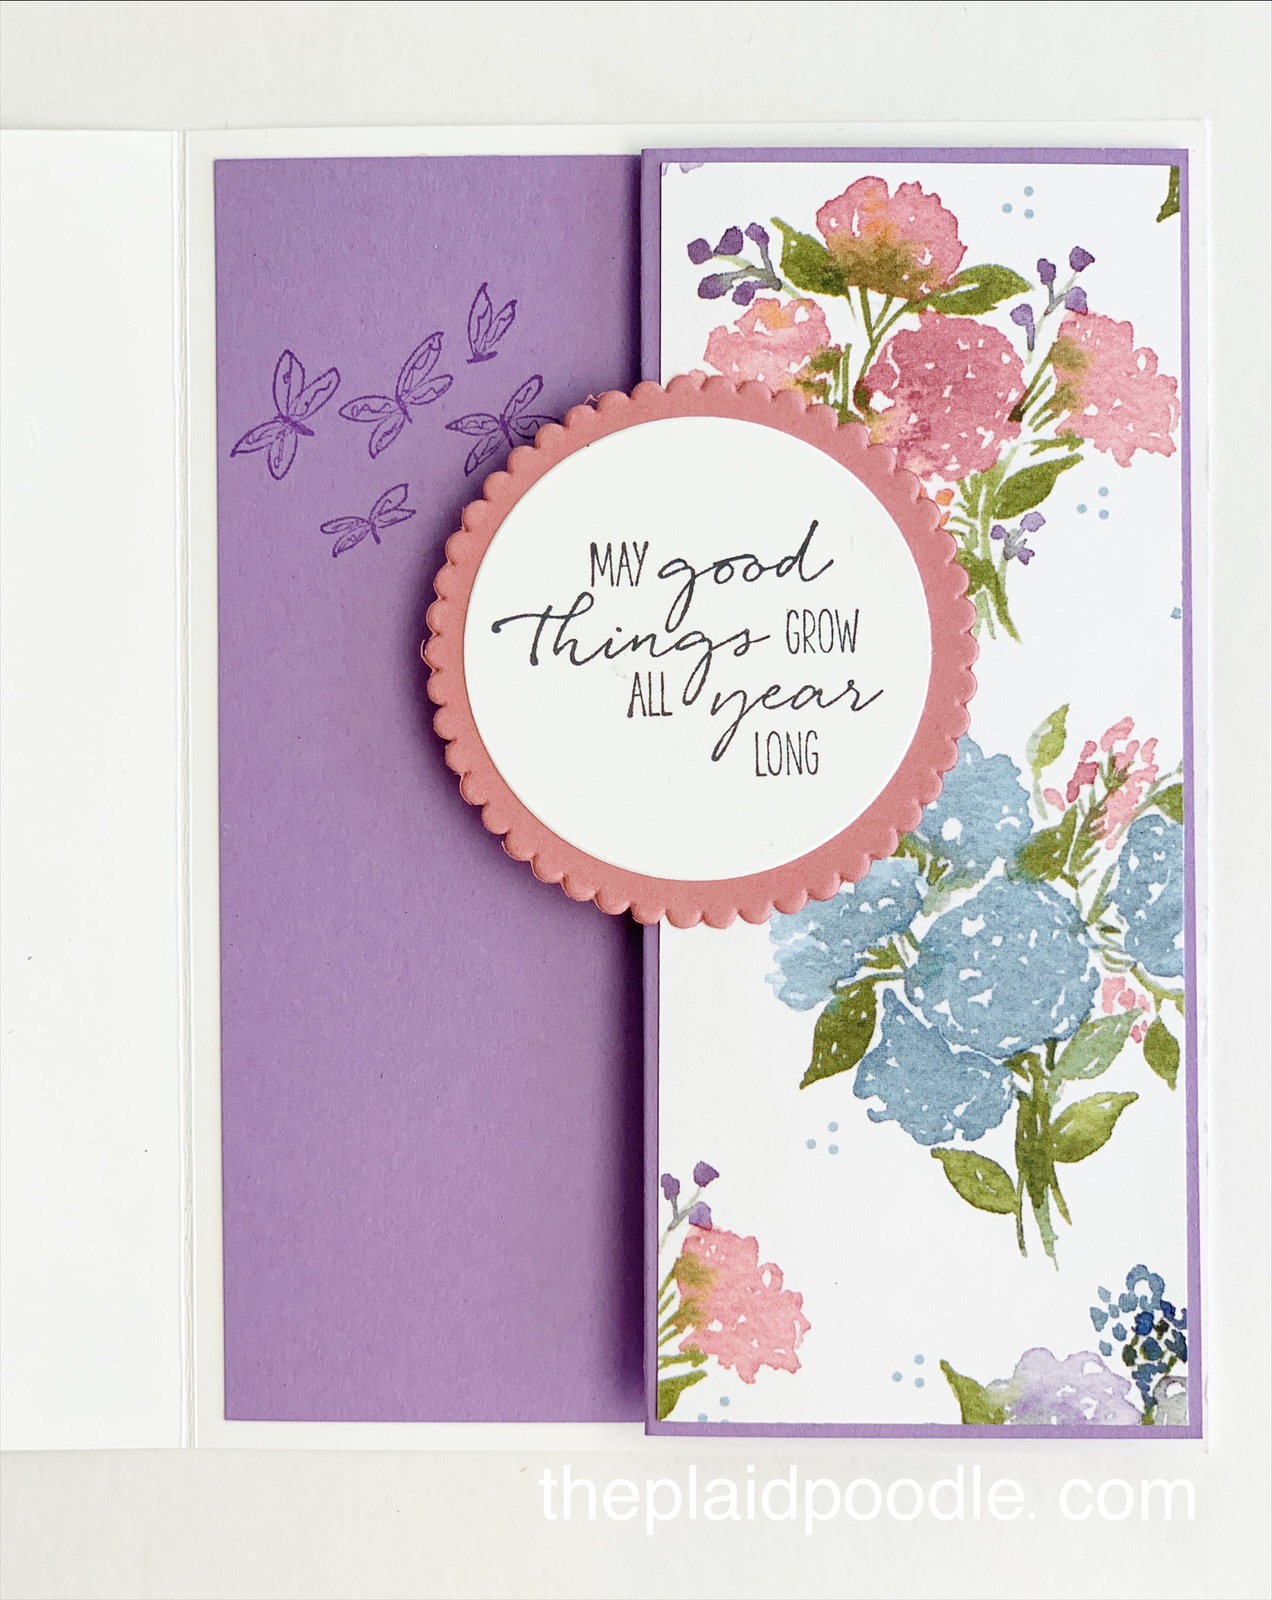
The Hydrangea Hill fancy fold window card is like having two cards in one because when you open the card front . . . surprise, there’s a z-fold card found inside. This card is one that I will be making more of.

Cutting/Scoring Guide

  • Card Base = 8-1/2” x 5-1/2” piece of Basic White cardstock; score at 4-1/4” on 8-1/2” side
  • First Layer = 5-1/4” x 4” piece of Highland Heather cardstock
  • Second Layer = 5-1/8” x 3-7/8” piece of Hydrangea Hill DSP
  • Inside z-fold layer = 8-1/2” x 5-1/4” piece of Highland Heather scored at 4” and 6’-1/4” on the 8-1/2” side
  • Stamped circle = 2-1/2” x 2-1/2”
  • Scallop frame = 2-1/2” x 2-1/2” piece of Highland Heather cardstock
  • Scallop circle = 2-1/2” 2-1/2” piece of Rococo Rose cardstock
  • Punched blooms = scrap of Vellum

Video Tutorial

Product List

These cards are so much fun to make and are fairly easy to put together. Hydrangea lover or not, I hope you were inspired today to create your own fancy fold window card.

Make Beautiful Butterfly Brilliance Cards!

Spring sprung on us over the weekend and I’m ready for it! I’m ready to spend more time outside. I’m ready to get my hands dirty planting all my favorite spring flowers. And most of all, I’m ready to pull out the pastel and bright colors to make fun spring paper projects!

Here are a few projects I made last week using the Butterfly Brilliance Bundle:

If you would like to recreate these projects you can watch the video replay of my Coffee & a Card Episode where I showed how to make a couple of them.

Product List
So Saffron Classic Stampin' Pad
So Saffron Classic Stampin’ Pad

What will you be making this Spring? Do you change up the colors you use with the seasons? It would be my privilege to help you with your paper crafting needs. Email me anytime with questions you may have and don’t forget you can shop 24/7 at my online shop!

Email: Leslie@theplaidpoodle.com

Heartwarming Hugs Gift Card Holder

I’m one of those people who likes a beautifully wrapped present almost as much as the gift that is inside! I’m also one of those people who gives gift cards. It’s hard to present a gift card in a “wow” package, but with a little paper, stamps and ink, you can create something fun to slip a gift card into.

This gift card holder is a simple 11″ x 3-1/4″ piece of designer series paper scored and folded to create a pocket to slip a gift card into. I added an embellished belly band and some ribbon to close it up.

The Heartwarming Hugs Gift Card Holder will fit in a standard A2 size envelope but will also slip into a note card sized envelope perfectly.

Watch the replay of my Coffee & a Card Facebook Live where I demonstrate how to make this project.

Product List

Thanks for stopping by my little place on the interwebs. I hope I have given you some ideas to create your own Heartwarming Hugs Gift Card Holder using paper, stamps and ink!

Make a Parisian Flourish Embossed Card

I wanted to make a Parisian Flourish Embossed card and here is what I came up with. I also tried a new technique with my rectangular shaped dies. These cards have an embossed panel using the Parisian Flourish 3D Embossing Folder and Stitched So Sweetly Dies from Stampin’ Up!

I had been itching to use the Playful Alphabet Dies and wanted to make a pretty background for the “HELLO” die-cuts. I pulled the colors for the card from the Playing with Patterns Designer Series Paper.

I showed how to make this card on today’s Make-it-Monday Facebook Live. Watch the video replay below to learn how used a Stitched so Sweetly Die to create the angled embossed panel.

Product List

I started with an 8-1/2″ x 5-1/2″ piece of Coastal Cabana card stock folded in half to create the card base. Next an 4″ x 5″ piece of Whisper White card stock was embossed the the Parisian Flourish 3-D Embossing Folder then die-cut per the video. The piece of Playing with Patterns Designer Series Paper for this card measures 4″ x 3-1/2″.

These cards have clean lines and use bright colors with fun patterns. One of the gals on my Make-it-Monday Facebook Live described the card as a “Happy Card” which I think hits the nail on the head.

Birds & Branches Slimline Card

Slimline cards are a new trend in card making and I thought I would try my hand at it. I thought a bird nest balancing on a branch up in the sky would make a great slimline card. The Birds & Branches Bundle from Stampin’ Up! was perfect for what I had in mind.

I started with a 8-7/8″ x 7-3/4″ piece of Thick Whisper White card stock folded in half to form the card base. The dimensions I chose will allow the card to fit into a #10 business size envelope.

I used the Birds & Branches Bundle from Stampin’ Up! Don’t you just love the sweet little birds and their cozy nest?

Did you notice the stitched outline on the stamped layer on the card? Did you wonder how in the heck I was able to create a stitched rectangle perfectly sized for this slimline card? If so, you’re in luck because here is a video tutorial that shows how to extend your square and rectangle dies.

The sentiment I used came from the Field of Flowers stamp set from Stampin’ Up! Isn’t that font the bomb?!

Here is a couple of cards that I have created with the Field of Flowers stamp set. I love the simplicity of this stamp set.

Here are the card dimensions and a list of products used in my Birds & Branches Slimline card.

  • Card Base = 8-7/8″ x 7-3/4″ piece of Thick Whisper White card stock scored at 3-7/8″ on the 8-7/8″ side then folded on score line.
  • First Layer = 8-5/8″ x 3-5/8″ piece of Balmy Blue card stock
  • Stamped Layer = 8-7/8″ x 7-3/4″ piece of Whisper White card stock cut with second largest Stitched Rectangle Die.
  • Birds & Nest Die-Cuts = 4″ x 4″ piece of Crumb Cake card stock.
Product List

Thank you for stopping by my little part of the internet. I hope I may have inspired you to step out on a limb (gack!) to create your own slimline card!

Two Fun Fold Cards Full of Flowers

Fun-fold cards pack a big “WOW” factor and are such a treat to receive! I enjoyed making the cards in today’s post and they were so easy to make.

This first card looks like a large matchbook. The sentiment tag is positioned just right to keep the card closed. The pretty sunflower print from the Flowers for Every Season 6″ x 6″ Designer Series Paper begged for me to use the Celebrate Sunflowers Bundle. It didn’t really beg me but don’t you think it was a great idea?

The second card uses paper from the Flowers for Every Season Designer Series Paper pack as well. This vibrant floral print is lively and includes my favorite new In-Color Magenta Madness! I pulled that color from the paper by adding the butterfly die-cuts.

Watch the video below to see how I put these full-of-flowers card together.

Cutting & Scoring Guide

Card #1:

  • Score 11″ x 4-1/4″ piece of Thick Whisper White cardstock at 4″ and 9-1/2″ on the 11″ side to create card base.
  • Misty Moonlight Cardstock: 4″ x 3-3/4″, 4″ x 1-1/4″ and 3-3/4″ x 1″
  • Flowers for Every Season Designer Series Paper: 3-3/4″ x 3-1/2″ and 3-3/4″ x 1″
  • Whisper White Cardstock: 3-1/2″ x 3/4″

Card #2:

  • Score 11″ x 4-1/4″ piece of Bumble Bee cardstock at 2-3/4″ x 5-1/2″
  • Flowers for Every Season Designer Series Paper: 4-1/2″ x 3-1/2″ and 2-1/4″ x 4-1/4″
  • Whisper White Cardstock: 4-1/2″ x 3-1/2″, 4″ x 3″
  • Magenta Madness Cardstock: scrap
Product List
Celebrate Sunflowers Bundle (English)
Tasteful Touches Bundle (English)
Celebrate Sunflowers Cling Stamp Set (English)
Sunflowers Dies
Tasteful Touches Cling Stamp Set (English)
Tasteful Labels Dies
Tuxedo Black Memento Ink Pad
Crushed Curry Classic Stampin' Pad
Whisper White 8-1/2" X 11" Thick Cardstock
Whisper White 8-1/2" X 11" Cardstock
Bumblebee 8-1/2X11 Cardstock
Misty Moonlight 8-1/2" X 11" Cardstock
Magenta Madness 8-1/2" X 11" Cardstock
Flowers For Every Season 6" X 6" (15.2 X 15.2 Cm) Designer Series Paper
Paper Trimmer
Lovely Labels Pick A Punch
Butterfly Beauty Dies
Multipurpose Liquid Glue
Stampin' Dimensionals
Mini Stampin' Dimensionals

Thanks for stopping by my little spot of the interwebs. I hope you enjoyed the projects I shared today.

Make a Floating Card

I have been having a blast making floating cards! Floating cards are not new but I am new to them. The cards are simple to make but the end result is a pretty fancy card. I’m so glad I stepped out of my comfort zone to create these cards. I will definitely make them again.

Both floating cards I’m sharing today were made during one of my Coffee & a Card Facebook Live’s. I’ve included the video replays and a list of products I used in both cards.

For this first card I used the retiring Piece of Cake stamp set and Cake Builder Punch from Stampin’ Up! The Cake Builder Punch is discounted while supplies last.

Both the floating cards use the retiring Perennial Essence Designer Series Paper. The paper is also retiring and is discounted as well. The Designer Series Paper is elegant and perfect to use for any feminine occasion including birthdays, bridal showers and Mother’s Day.

For this second card I used retiring products as well. The Special Celebrations stamp set is full of card front sentiments as well as card insert verses. The intricate butterfly die on the card front is from the Springtime Impressions Dies and is also very discounted right now while supplies last.

Product List
Piece Of Cake Photopolymer Stamp Set
$17.00
Special Celebrations Cling-Mount Stamp Set
$33.00
Mossy Meadow Classic Stampin' Pad
$7.50
Window Sheets
$5.00
Highland Heather 8-1/2" X 11" Cardstock
$8.75
Mossy Meadow 8-1/2" X 11" Cardstock
$8.75
Blackberry Bliss 8-1/2" X 11" Cardstock
$8.75
Perennial Essence Designer Series Paper
$11.50
Petal Pink 8-1/2" X 11" Cardstock
$8.75
Whisper White 8-1/2" X 11" Cardstock
$9.75
Paper Trimmer
$25.00
Cake Builder Punch
$18.00
Layering Ovals Dies
$35.00
Stitched Shapes Dies
$30.00
Springtime Impressions Dies
$29.00
Take Your Pick
$10.00
Take Your Pick Die Brush Tip
$9.00
Petal Pink 1/4" (6.4 Mm) Metallic-Edge Ribbon
$7.00
Highland Heather Stampin' Blends Markers Combo Pack
$9.00
Petal Pink Stampin' Blends Markers Combo Pack
$9.00
Old Olive Stampin' Blends Markers Combo Pack
$9.00
Seaside Spray Stampin' Blends Combo Pack
$9.00
Mini Glue Dots
$5.25
Multipurpose Liquid Glue
$4.00

Make a 3-D Front Flap Card

TGIF everyone! I wanted to share this card that I made recently during one of my Coffee & a Card Facebook Lives. I go live two times per week and share some fun projects and paper crafting techniques. If you’re looking for some cool craftiness and you’re on Facebook, please follow me here: https://www.facebook.com/theplaidpoodle

This is a front flap card. It’s very easy to make and has a little pizazz with the 3-D hot air balloon and fancy fold. Click on the button for the .PDF copy of the Project Recipe and watch the video tutorial for step-by-step instruction.

Here is the supply list if you’re interested in any of the products used in this card. They are on the Stampin’ Up! Retiring List so it’s “while supplies last” only.

Product List

Make a Country Floral Wax Paper Embossed Card

Hello, I’m sharing a technique with you today that is so much fun to do and if you have been paper crafting for a while you probably already have all the supplies you need.

I’m not sure what the official name is but I call the technique “wax paper embossing” and I used it as the background for this card. The wax from the waxed paper is melted onto a piece of card stock then sponged with ink creating a batik-like look.

The wax paper embossing technique has been around for awhile, it’s super easy to do and the end result is pretty impressive. It is very similar to and reminds me a lot of batik art.

To use this technique you will need waxed paper, an iron, a die-cutting or embossing machine and an embossing folder. The more intricate the design on the embossing folder, the better your results will be. I used the Country Floral Dynamic Textured Embossing Folder from Stampin’ Up! for my card.

Isn’t that a pretty embossed pattern? Because it’s easier to show you how to do this technique than it is to try and explain it, here is a video tutorial demonstrating wax paper embossing:

Paper Cutting Guide

  • Poppy Parade 8-1/2″ x 11″ Cardstock = 8-1/2″ x 5-1/2″ scored at 4-1/4″
  • Whisper White 8-1/2″ x 11″ Cardstock = two pieces 4″ x 6″ each and one piece 3″ x 2-1/2″
  • Basic Black 8-1/2″ x 11″ Cardstock = 3-1/2″ x 4-1/2″
Product List

I hope you enjoyed learning this new technique for creating beautiful, batik-like backgrounds for your paper crafting projects. Thanks for stopping by!

How to Make a So Sentimental Thank You Card

The project I made for today’s post is a lovely, feminine card that would fit so many occasions!

The floral paper from the Best Dressed Designer Series Paper Stack was my inspiration for the card. I pulled the Lovely Lipstick color from the paper to use for the card base, the embossed layer, the butterflies and even the rhinestones! I used a sentiment from the So Sentimental Stamp Set from Stampin’ Up! Look at all the great occasions this stamp set would work for!

What was really fun was using the stamps along with the coordinating Stitched So Sweetly Dies. When you purchase the So Sentimental Bundle, the stamp set and dies, you save 10%! The dies fit perfectly over several of the stamped images creating pretty tags for cards and packages. I’m excited to use the stitched scallop rectangle dies on a project!

For the inside sentiment, I chose a stamp from the Little Ladybug stamp, a Host Stamp Set from Stampin’ Up! Isn’t it cute?

Product List
Bone Folder
$7.00
Stamparatus
$49.00

Card Recipe:

  • Real Red card stock = 4-1/4″ x 11″ scored at 5-1/2″ to form card base
  • Real Red card stock = 2-1/2″ x 5-1/4″ emboss
  • Best Dressed Designer Series Paper = 2″ x 5-1/4″
  • Rose Glimmer Paper = 1/4″ x 5-1/4″
  • Whisper White card stock = 2-1/2″ x 3″ stamp sentiment & die-cut out
  • Whisper White card stock = 4″ x 5-1/4″ inside card sentiment
  • Vellum = scrap for punched butterflies

Click on the Shop Now button below to get everything you need to make your own So Sentimental Thank You Card!

Make a K.I.S.S. Card

You might know that the acronym for K.I.S.S. is “Keep it simple sweetie”! In the card making world K.I.S.S. cards are life savers.

Keep It Simple Sweetie cards are great

  • when you’re in a hurry!
  • for beginning stampers/card makers.
  • when you need to make multiple cards.
  • when you want your crafting budget to go farther.
  • when you’re stuck and want to jump start your crafting mojo!

Here is an example of a K.I.S.S. card:

A simple, elegant card and sometimes, as in this case, less is more. All that is needed are a few basic paper crafting supplies – no special tools required. Here is video tutorial for the card that I shared during my Coffee & a Card Facebook Live today:

Directions:

  • Fold 8-1/2″ x 5-1/2″ piece of Gorgeous Grape or Grannie Apple Green card stock in half to create card base.
  • Adhere 4″ x 3″ piece of Lilly Impressions Designer Series Paper to center of card front at an angle using snail adhesive.
  • Adhere another 4″ x 3″ piece of Lilly Impressions Designer Series Paper to center of card front.
  • Stamp sentiment onto 5/8″ x 4″ piece of Whisper White card stock using Memento ink. Flag both ends of tag using the Banner Triple Punch. Adhere tag to center of card front using Stampin’ Dimensionals.
  • Tie a bow with Mint Macaron Textile Ribbon; adhere to card front using Mini Glue Dot.
  • Adhere sequins to card front using Multi-Purpose Liquid Glue.
Product List
Stamparatus
$49.00

I hope this article encouraged you to add a little simple card making to your crafting calendar. Happy Stamping!

Resist Emboss Technique with Rooted in Nature

As a Stampin’ Up! Demonstrator we get extra perks and one of those is the quarterly magazine, Stampin’ Success. In the most recent issue I discovered a beautiful card using the resist emboss technique and I wanted to share it with you.

I used the Rooted in Nature stamp set from Stampin’ Up! and recreated the card found in the magazine. This card has all the things; resist embossing, layers, texture and gold embossed die-cuts.

The resist emboss technique couldn’t be easier but takes your paper crafting projects up a level. Here is my video tutorial for the card and below that is a list of all the products I used in the video.

Product List

Sailing Home Card

I just got back from San Antonio where I attended OnStage Local with Stampin’ Up! OnStage is an exciting event designed to bring Stampin’ Up! demonstrators together. These events coincide with the launch of the annual and seasonal catalogs so we can see all of the new products before anyone else.

Here are the lovely ladies from our Team that attended the event in San Antonio. We always enjoy catching up with each other and have a great time.

The most exciting part of April On-Stage is the launch of the new Stampin’ Up! Annual Catalog.

I am so excited about this catalog and look forward to sharing it with you! If you would like a copy of the catalog when it becomes available click on the button below to request one.

Demonstrators are able to pre-order from the catalog before it goes live on June 4th. We are sworn to secrecy and cannot share images from inside the catalog. We are allowed however, to show any products from the catalog that we receive as well as projects made with those products.

We always get to play with some of the new products at OnStage. I wanted to share everything with you all so here is the replay of my Facebook Live Coffee & a Card where I show the goodies I received and finish a card using the Sailing Home stamp set.

Here are photos of three of the cards we made during OnStage

Abstract Impressions Thank You Card

I’ve been away from my studio for about a week and I think it has affected my creative mojo. One of the things I do when that happens is gather items from a suite of products.

Placing the stamp set, pretty papers and other elements in front of me helps to spur some ideas and I know that everything is going to coordinate. For today’s project I used products from the Garden Impressions Suite from the Stampin’ Up! Annual Catalog and this is the card I came up with.

I pulled colors from the Garden Impressions Designer Series Paper to use for the card base, ink and tag. The beautiful die from the Springtime Impressions Thinlits made a great background for the card front. I used Multipurpose Adhesive Sheets which made adhering the intricate die-cut to the card front a breeze. Make sure to watch the video tutorial below to view how I utilized the sheets.

Most of the stamping for this card is inside the card. The Abstract Impressions stamp set has two and three-step stamps that add so much depth to the image. And don’t you just love that sweet butterfly? Again, I pulled colors from the Designer Series Paper to choose inks using Soft Sea Foam for the flower stems and Petal Pink with Calypso Coral for the flowers.

Product List
Abstract Impressions Photopolymer Stamp Set
Night Of Navy Classic Stampin' Pad
Soft Sea Foam Classic Stampin' Pad
Petal Pink Classic Stampin' Pad
Calypso Coral Classic Stampin' Pad
Springtime Impressions Thinlits Dies
Rectangle Stitched Framelits Dies
Big Shot
Big Shot Die Brush - New Configuration
Rhinestone Basic Jewels
Multipurpose Adhesive Sheets
Stampin' Dimensionals

Amazing Life You are Amazing Card

Today’s Card is a quick and easy card. The stamped images are from the Amazing Life Stamp Set. “You are amazing!”, “I believe in you!”, “Yay!” – I make these statements all the time and am excited to have stamps that match my expressions! Also, we’re in the month of March and the four-leaf clover along with the “good luck” sentiment are perfect for St. Patrick’s Day cards and decorations.

I pulled the colors for the ink and card stock form the Garden Impressions Designer Series Paper. Our winter has been so long that I needed the bold, vibrant colors of this beautiful paper!

I demonstrated this card on this week’s Coffee & a Card. Here is an edited video of that demonstration and below that is the list of products used.

Product List
Amazing Life Photopolymer Stamp Set
Shaded Spruce Classic Stampin' Pad
Soft Sea Foam 8-1/2" X 11" Cardstock
Shaded Spruce 8-1/2" X 11" Cardstock
Garden Impressions 6" X 6" (15.2 X 15.2 Cm) Designer Series Paper
Whisper White 8-1/2" X 11" Card Stock
Powder Pink 8-1/2" X 11" Cardstock
Night Of Navy Medium Baker's Twine
Rhinestone Basic Jewels
Stampin' Dimensionals
Stamparatus