Uncategorized

Craft Room Storage

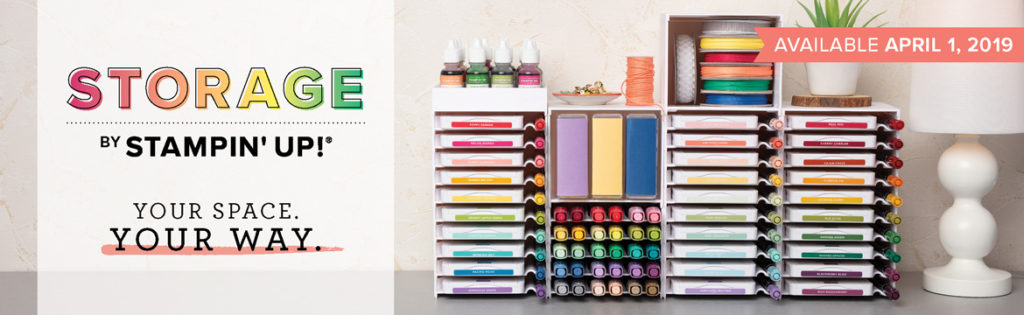
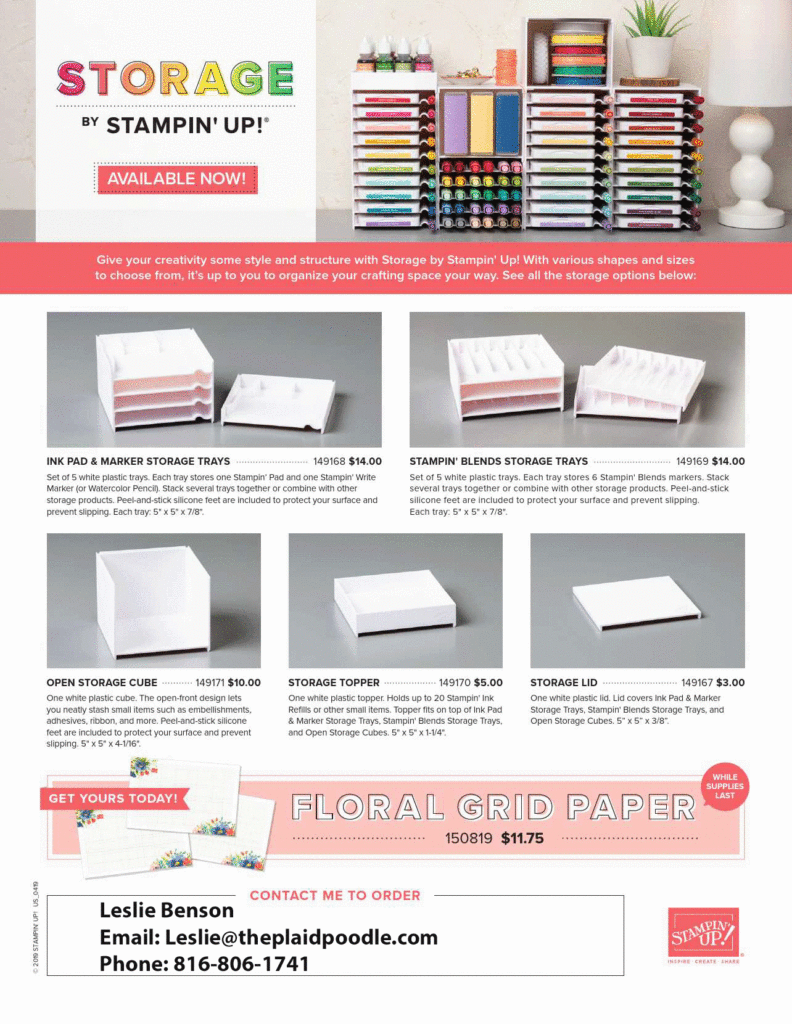
I am tickled Petal Pink to announce that Stampin’ Up! is launching a modular storage system! Whether you have an entire room or a small corner in your home for stamping, your creative space should be tailored to you. The new product line, Storage by Stampin’ Up!, provides you with modular storage solutions that let you organize—and customize—your space your way! Take a look:

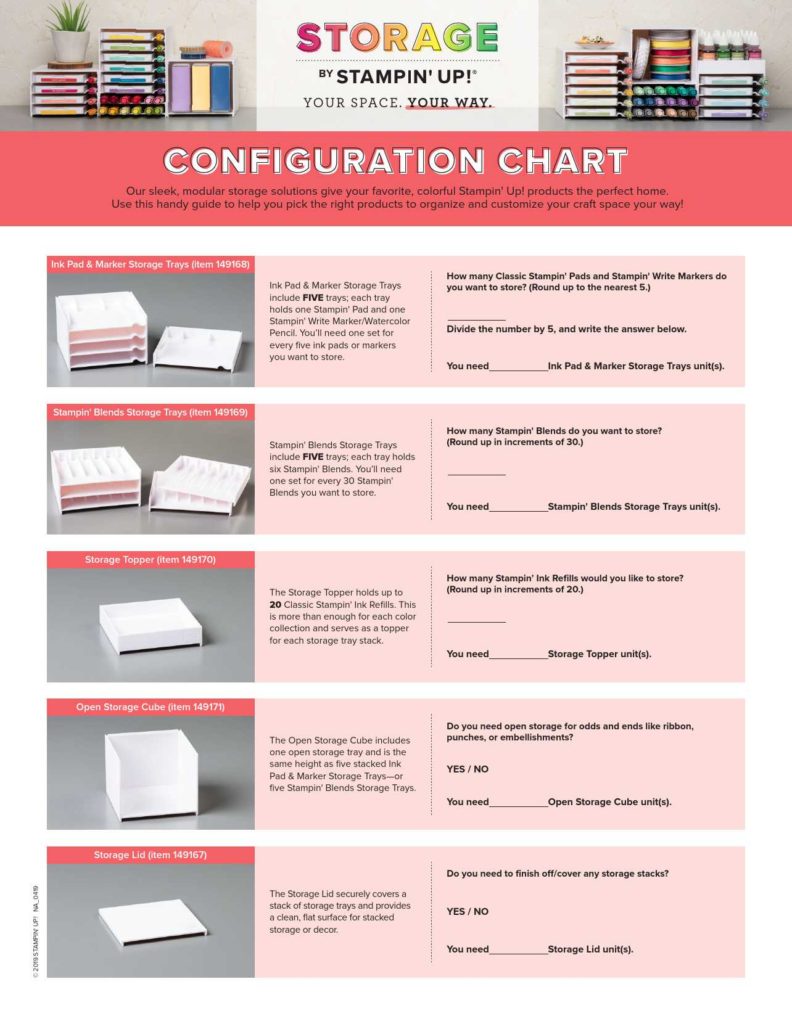
Storage by Stampin’ Up! is designed to store and showcase your Stampin’ Pads, Stampin’ Ink Refills, Stampin’ Blends, Stampin’ Write Markers, Watercolor Pencils, and other accessories. Here are some other features and benefits of Storage by Stampin’ Up!:

Features & Benefits:

  • Keeps products organized, tidy, visible, and trackable at all times.
  • Ensures that your Stampin’ Pads, Stampin’ Write Markers, and Stampin’ Blends are all stored horizontally, as recommended.
  • Designed to be stylish, durable, compact, stackable, and modular.
  • Blends in naturally with most home decor with its white neutral color.
  • Stacks vertically and can be arranged to fit practically any flat workspace.
  • Easily assembled and disassembled for rearrangement and/or cleaning.

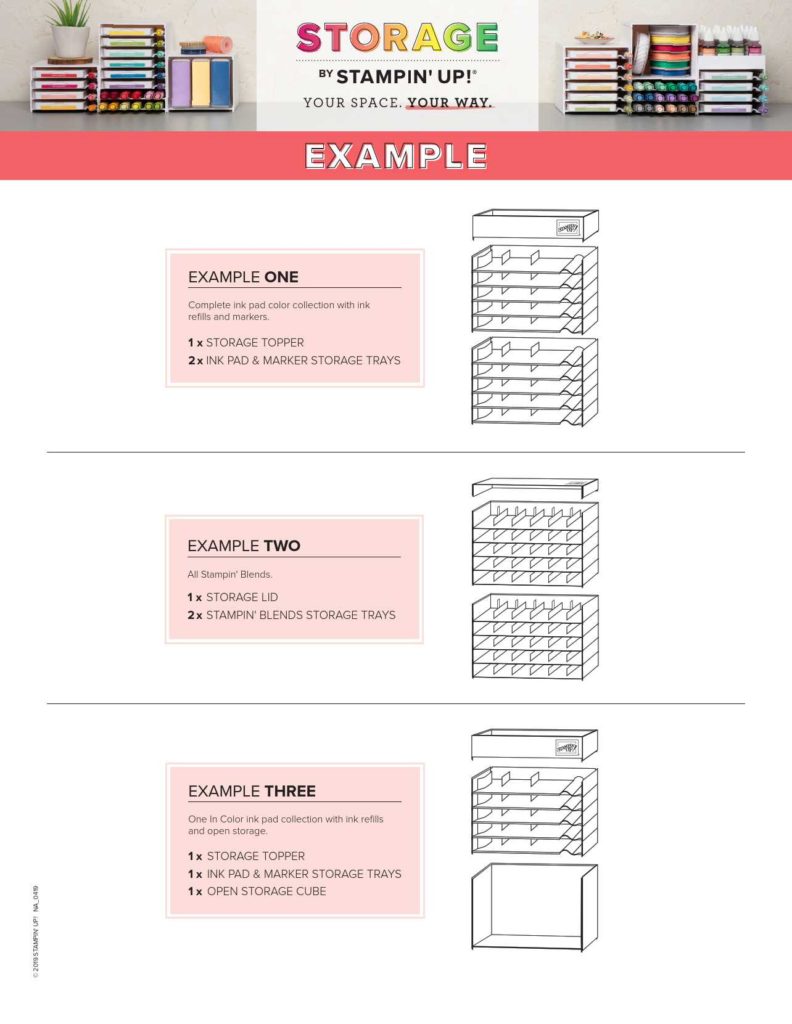
How much storage do you need? Here is an easy configuration chart.

Before I get to the nitty gritty stuff, like how much these awesome products are going to sell for (which is very reasonable by the way), let me remind you that you can have these products at a discount.

You can join Stampin’ Up! anytime but new demonstrators who join by March 31st get a lot of extra FREE stuff! Then, when Storage by Stampin’ Up! launches on April 1, you can purchase them using your Demonstrator discount. It’s something to think about. You can find information about joining Stampin’ Up! HERE. I would enjoy talking with you about it so feel free to email me at Leslie@theplaidpoodle.com with your contact information.

Abstract Impressions Thank You Card

I’ve been away from my studio for about a week and I think it has affected my creative mojo. One of the things I do when that happens is gather items from a suite of products.

Placing the stamp set, pretty papers and other elements in front of me helps to spur some ideas and I know that everything is going to coordinate. For today’s project I used products from the Garden Impressions Suite from the Stampin’ Up! Annual Catalog and this is the card I came up with.

I pulled colors from the Garden Impressions Designer Series Paper to use for the card base, ink and tag. The beautiful die from the Springtime Impressions Thinlits made a great background for the card front. I used Multipurpose Adhesive Sheets which made adhering the intricate die-cut to the card front a breeze. Make sure to watch the video tutorial below to view how I utilized the sheets.

Most of the stamping for this card is inside the card. The Abstract Impressions stamp set has two and three-step stamps that add so much depth to the image. And don’t you just love that sweet butterfly? Again, I pulled colors from the Designer Series Paper to choose inks using Soft Sea Foam for the flower stems and Petal Pink with Calypso Coral for the flowers.

Product List
Abstract Impressions Photopolymer Stamp Set
Night Of Navy Classic Stampin' Pad
Soft Sea Foam Classic Stampin' Pad
Petal Pink Classic Stampin' Pad
Calypso Coral Classic Stampin' Pad
Springtime Impressions Thinlits Dies
Rectangle Stitched Framelits Dies
Big Shot
Big Shot Die Brush - New Configuration
Rhinestone Basic Jewels
Multipurpose Adhesive Sheets
Stampin' Dimensionals

Amazing Life You are Amazing Card

Today’s Card is a quick and easy card. The stamped images are from the Amazing Life Stamp Set. “You are amazing!”, “I believe in you!”, “Yay!” – I make these statements all the time and am excited to have stamps that match my expressions! Also, we’re in the month of March and the four-leaf clover along with the “good luck” sentiment are perfect for St. Patrick’s Day cards and decorations.

I pulled the colors for the ink and card stock form the Garden Impressions Designer Series Paper. Our winter has been so long that I needed the bold, vibrant colors of this beautiful paper!

I demonstrated this card on this week’s Coffee & a Card. Here is an edited video of that demonstration and below that is the list of products used.

Product List
Amazing Life Photopolymer Stamp Set
Shaded Spruce Classic Stampin' Pad
Soft Sea Foam 8-1/2" X 11" Cardstock
Shaded Spruce 8-1/2" X 11" Cardstock
Garden Impressions 6" X 6" (15.2 X 15.2 Cm) Designer Series Paper
Whisper White 8-1/2" X 11" Card Stock
Powder Pink 8-1/2" X 11" Cardstock
Night Of Navy Medium Baker's Twine
Rhinestone Basic Jewels
Stampin' Dimensionals
Stamparatus

Incredible Like You Birthday Card

This is the birthday card we made during this week’s Coffee and A Card Facebook Live using one of my favorite Stampin’ Up! colors, Melon Mambo. It was a quick and easy card and I think it turned out very pretty.

The flowers seemed to be floating around at first but once I added the other leaf and floral images it came together how I imagined it would. I couldn’t decide whether I wanted to place the sentiment horizontal on the card front or at an angle and, as you can see, I went with the angle. I thought it kind of went with the floating flowers – lol!

All the colors I used in the card except for one came from the Stampin’ Up! Brights Color Family. The one subtle color I added was Blushing Bride which I stamped the small circles with.

Here is the edited replay of the Coffee and a Card Facebook Live and below that is a list of all the supplies I used for this card.

Product List: Click on product image for details.


Home to Roost Bundle

Share the simple moments with the Stampin’ Up! Home to Roost stamp set. Available free during Sale-a-bration. Create these beautiful and easy cards with fond thoughts of friendship.

Did you know you can purchase all of the supplies to make these adorable cards with just one item number? Use item code #151039 when you shop with me and get all of the products listed plus you can choose the Home to Roost stamp set for FREE (or chose another Sale-a-Bration product for your free choice). You may also purchase the products individually. Here’s what’s included in the bundle:

Home to Roost “You Can Make It” Bundle:

  • Wood Textures Designer Series Paper Stack
  • Nature’s Poem 8-1/2″ X 11″ Cardstock Pack
  • Soft Suede Classic Stampin’ Pad
  • Watercolor Pencils
  • 3/16″ (1 Cm) Braided Linen Trim
  • Tin Tile Dynamic Textured Impressions Embossing Folder
  • Stampin’ Dimensionals
  • CLICK HERE TO PURCHASE

Coffee Cafe Gift Card Holder

I love coffee! My Kuerig is the first thing I drag myself to each morning. Taking a few minutes to enjoy a hot cup of coffee while my brain tries to wake up is one of the best moments of my day.

I’m not alone in my love for coffee and that’s why I often give coffee shop gift cards to family and friends. I shared how to make an easy gift card holder on my recent Coffee and a Card Facebook Live that is perfect for this purpose.

The base of the card is a 3″ x 3″ Whisper White Envelope and you slip a gift card in the top. Genius! I can’t take credit for the design however. I discovered the idea for this Coffee Cafe Gift Card Holder in the annual Stampin’ Up! Catalog. The catalog is always a great source of ideas and inspiration. If you do not have a Stampin’ Up! Demonstrator I would love to send a copy to you. CLICK HERE to request a catalog.

For the project details watch the replay video from my Facebook Live below. The video includes all the measurements for the gift card holder and below the video you will find the list of products I used.

Product List
Coffee Café Photopolymer Stamp Set
Coffee Cups Framelits Dies
Early Espresso Classic Stampin' Pad
Melon Mambo Classic Stampin' Pad
Crumb Cake 8-1/2" X 11" Card Stock
Whisper White 8-1/2" X 11" Card Stock
Vellum 8-1/2" X 11" Card Stock
Whisper White 3" X 3" (7.6 X 7.6 Cm) Envelopes
Big Shot
1-3/8" (3.5 Cm) Scallop Circle Punch
Gold Mini Sequin Trim
Stamping Sponges
Liquid Multipurpose Glue
Tear & Tape Adhesive
Mini Stampin' Dimensionals
Glue Dots
Silicone Craft Sheet
Circle Tab Punch


Valentine Chocolate Box


I made this adorable little heart shaped box during my Facebook Live Coffee and a Card last week. I patterned it after a box of chocolates I received from my husband to celebrate the anniversary of our first date. I talk all about that first date during the Facebook Live. You can hear all about it if you care to watch the replay of the video found in this post below.

Here is the box of chocolates that was my inspiration for this project:

I thought it was so clever that the box had a pocket on the lid to insert a card into and knew right away that I wanted to make something similar only on a smaller scale. The Be Mine Stitched Framelit dies from Stampin’ Up! helped me achieve my goal beautifully!

Below is the list of supplies I used for this Valentine Chocolate Box project along the Facebook Live Video tutorial and a scoring/cutting diagram for the box.

I hope you enjoy today’s project and feel free to contact me if I can assist you with any of your paper crafting needs

Product List
Meant To Be Cling Stamp Set
Real Red Classic Stampin' Pad
Real Red 8-1/2" X 11" Card Stock
Crumb Cake 8-1/2" X 11" Card Stock
Whisper White 8-1/2" X 11" Card Stock
Simply Scored
Detailed Trio Punch
Big Shot
Precision Base Plate
Be Mine Stitched Framelits Dies
Big Shot Die Brush - New Configuration
Real Red 1/8" (3.2 Mm) Solid Ribbon
Silicone Craft Sheet
Stamping Sponges
Liquid Multipurpose Glue

Beauty Abounds Friendship Card

I made this charming card during my weekly Coffee and a Card series today. It has all the things; a lovely floral print, dainty bow and petite butterflies that shine. My favorite thing about the card however, is the sentiment. Here is the inside of the card.

Isn’t that the perfect sentiment? Such a kind word to send to one or all of your besties.

Here is the video tutorial for the Beauty Abounds card along with a list of supplies I used.

Product List
Beauty Abounds Cling Bundle
Lovely Lipstick Classic Stampin' Pad
Crumb Cake 8-1/2" X 11" Card Stock
All My Love 12" X 12" (30.5 X 30.5 Cm) Designer Series Paper
Whisper White 8-1/2" X 11" Card Stock
Banner Triple Punch
1-3/4" Circle Punch
Whisper White 1/8" Sheer Ribbon
Grapefruit Grove & Lovely Lipstick Foil Sheets
Stampin' Dimensionals
Liquid Multipurpose Glue

Meant to Be Valentine Card

Sometimes the best things are simple things and that is certainly true for this card. Lots of white space that highlights the Balmy Blue fourish, the Lovely Lipstick heart and the Flirty Flamingo ribbon.

Simple doesn’t mean boring. This card has color, pattern, texture and a little bit of glimmer from the ribbon. And although the occasion is for Valentine’s Day, by changing up the sentiment, this card would be great for birthday, wedding, thank you and thinking of you cards. Gotta love the versatility!

Click on the button for a FREE full-color project sheet then watch my video to see how fast and easy this simple card is to make.


Product List
Meant To Be Cling Stamp Set
Tuxedo Black Memento Ink Pad
Whisper White 8-1/2" X 11" Thick Cardstock
All My Love 12" X 12" (30.5 X 30.5 Cm) Designer Series Paper
Lovely Lipstick 8-1/2" X 11" Cardstock
Balmy Blue 8-1/2" X 11" Cardstock
Big Shot
Be Mine Stitched Framelits Dies
Flourish Thinlits Dies
Big Shot Die Brush - New Configuration
Silicone Craft Sheet
Stamping Sponges
All My Love Ribbon Combo Pack
Liquid Multipurpose Glue
Stampin' Dimensionals
Glue Dots

Meant to Be Chocolate Box

Today’s project is this elegant little box that is the perfect size for three Ferrero Rocher chocolates. One of my favorite things about this box is the design. This box is very substantial and because of the folds used, has nice finished edge.

There is some scoring and cutting involved that can be a little tricky. I’ve included a scoring and cutting diagram in the project sheet. That, along with the video tutorial below should make this box a breeze for you to make.

You’ll notice that one of my comments on the video suggests that I had a problem with the ribbon pull. I would recommend a stronger adhesive to adhere the ribbon ends to the inside of the box. Another solution would be to tie the ribbon ends together in a knot to keep them from pulling out of the box.

Click on the button to view and download the Meant to Be Chocolate Box Project Sheet.


Product List

Scallop Tag Topper Valentine Banner

This is the sweet Scallop Tag Topper Valentine Banner we made in this evening’s 12 Days of Valentines on Facebook Live. If you weren’t able to join us for the Live 12 Days of Valentines you may visit my Facebook Page Here to view the recording.

I just love the Balmy Blue color along with the traditional reds and pinks of Valentine’s Day. This project is probably considered an intermediate level craft but only because of the extra tools and steps required. It is actually pretty easy to put together. You just make four tags and then connect them all together!

Click on the blue button below for a full color .pdf copy of the project directions. And don’t forget to tune in tomorrow, Tuesday, January 8, 2019, at 7:00 pm cst for Day #2 of the 12 Days of Valentines!

Here is the project video tutorial.

Here are the supplies used for the Scallop Tag Topper Valentine Banner:

Product List

Stampin’ Up! Occasions Catalog & Sale-A-Bration

The 2019 Occasions Catalog and Sale-A-Bration Brochure go live today! Sale-A-Bration is Stampin’ Up!’s most exciting promotion of the year! Sale-A-Bration rewards you for shopping! With two earning levels, you receive FREE products with qualifying orders, and there is no limit to how many free products you can earn.

Click on the Catalog images above to view both new catalogs and to request a FREE copy from me.

Three Ways to Earn Free Stamps

  • SHOP: Earn a FREE product every time you reach $50 increments before tax and shipping. For example, spend $50, then choose one level 1 product. Spend $100, then choose two Level 1 products or one Level 2 product. Spend $150, and choose three level 1 products or one Level 1 and one Level 2 products PLUS receive $15 in FREE Hostess Rewards!
  • STAMPIN’ REWARDS: In addition to the regular Stampin’ Rewards, orders over $250 during Sale-A-Bration earn $25 MORE Stampin’ Rewards! 
  • JOIN: Becoming a Stampin’ Up! demonstrator has many benefits, including discounted products, having your own business, and being part of the Stampin’ Up! demonstrator community. To get you started on the right foot, during Sale-A-Bration we’ve sweetened the deal with TWO Starter Kits to choose from.

And this exclusive Craft & Carry Tote is only available to new Demonstrators during Sale-A-Bration! Click Here for more information about joining Stampin’ Up! and my Paper Dolls Team.

Merry Christmas to All DYI Ornament

The trend right now in home decor, fashion and crafts is Farmhouse Chic.  I always make a handmade gift for the guests who attend my Christmas Fun & Fancy Classes and wanted to do something this year using the trend.  I ended up making this ornament for my guests.  The idea came from another Stampin’ Up! Demonstrator who made a larger, plaque version.  Unfortunately I cannot find the name of that Demonstrator to give her proper credit.

I used a traditional stamp set and Thinlits bundle – Merry Christmas to All.  This is a classic bundle that will stand the test of time and stay in my craft room for years to come.  I love that the Framelits include tag dies that fit perfectly around the word images.

I created the DYI ornament on this week’s Coffee & A Card Facebook Live.  I meet with everyone live each Wednesday morning at 11 am CST on my Facebook Page and we craft together.  Make sure you “Like” and “Follow” my page here so you don’t miss an episode.

Here is an edited version of the video tutorial that includes all the dimensions:


Product List

Online Extravaganza

Six days. Three sales. One spectacular promotion!

For savvy shoppers everywhere, this time of year is a dream come true. Some of the biggest sales of the year are happening, which means some of the biggest savings are, too! I hope you are ready to save big, because Stampin’ Up! is throwing a spectacular six-day promotion with exclusive, limited-time deals. Get ready for Online Extravaganza!

Promotion Details

Online Extravaganza will run for six days. During this time, Stampin’ Up! is throwing three, 48-hour sales featuring a selection of products from the 2018–2019 annual catalog—all at 10% off! Each 48-hour sale will feature two product categories (e.g., paper, stamps, ink, etc.). When one sale ends, the next sale begins; this cycle will continue until Online Extravaganza is over. By the end, nearly every item from the annual catalog will have been on sale!

If you would like to see the full selection of discounted items during each 48-hour sale, please visit my online store here. Each sale will be given its own category, which will contain all available discounted items for that particular 48-hour sale. After that, the only thing left to do is shop!

While discounts will be available for most items, some exclusions apply. These non-discounted items include—but are not limited to—the following products:

  • Host stamp sets
  • Paper Pumpkin (prepaids, monthly subscriptions, past kits/refills)
  • Big Shot
  • Stamparatus
  • Bundles will not receive additional discounts during this promotion.

Click here for a comprehensive list of items excluded from Online Extravaganza 

But hurry, the discounted prices are while supplies last.  Once inventory levels are depleted, items will be removed from the sale.

Snow is Glistening

Stampin’ Up! is offering the Snowflake Showcase Suite during the month of November or until supplies last.  We had snow this week inspiring me to play with the products in this suite.

Here are the products included in the Suite:

Aren’t they beautiful?  The card I made above was quick and easy to make and would be a good choice for mass production.  I used Whisper White Notecards – quicker to fill the smaller space.  I stamped the snowfall image from the Snow is Glistening Stamp Set onto a piece of 4-3/4″ x 3-1/4″ piece of Pool Party card stock with VersaMark Ink then heat embossed it with White Stampin’ Emboss Powder using the Heat Tool.  Next, I stamped the sentiment onto the card stock using Memento Ink and adhered to the front of the notecard.

Finally, I cut three snowflakes from Silver Glimmer Paper and Whisper White Shimmer Paper with the Snowflake Thinlit Dies using the Big Shot and Precision Base Plate.  The snowflake Thinlits are so finely detailed that the Precision Base Plate was very helpful to obtain clean cuts, especially with the thicker Silver Glimmer Paper.  I would also recommend the Big Shot Die Brush to remove paper from intricate dies like these.  Once cut, I adhered the snowflake dies to the card front using a few drops of Multipurpose Liquid Glue.

Here is a photo of the inside of the card.  I always like to stamp a little image along with the inside sentiment.

Here is a list of the products I used to make the notecard.  Click on any of the images for more information and to purchase.  But hurry, the products in the Snowflake Showcase Suite are only available for a limited time and will be gone on November 30, 2018.

Product List

SNEXT